2022
Overview
DBSync for Salesforce and Database Integration is an easy to use solution. It integrates Salesforce objects like - Accounts, Contacts, Products, Opportunity & Opportunity line items. Salesforce to Database Integration solution is also useful to migrate historical Salesforce data into database. DBSync provides uni-directional sync with pre-built field-to-field mapping along with flexibility for more complex and dynamic mapping capabilities.
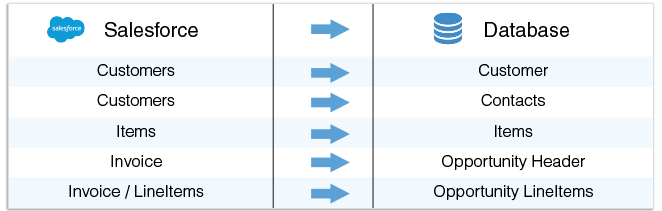
Data Flow
This tutorial shows how to read various records from Salesforce and write to the configured tables of a database. The table below shows the data flow between various objects of Salesforce and Database tables.
Process Map
The process map of the solution - between Salesforce and database - is as shown in following image.

Prerequisites For Integration
The integration prerequisites are as follows:
- Have valid licenses to DBSync Salesforce, Database Connector and Username, Password to connect with DBSync iPaaS platform.
- Have Salesforce login and password to access their Web Services.
- Setup security in Salesforce to connect to external integration.
- Have a valid database Username, Password, host/IP address and Port on which database is hosted.
For integration, it is required that the Username and Password configured for Database Connector instance should have sufficient privilege to access the Database.
Configuring Source App
Follow the steps to get started with your Salesforce instance and to configure the DBSync's Salesforce Connector:
- Click Edit of the Salesforce Connector to input the Salesforce parameters.
- Click Save to save the settings.
The following table gives the required, and optional, parameters to be set for establishing a Connection of Salesforce from which you can read the data and write to the Database of your choice.
Property | Description | Required |
|---|---|---|
UserName | The username to log into salesforce account. | Yes |
Password | The password to login to salesforce account | Yes |
End-point | Yes | |
Sid | Session Id | Optional |
Transport.compression | For compression | Optional |
Proxy Host | If you use a proxy server then put <<proxy ip or host>> | Optional |
Proxy Port | If you use a proxy server then put <<proxy port>> | Optional |
Proxy Username | If you use a proxy server then put <<proxy username>> | Optional |
Proxy Password | If you use a proxy server then put <<proxy password>> | Optional |
Accept Gzip | As Applicable | Optional |
Send Gzip | As Applicable | Optional |
Configuring Target App
Follow the steps to get started with a Database and to configure the Database Connector.
- The following table gives the required, and optional, parameters to be set for establishing a connection to the Database and write to various tables selected in the relevant workflows .
- Click on save to save the parameter settings.
| Property | Description | Required |
|---|---|---|
| Username | Database username | Yes |
| Password | Database password | Yes |
| Host | Host name or IP address of the database server | Yes |
| Port | The port used to connect to database server | Yes |
| Database | The name of your database | Yes |
| Type | JDBC Driver for the Databases mentioned in the URL section in the same order.
| Yes |
| Database URL | JDBC connection string
| Yes |
For the sake of understanding, I have selected MySQL database with tables like Contacts, Customers, Items, Oppheader, Opplineitem in which data from Salesforce is dumped. In case if you do not have database schema readily defined, you can use auto create functionality of the Database Connector. This will create the table structure and mapping based on the source objects of SF.
DBSync Project Setup
- Login into www.mydbsync.com. Click on Customer Login.
- Enter your DBSync Username and Password. Click on Login.
- Once logged in, click on template library menu from the left side navigation.
- Search for template name Salesforce To Database: uni-directional template and import to your workspace.
- You will be re-directed to Connector listing of the Salesforce To Database: uni-directional template.
- In the Connector listing page, you can see Salesforce and Database connector.
- Click Edit to configure Connectors respectively. Individual Connector configuration are explained in the subsequent sections.
- Navigate to the Process listing page to view the pre-defined mappings.
- The various transformations can be applied to each field through the mapping section. Then, save the workflow
- Click 'Run Now' button to initiate the integration of the selected workflow.
- The sync can be monitored through the log section. In the event of the error, you can drill down to each event log to debug and to fix the error at its occurrence.
Guide Lines For customization And Mapping

The above mappings are not standard and vary based on implementation to implementation. The above table shows mapping when an auto-create functionality is used so that all the tables of database replicate the Salesforce objects.
Run Integrations
Integration can be run using scheduler; or, by clicking on the 'Run Now' button. Scheduler jobs are used to trigger process at scheduled time interval automatically. Manual trigger of the sync can be initiated by clicking on the Run Now button from the Process listing page/workflow page.
Scheduler
Follow the steps to create a scheduler job:
- Inside a project, navigate to the Scheduler page from the left side navigation.
- From the 'Add schedule section' create a schedule job. Select the process from the drop down then choose start on date , start on time and repeat frequency. Save the job.
- If repeat frequency is set to no repeat then, the scheduled job triggers syncs only once - as per scheduled date and time.
- If repeat frequency is set to either minutes, hourly, weekly then, the process is scheduled to run at the repeated set frequency.
Run Now
To manually trigger the sync, click 'Run Now' button:
- From the process listing page.
- From workflow listing page.
- From the Trigger page.
Related References
Overview
Content Tools