2022
Page History
| Table of Contents |
|---|
| Panel |
|---|
Integration from |
...
QuickBooks to Salesforce |
- If you use Product Hierarchy in QuickBooks then, then Salesforce needs to be updated to support product hierarchy. A Screenshot for product hierarchy in QuickBooks is shown below.
...
- In the previous screenshot Product Hierarchy.
- Let's say DBSync is the parent item for SF2QBDesktop SF2QuickBooksDesktop and SF2QBOnline SF2QuickBooksOnline items. Now, if you generate an invoice in QuickBooks with DBSync and SF2QBDesktop SF2QuickBooksDesktop, Item Name for DBSync remains DBSync but for SF2QBDesktop SF2QuickBooksDesktop it is shown as DBSync: SF2QBDesktop. A screenshot for the same is shown below.
...
- SF2QuickBooksDesktop.
- If this invoice is moved to Salesforce Opportunity then, then the product is migrated with the parent Name into Salesforce.
- To make changes, go to https://login.salesforce.com/. Enter you User Name your Username and Password and . Then, click on Login. The user
- Note the user logging in, should have administrative privileges to make changes to Salesforce instance.
...
- Go to Setup ?Customize?Products? > Customize > Products > Fields and click on New in Products Custom Fields and Relationships.
...
- Select Text in the Next page and click on click Next button. Enter Field Label as QBNameQuickBooksName, Length as 255 and, Field Name as QBName, click on Next buttonQuickBooksName. Click Next.
- In the next screen, select field-level security for profiles and click on Next. Check Add Field check box and check checkbox. Then, check the Page Layouts you want to add it to and click on . Click Save.
- Go to Setup ? > Customize ?> Products ?> Page Layouts. Click on Edit for Product Layout.
...
- Add QB QuickBooks Name fields on to the page Page Layout. And click on Click Save Button.
...
- Go to Customer Login in www.mydbsync.com/user/login and enter your user name and password and click on Login.
...
- . Enter your username and password. Then, click on Sign-in. Click on Launch Button , to Launch DBSync integration consoleproject page.

- Click on Edit under Manage to Launch the Process Builder screen for your integration profile.
...
- Double click on BiDirectionalSync Sync process on the right hand side.
...
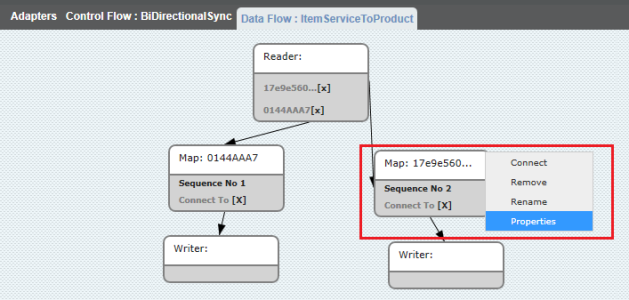
- Double Click on State "ItemServiceToProduct" to open the data flow window.

- Once inside the "ItemServiceToProduct" state, right-click on the Ensure that the Salesforce and QuickBooks connectors are validated. You should have process template SalesforceQuickBooksBiDirectional.
- Click on Projects. Select and open a relevant project. You will see a list of available processes. Select and open the relevant Process. You will see a list of available Workflows.
- Open the workflow "ItemServiceToProduct". In the Rules section, open the map for "Sequence No. 2" box and select "Properties" from the menu as illustrated below.
- Click on "Edit" link for " ********_map.xml"* to open the mapping in a new tab or window.
...
- Add the mapping QBNameQuickBooksName__c = VALUE("FullName") and save the mapping.
...
- Similarly, add the above mapping in the following States as follows to complete the product hierarchy Product Hierarchy setup. :
- ItemInventoryToProduct
- ItemNonInventoryToProduct
- ItemDiscountToProduct
- ItemOtherChargesToProduct
- ItemInventoryAssenblyToProduct
- ItemSalesTax2Product
- Now your Salesforce is configured to handle product hierarchy the Product Hierarchy of QuickBooks.
| Panel |
|---|
Integration from Salesforce to |
...
QuickBooks |
- If you have a Parent-Child relationship for Products in Salesforce then, the following changes need to be made to the mappings.
- Go to Customer Login in www.mydbsync.com. Enter your username and password. Click on Sign-in. Click on Launch, to Launch the DBSync Project page.
- Ensure that Salesforce and QuickBooks connectors are validated. You should have process template SalesforceQuickBooksBiDirectional.
- Click on Projects. Select and open the relevant Project. You will see a list of available processes. Select and open the relevant Process. You will see a list of available Workflows.
- Open the workflow "OpportunityToInvoice". In the Rules section, open the map for "Sequence No.3".
Find the target field "ItemServiceAddRq/ItemServiceAdd/Name". Then, replace the source code by copy-pasting the following:
Code Block IF(EXACT(VALUE("PricebookEntry/Product2/AVSFQuickBooks__QuickBooks_ItemType__c"),"ItemService"), RSPLIT(VALUE("PricebookEntry/Product2/Name"),":"),"")
Add the mapping where target field = "ItemServiceAddRq/ItemServiceAdd/ParentRef/FullName" and source field as the following:
Code Block IF(EXACT(VALUE("PricebookEntry/Product2/AVSFQuickBooks__QuickBooks_ItemType__c"),"ItemService"), (IF(VALUE("PricebookEntry/Product2/Name").contains(":"), LSPLIT(VALUE("PricebookEntry/Product2/Name"),":"),"")),"")- Similarly, open the Sequence No.4 mapping.
Find the target field "ItemInventoryAddRq/ItemInventoryAdd/Name" and replace the source code by copy-pasting the following:
Code Block IF(EXACT(VALUE("PricebookEntry/Product2/AVSFQuickBooks__QuickBooks_ItemType__c"),"ItemInventory"), RSPLIT(VALUE("PricebookEntry/Product2/Name"),":"),"")
Find the target field "ItemNonInventoryAddRq/ItemNonInventoryAdd/Name". Replace the source code by copy-pasting the following:Add the mapping where target field = "ItemInventoryAddRq/ItemInventoryAdd/ParentRef/FullName" and source field as the following:
Code Block IF(EXACT(VALUE("PricebookEntry/Product2/AVSFQuickBooks__QuickBooks_ItemType__c"),"ItemInventory"), (IF(VALUE("PricebookEntry/Product2/Name").contains(":"), LSPLIT(VALUE("PricebookEntry/Product2/Name"),":"),"")),"")- Similarly, open the Sequence No.5 mapping.
Code Block IF(EXACT(VALUE("PricebookEntry/Product2/AVSFQuickBooks__QuickBooks_ItemType__c"),"ItemNonInventory"), RSPLIT(VALUE("PricebookEntry/Product2/Name"),":"),"")
Add the mapping where target field = "ItemNonInventoryAddRq/ItemNonInventoryAdd/ParentRef/FullName" and source field as the following:
Code Block IF(EXACT(VALUE("PricebookEntry/Product2/AVSFQuickBooks__QuickBooks_ItemType__c"),"ItemNonInventory"), (IF(VALUE("PricebookEntry/Product2/Name").contains(":"), LSPLIT(VALUE("PricebookEntry/Product2/Name"),":"),"")),"")
- The above example illustrates Product Hierarchy mapping for OpportunityToInvoice state. Based on the transaction you use, a similar procedure can be followed for other transaction workflows like OpportunityToEstimate,OpportunityToSalesOrder,OpportunityToSalesReceipt,OpportunityToCreditMemo.
Overview
Content Tools