2022
Page History
...
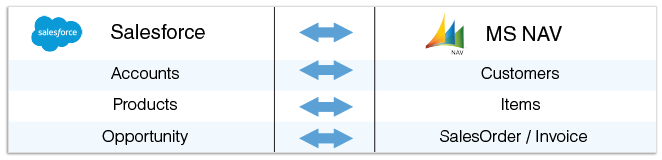
DBSync for Salesforce and Microsoft Dynamics NAV Integration template is easy to use integration solution to integrate Salesforce accounts, products and opportunity with NAV customers. It integrates Salesforce Accounts, Products and Opportunity with NAV Customers, Items and sales Sales orders/Invoices respectively. This solution provides bi-directional sync between Salesforce and MS NAV with the pre-built, field-to-field mappings, along with flexibility for more complex and dynamic mapping capabilities. It is also useful in migrating historical NAV data into Salesforce or vice versa.
...
The data flow of Bi-directional integration between Salesforce & Microsoft Dynamics NAV is shown in the table below table.
| Panel |
|---|
Process Map |
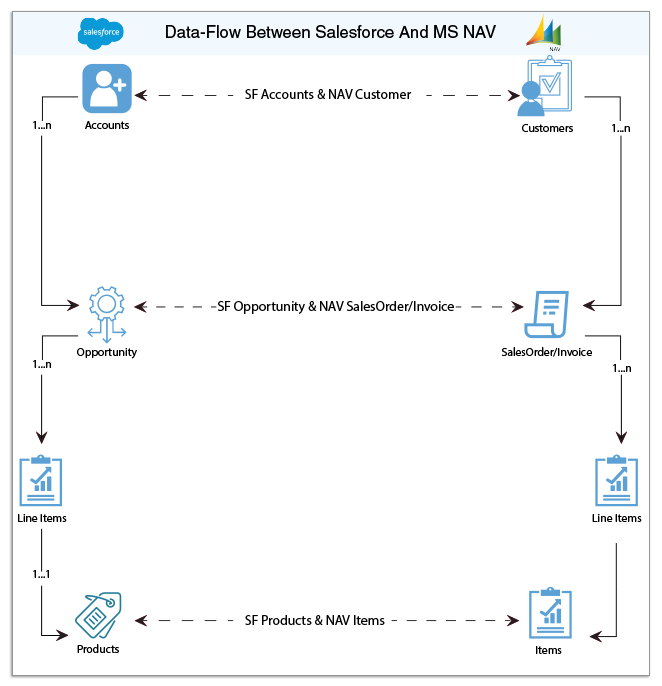
The process map of bi-directional integration between Salesforce & Microsoft Dynamics NAV is shown in the image below image.
| Panel |
|---|
Pre-requisites for Integration |
In order to To ensure that DBSync is accurately configured to integrate data between Salesforce and Microsoft Dynamics NAV instance, the following should be ensured.user must meet the following requirements:
- Have a valid license to DBSync NAV connector, Salesforce connector, username and password to Username, Password, and Microsoft Dynamics NAV Odata to be enabled to connect to DBSync iPaaS platform.
- Access to Dynamics Nav with valid username Username and passwordPassword.
- Have your both login and password of the Salesforce, to access their web service.
| Panel |
|---|
DBSync package (DBSync GreatPlains Integration) Installation in Salesforce |
- Install the DBSync Salesforce package for Salesforce & Microsoft Dynamics GP integration solution from the AppExchange using the following link. https://login.salesforce.com/?startURL=%2Fpackaging%2FinstallPackage.apexp%3Fp0%3D04t9000000094vw&crc=1
- Once you click on the above link, you will get a prompt to enter Username and Password of Salesforce instance. Provide the necessary Salesforce credentials to proceed with the package installation. The Salesforce user installing the package should have the administrative privileges to proceed with the installation.
- Next you will see the Package Installation Details & Components. Click on Continue to Approve Package API Access, Choose Security Level and complete Installation.
- Verify if the package installation was completed successfully and check for the 'Deployed' status of the DBSync Invoices object.
- Go to Setup > Create > Custom Objects menu to verify if the "Invoices" object has Deployed status. If it is not, click edit button adjacent to the Invoice object, and mark Deployed as checked, and click on 'Save' button.
- Follow the next steps to include DBSync fields into Page Layout.
- Go to Setup > Customize > Account > Page Layout. Click on edit and drag 'GPCustomerID' field on the page layout. Save the Account Page Layout.
- Go to Setup > Customize > Contact > Page Layout. Click on edit and drag 'GPContactID', 'UniqueContactID' fields on the page layout. Save the Contact Page Layout.
- Go to Setup > Customize > Opportunities > Page Layout. Click on edit and drag 'DOC ID', 'Doc Number', 'GPTransaction', ' GPTransactionID',' TransactionType' and ' Primary Contact' fields on the Page Layout.
- Go to Setup > Customize > Opportunities > Opportunity Products. Click on edit and drag 'GP TransactionID' field on the Page Layout.
- Click on Related List and drag Invoices object to the Page Layout.
- Click on the setup icon on the Invoices object in the Related List Section and hit 'edit properties' button. Select columns Invoices, Invoice number, Total Invoice Amount, Payments, Balance, Days Outstanding, and Transaction Date.
- After completing the process of adding all the necessary fields to the Opportunity page layout, click on the Save button on the top left hand a corner of the Opportunity Page Layout window to commit all the changes.
- Go to Setup > Customize > Opportunities > Fields, and under Opportunity Custom Fields & Relationships section, click on New button to create a new custom field of Data Type "Auto Number" in Opportunity page layout with the following parameters.
- Field Label: Auto Doc Number
- Display Format: DBSYNC{000000}
- Starting Number: 1
- Field Name: Auto_Doc_Number
- Click Next and make sure all the check boxes under Visible column are checked. Once done, click on Next and make sure Opportunity Layout is marked as checked on the subsequent page and click Save to commit all the changes.
- Go to Setup > Customize > Product > Page Layout to move 'GPProductID, 'Location Code, 'Product Type' and 'Unit Of Measurement', 'PriceLevel', 'Class ID' and 'Currency ID' field to the Product layout.
- At this point, you have successfully completed configuration of your Salesforce instance for integration with Microsoft Dynamics GP.
| Panel |
|---|
Install & Configure eConnect Proxy Service |
- In order to establish the connection between DBSync application and Microsoft Dynamics GP, you will need to download the eConnect Proxy Service from the below location. http://www.mydbsync.com/dbsync2download/currentrelease/gp2015/eConnectProxy14.zip
- Once the file is downloaded, extract the contents of the file to any desired download location.
Note: The extract of the file contains four versions of eConnect Proxy service, eConnectProxy_2010.exe for GP10 or GP 2010, eConnectProxy.exe for GP11, eConnectProxy12.exe for GP12 & GP13 and eConnectProxy14.exe for GP14 & GP15.
- Once the right version of the eConnectProxy file is extracted, install the eConnectProxy Service using windows installutil utility.
- If the eConenctProxy is extracted to location "c:\ep\eConnectProxy12.exe", then navigate to Microsoft.net framework location and run the following command from the elevated command prompt window on your windows or windows server operating system. C:\Windows\Microsoft.NET\Framework\v4.0.30319> installutil c:\ep\eConnectProxy12.exe
- Once you run the command, you will see a message in the command prompt as shown below acknowledging that the service has installed successfully.
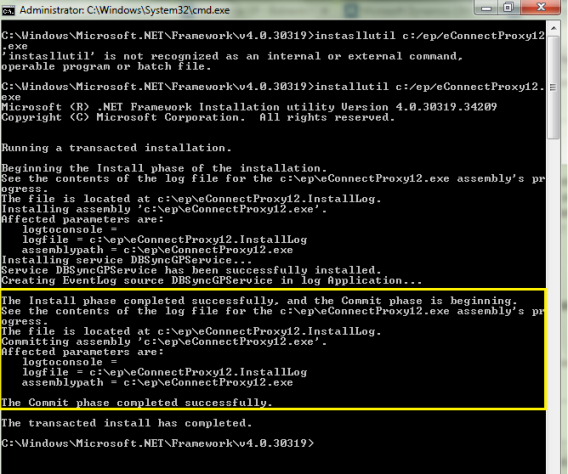
- If for some reason, the service was not successfully installed, you can verify the error log details in the file eConnectProxy12.InstallLog or eConnectProxy.InstallLog files.
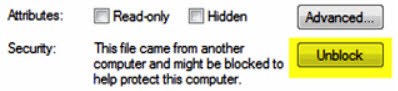
- Note: Following are some of the known issues working with install util utility for any file downloaded from the internet and resolution steps to avoid/prevent them.
- If you are getting an error with regards to file permissions, right click on the eConenctProxy.exe file and click on UnBlock as shown below.
| Panel |
|---|
DBSync Profile Setup |
- Go to www.mydbsync.com & register for Free Trial. Ensure that Source & Target Adapters are Salesforce & Microsoft Dynamics GP respectively.
| Panel |
|---|
DBSync Installation |
It is necessary that on-premise version of DBSync is used for Salesforce and Microsoft Dynamics GP Integration. In order to use DBSync On Premise, DBSync should be installed locally and DBSync Account should be switched to On Premise from On Demand.
The process of installing DBSync is explained in the below link.
http://help2.mydbsync.com/docs1/display/dbsync/DBSync+On-Premise+Installation
The process of switching DBSync Account from On Demand to On Premise is explained in the below link
http://help2.mydbsync.com/docs1/display/dbsync/DBSync+On+Demand+to+On+Premise
| Panel |
|---|
DBSync Configuration with Salesforce & Microsoft Dynamics GP |
...
...
| Note |
|---|
Related references to learn about Pre-requisites of Salesforce and MS NAV connectors are listed below. http://help.mydbsync.com/docs/display/dbsync/Microsoft+Dynamics+NAV+Connector |
| Panel |
|---|
Import Salesforce & MS Dynamics NAV Template |
Unregistered user
- Go to www.mydbsync.com from a preferred web browser.
- Click "Start your free trial" on the home page.
- Follow the registration steps by activating your account through the activation link sent to your registered Email ID. Follow the registration steps below.
Registered User
- Go to www.mydbsync.com from a preferred web browser.
- Navigate to the login page through Account section→ Customer login.
- Input your Username and Password to login to your DBSync account.
- Navigate to the Template library menu tab and choose the PDL of Salesforce & Nav bi-direction. Click on "Import To Workspace" to start your integration between the source and target applications respectively.
- Follow the steps in the 'DBSync Configuration of Salesforce & Microsoft Dynamics NAV section, to configure your connectors. This will result in data flow between Salesforce and MS NAV.
| Panel |
|---|
DBSync Configuration Of Salesforce & Microsoft Dynamics NAV |
- After the successful import of Salesforce & Microsoft Dynamics NAV into your account, a user will be re-directed to the connector listing page.
- You will see MS NAV & Salesforce connectors.
- Click on the Edit of the MS NAV to configure the NAV connector to connect to your NAV instance.
- Nav requires the following parameters to connect to your NAV instance.
- Username: A Username to connect to MS Dynamics NAV instance.
- Password: A Password to connect to the hosted Navision.
- URL: Connection URL for Microsoft NAV.
- Nav requires the following parameters to connect to your NAV instance.
- Click on Save and Validate Connection to save and validate your GreatPlains adapterNAV connector.
- Click Edit on Salesforce Connector select the appropriate End Point under Quick Setup tab. Click on Connect to Salesforce. This will take you to Salesforce login page. Enter your username & password to login to Salesforce. the Salesforce connector to connect to your Salesforce instance.
- Select an End Point you wish to connect toand, under the Quick Setup tab, click on Connect to Salesforce button. This will open up a Salesforce pop up window.
- Username: Input a Username of the Salesforce instance you wish to connect to.
- Password: Input password to connect to your Salesforce instance.
- Select an End Point you wish to connect toand, under the Quick Setup tab, click on Connect to Salesforce button. This will open up a Salesforce pop up window.
- Once you login to Salesforce, your Salesforce connector is connected to your Salesforce instance. If you want to connect using different Salesforce instance, click on Disconnect in on the Quick Setup tab. Then, connect using the required Salesforce credentialscredentials with which you wish to connect with.
- You can also use use the Advanced Properties tab to connect to your Salesforce instance. Go to Advanced Properties, fill . Fill in the Salesforce Username, Password & Security Token for of your Salesforce Instance. Select the appropriate End Point. Once you enter all the required details, click on Validate Connection. If the validation is successful, click on Save to Save the Salesforce details. If the validation fails, you will see Validation Errors on the top right corner. Refer the details in Validation Errors section and make the necessary changes information in the Advanced Properties and , click on Validate Connection again.
| Panel |
|---|
Running the integration |
...
Using the Run button to run the integration manually is explained below.
- Login into www.mydbsync.com with your Username & Password.
- Once logged in, click on My Home from the menu and click on the Launch button.
- Once launched, you will be redirected to DBSync Project page in the next tab.
- Click on the project SalesforceGreatPlains: BiDirectional and then click on Connectors on the left panel.
- Upon successful validation of your connectors, you can click on Processes on the side panel. Click on the Run Now button available there.
- Click on Save and Validate Connection to save and validate your Salesforce connector.
| Panel |
|---|
Salesforce To MS NAV Field Mapping |
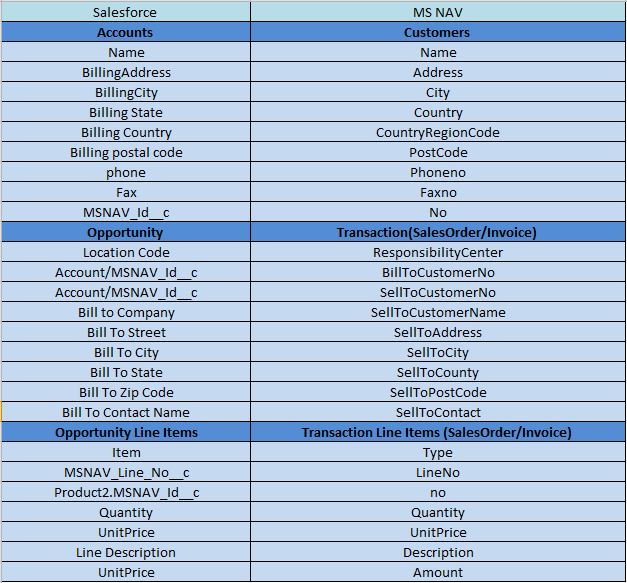
| Panel |
|---|
MS NAV To Salesforce Field Mapping |
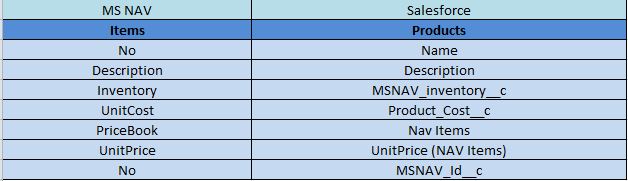
| Panel |
|---|
Related References |
Related references to learn about Salesforce and MS NAV connectors are listed below.
Microsoft Dynamics NAV Connector
Overview
Content Tools