2022
Page History
Quick
...
start with DBSync Replication
Use DBSync Replication for different databases like MySql, SQL Server, Oracle,
...
DB, PostgreSQL, Cassandra,
...
AWS RedShift, Snowflake, Sybase, and
...
MongoDB. to connect with
...
source applications like Salesforce and Microsoft CRM.
(Note: Source Apps includes Salesforce and Microsoft CRM Application)
The quickstart walks through shows how Database database to Source source applications synchronization can be performed in the same profile where in Source Applications to Database Replication wherein source applications to database replication is configured.
DBSync Replication replication tool facilitates Database to Source Apps Replication using Control database to source apps replication using control Flag (do_sync_flag).
Log in to the DBSync Replication
...
portal
Sign in to the DBSync Replication Portalportal.
Fill the configuration details in
...
global settings
Start the DBSync Replication Console console to configure the proxy settings under the Global global settings option on the home page.
Follow these steps to configure a proxy global settings in the DBSync replication portal.
- Once, you have logged in then click to "Main Menuthe main menu" in the right-hand top corner on the home page of the DBSync Replication Portalportal.
- Next, enter the required proxy credentials in different text boxes like proxy host, proxy port, proxy username and proxy password under the global settings section.
- Click on save changes button tobutton to save a global settings details.

Create a
...
source application profile
Source Application application profile Includes Salesforce and Microsoft CRM. The Source App source app profile is created within the DBSync Replication Platformplatform.
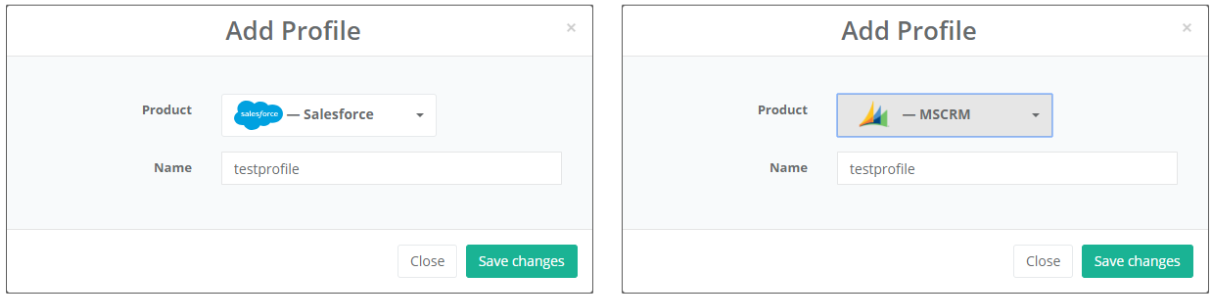
Follow these steps to create a profile under Source Application source applications like Salesforce and Microsoft CRM.
- Click to "Add Profileadd profile" in the right-hand - corner of the Profiles profiles section of the DBSync Replication Portalreplication portal.
- Select, the required source name application from the drop-down menu under the Product product header.
- Next, enter the name of the profile like Testprofile like "testprofile" under the Name name section.
- Click on save changes Click on save changes button to create a new Replication Profilereplication profile.
Source
...
application setup details
Start with Source Application source application setup details includes Salesforce and Microsoft CRM.
The Source source setup applications application details required to configure your Salesforce and Microsoft CRM credentials like "username" and "Passwordpassword".
Follow these steps to configure your Source Application source application like Salesforce and Microsoft CRM.
- Click to "Salesforce and Microsoft CRM" Setup setup tab on the left-hand corner in corner in the Profiles profiles section of the DBSync Replication Portalportal.
- Don't change the "Environment environment and Soap soap end details", all these details are pre-filled.
- Next, enter the "Usernameusername" and "Passwordpassword" credential credentials for Salesforce and Microsoft CRM.
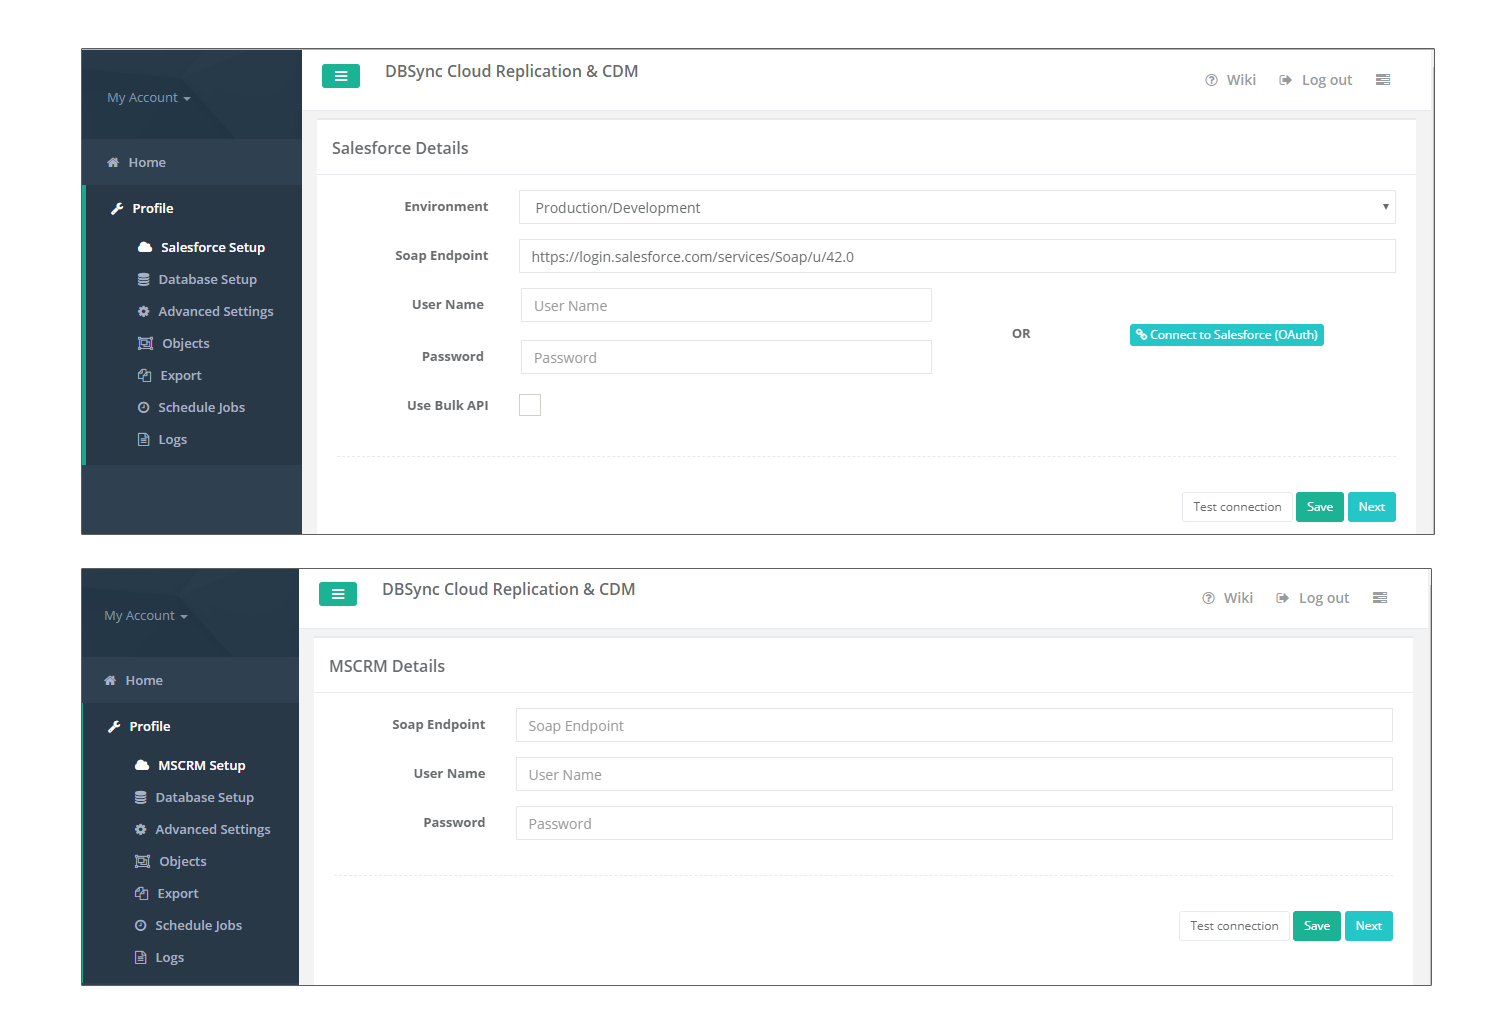

- "OR", "Other option for Salesforcesalesforce" Click click on connect to Salesforce (OAUTH) to enter Salesforce login credentials like "Usernameusername" and "Passwordpassword" to connect the Salesforce Applicationapplication.

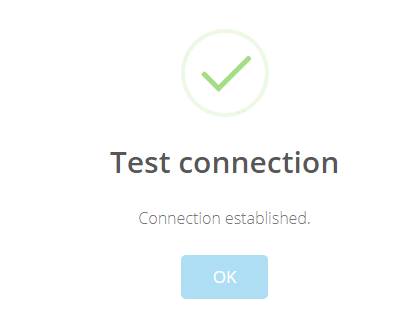
- Click on Test Connection the test connection button to validate your Source Application source application login details.

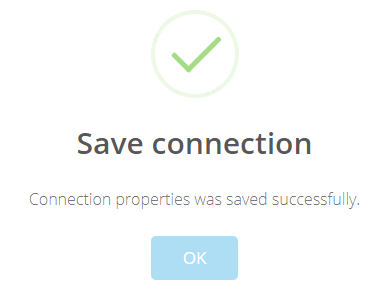
- Click Click on the Save button to save your Source Apps source apps login details.

- Once completed, click on Next button on the next button to proceed to Database Setup the database setup tab.
Configure
...
database setup details
Start with Database Setup with the database setup tab, to fill all the necessary details and follow the same procedure for testing and validating your Database database credentials.
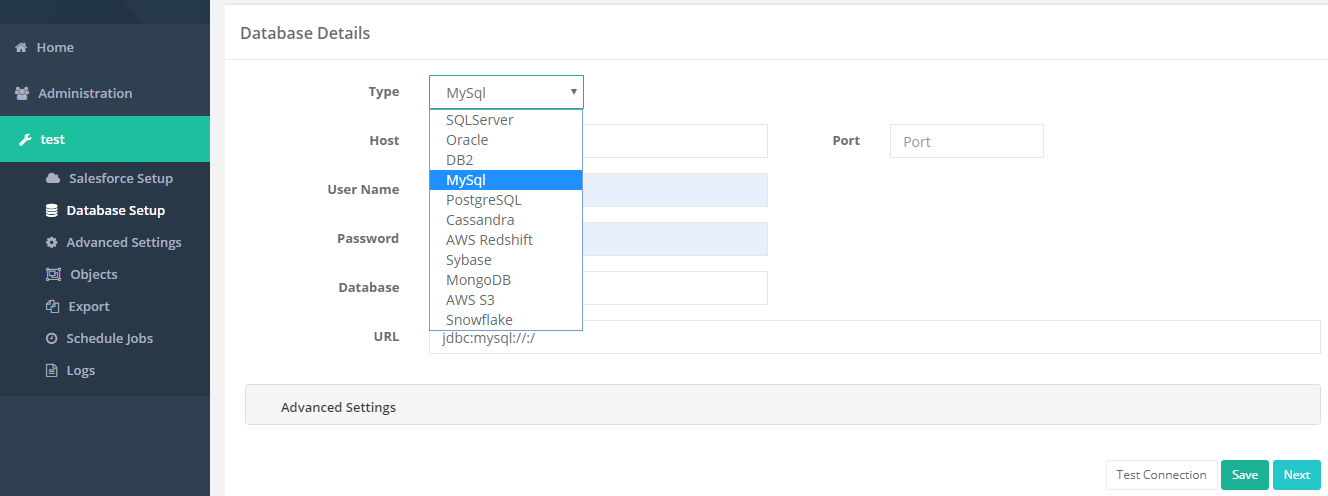
Follow these steps to configure your Database database credentials with different databases like MySQLMySql, SQL Server, Oracle, DB2DB, PostgreSQL, Cassandra, AWS RedShift, Snowflake, Sybase, and MongoMongoDB.
- Click to "Databasedatabase" Setup setup tab on the left-hand corner in corner in the Profiles profiles section of the DBSync Replication Portalreplication portal.
- Select, the required "Type nametype name" from the drop-down menu options like "MySql, SQL Server, Oracle, DB2DB, PostgreSQL, Cassandra, RedshiftAWS RedShift, Snowflake, Sybase, and MongoMongoDB" under under the "Database Setupdatabase setup" section.
(Note: The The database URL can also can also be entered manually if you know your database Connection database Connection string.)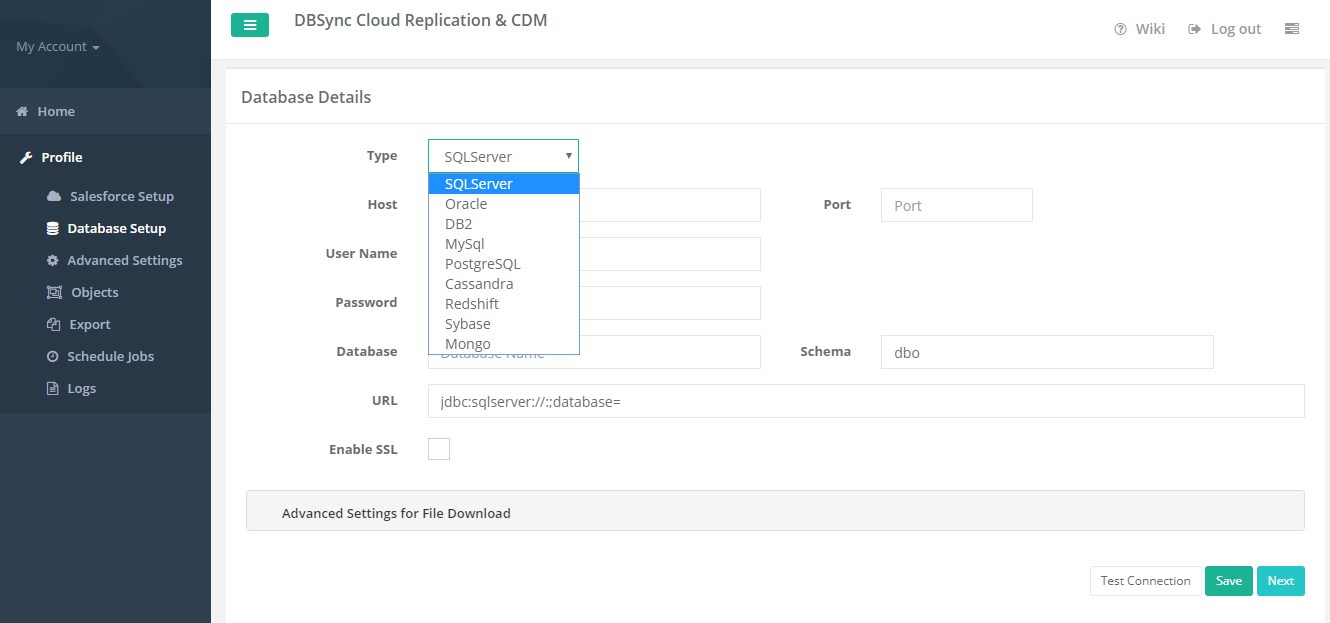
- To start with Database database credentials user has to entered enter all the configuration details like Host host, Portport, Usernameusername, Password, Database Name and Schemapassword, database name, and schema.
- Once, all the details enter entered by the user then URL details will get autofilled. (Note: The database URL can also be entered manually if you know your database Connection string.)auto-filled.
- Click on the Test Connection Test Connection button to validate your Source Application source application login details.
- Click on the Save Save button to save your Source Apps source apps login details.
- Once completed, click on Next button on the next button to proceed to Advanced Settings tab to write to the advanced settings tab to get the email Id to get the Notificationsthe notifications.
Note Note:
- While replicating with Cassandra, please refer to the following wiki link for specific details on Replication with Cassandra.
- http://help.mydbsync.com/docs/display/CloudReplication/3+-+Big+Data+Support
While replicating with the Amazon Redshift database, please refer to the following wiki link for specific details on Replication with Amazon Redshift.
http://help.mydbsync.com/docs/display/CloudReplication/Amazon+Redshift
Advanced
...
settings tab
...
details
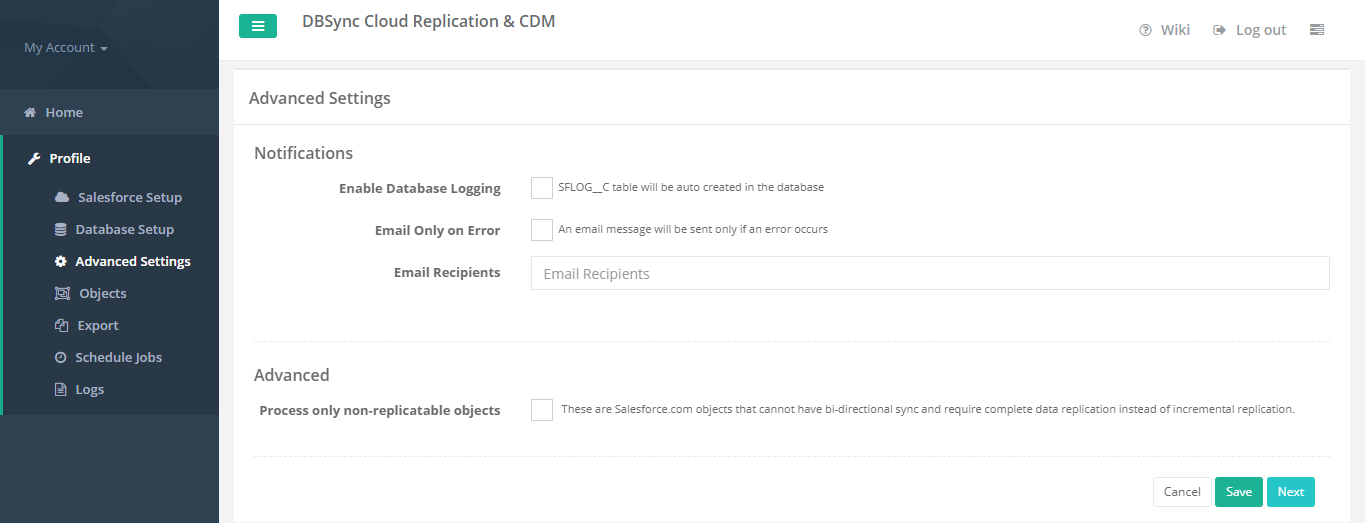
Start with Advanced Settings with the advanced settings tab, to fill all the necessary details and follow the same procedure for testing and validating Advanced settings credentials.
Follow these steps to configure your Advanced settings credentials.
- Click to "Advancedadvanced" Settingssettings tab on the left-hand corner in corner in the Profiles section of the DBSync Replication Portalreplication portal.
- Mark the checkbox to "Enable Database enable database logging" to create an auto-created table in the database.
- Next, Mark the checkbox of checkbox of "Email email only on Errorerror" to get an email message when error will occur.
- Enter an email for "Email Recipientfor an "email recipient" to get the notification when any run command is executed.
- Click on Save on the save button to save your Advanced settings detailsthe details of your advanced setting.
- Once the process is completed then click on Save & Next buttons to on save and next button to proceed further.
Source Application Objects tab
Start with Source Application Objects tab, to get synced all the objects when the user will get connected to different source applications like Salesforce/Microsoft CRM.
Follow these steps to synced all objects for source application like Salesforce and Microsoft CRM.
- Click to "Objectsobjects" tab on the left-hand corner in corner in the Profiles section of the DBSync Replication Portalreplication portal.
- Once, the user has connected to source applications like Salesforce and Microsoft CRM then objects will get synced and it will show on the Objects objects tab.
- Select any Source Apps objects you want to sync into Database "source apps objects" you want to sync into the database from the left Objects objects section as shown below.
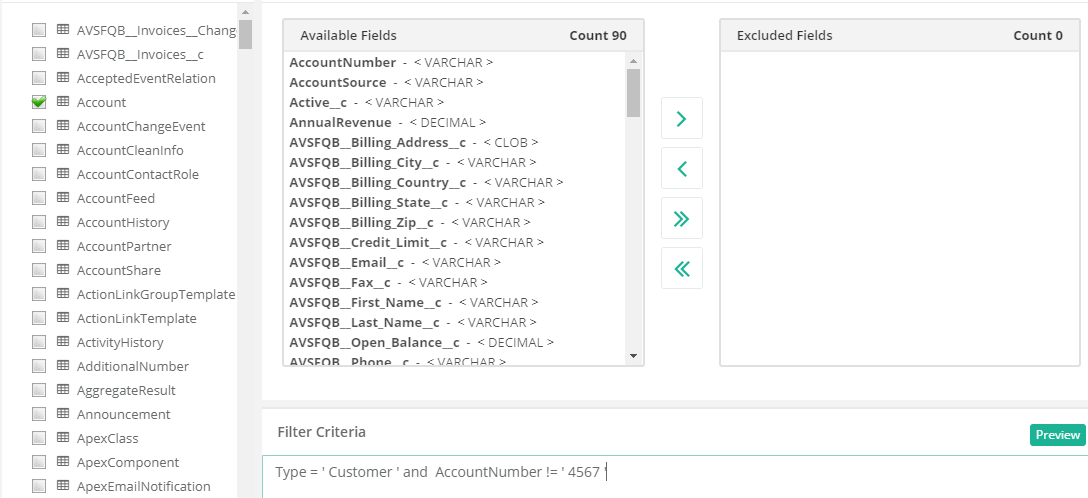
- Select the object fields you want to sync into Database the database from the"Available Fieldsavailable fields" section and use the "Exclude Fieldsexclude fields"section to section to filter out fields you don't want to sync into Databasethe database.

- Once completed, click on the "Run button" to Run the configuration for the Source Apps object.
- Run menu to select the required commands like Update Database Schema, Source Apps to Database like an update database schema, source apps to the database (Clean Copy), Source Apps to Database source apps to the database (Incremental) to execute.
As per the above commands options, the user has to select the Database database to Source source command to replicate all the sync objects to their Source Applicationssource applications.
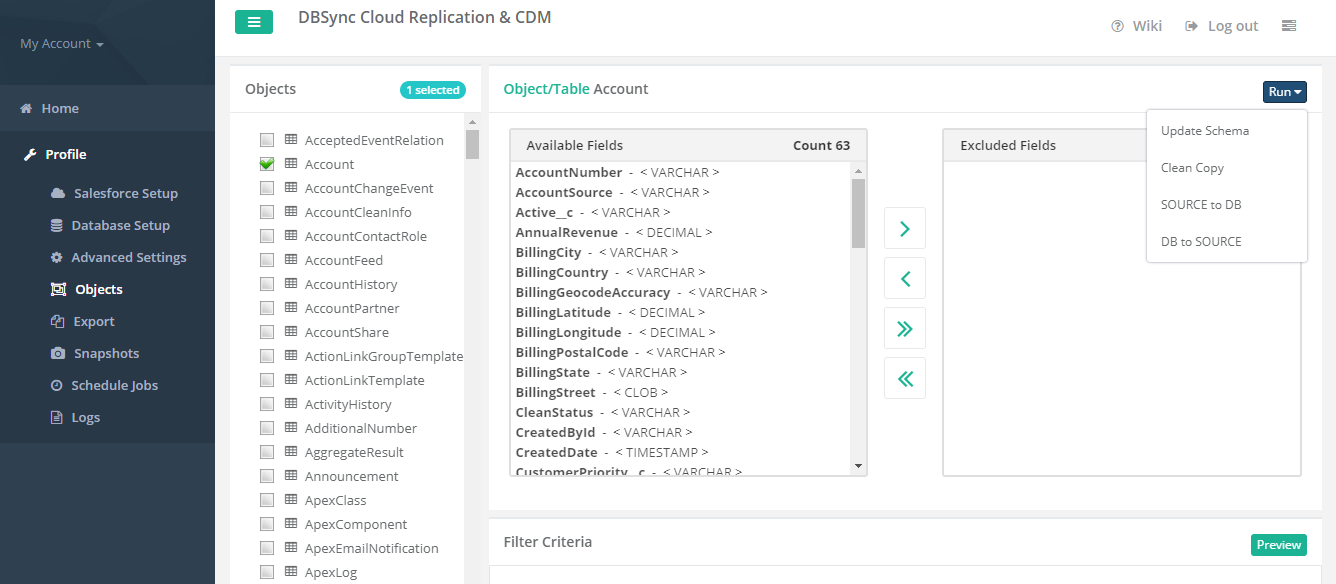

Include required control flags in the column do_sync_flag of Database database table where in Source App source app data is already stored during previous runs for Source App to Database Replication. Selection source app to database replication.
The selection of control fags shown in the below table is illustrated with an example in the topic topic do_sync_flag.Values
Description
Y
The record has been synchronized between Source Apps and Database
S
A request from an external system to indicate that the record needs to be synchronized from Database to Source Apps
D
Indicates This indicates that the record was deleted in Source Apps.
- Once the user has selected and "Runrun" the Commandcommand, then it will redirect to the user on the Log Screen Tab log screen tab to see the status of the command is completed or not.
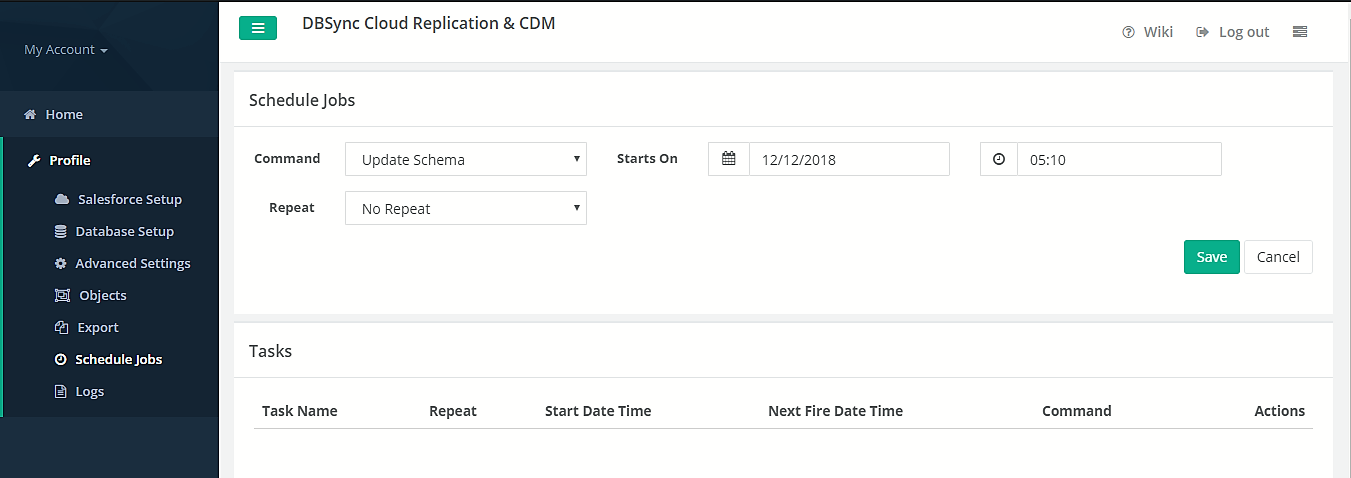
Configure
Scheduler Jobsschedule jobs tab
Start with the Scheduler Jobs tab, here where users can schedule the sync using Scheduler Tab.
Follow these steps to schedule the sync using the Scheduler tab with scheduler functionality like run commands options, Date, Month and year format settings and repeat Drop-down menu details to set the set the desired duration to sync the selected objects.
- Click to "Scheduler Jobsscheduler jobs" tab on the left-hand corner in the Profiles section of the DBSync Replication Portalreplication portal.
- Once, the user has connected to source applications like Salesforce and Microsoft CRM then objects will get synced and the user can directly select select the required Process from the Command Dropprocess from the command drop-down and configure the frequency of the sync by selecting a desired duration from the Repeat the Repeat drop-down menu.
- Next, "Start Onstart on" option to to select the Datethe date, Month month and Year from the Drop-down menu to year from the drop-down menu to get the objects synced for particular Date and Month format.
- Create a task in the "task section" with with all the details including Task Name task name, Actionaction, Command and Start Date and Timecommand, and start, date and time.
- Once the process is completed then click on Save & Next buttons on the Save button to proceed further.
Overview
Content Tools