2022
Page History
...
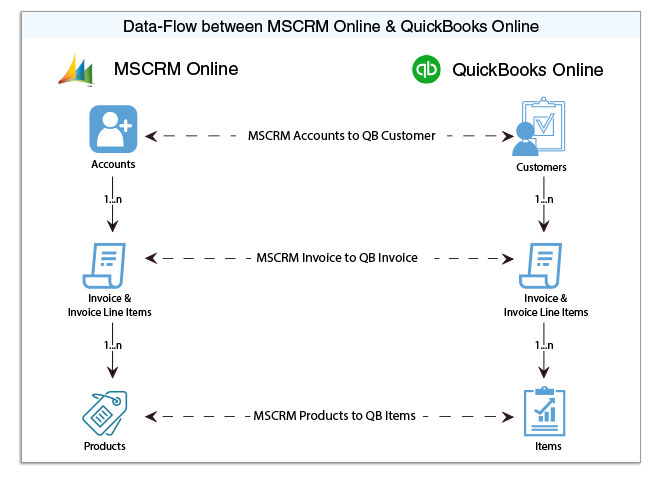
DBSync for Microsoft 365/CRM Online & QuickBooks Online Integration is an easy to use application to integrate . It seamlessly integrates Microsoft 365/CRM Accounts, Products, Opportunity, Sales Order, Invoice with QuickBooks Customers, Items, Job, Sales Order & Invoice. DBSync is also useful to migrate in migrating historical QuickBooks data into Microsoft 365/CRM Online or vice versa. DBSync provides Bi-directional sync with a pre-built field-to-field map mapping along with flexibility for more complex and dynamic mapping capability. DBSync also has an 's automatic online update, enabling DBSync updates enable its customers to enjoy all the product updates and features that come with every new release. The MS Dynamics CRM Online to QuickBooks Online connector uses the OAuth protocol , - making it highly secure and easy to use.
...
Process Map of Bi-directional integration between Microsoft 365/CRM Online & QuickBooks Online is shown in the image below image.:
| Panel |
|---|
Pre-requisite for integration |
- Integration from Microsoft 365/CRM to QuickBooks Invoice is invoked provided if the Generate object field in Microsoft 365/CRM Invoice is selected as Invoice.
- It is mandatory that Microsoft 365/CRM Invoice (to be integrated with QuickBooks Invoice) is associated with the respective Microsoft 365/CRM Account & . It should also should have Products with Price List attached to it for DBSync to invoke integration.
...
Microsoft 365/CRM-Quickbooks solution package can be downloaded from the Microsoft Azure App source and click . Click here to access the solution package to try it on the Microsoft App source platform.
Alternatively, for the Unmanaged installations, kindly follow the steps listed below steps for setting up Microsoft 365/CRM & QuickBooks Integration through iPaaS iPaaS:
- Download the DBSync Microsoft 365/CRM-Quickbooks solution package from the following URL .- https://dbsync-template-library.s3.amazonaws.com/DBMSQB_3_0.zip.
- The downloaded solution packages will be in a.ZIP format.
- Upload the zipped "DBMSQB_X.zip" solution package to your Microsoft 365/CRM Online instance as shown. by clicking on Settings > Customizations >Solutions > Import.
- Browse for the location on your hard drive where "DBMSQB_X.zip" was downloaded and click on Next.
- Once the Solution Packages are uploaded to your Microsoft Dynamics 365/CRM Online instance, you should be able to see the same in the Solutions list as shown below. Click on Publish All Customizations button to commit all the changes done to your Microsoft 365/CRM instance.
- After the successful import of the solution packages, you will find a section called "DBSync" within Account, Contact, Opportunity, Invoice and Order objects along with the custom fields that are essential for the Integration process.
Note:
Out-of-the box DBSync supports Products/Items in a flat structure and not in Hierarchy as an hierarchical structure. This is so because, Products in Microsoft 365/CRM does do not support a Hierarchical structure. Please look at our Knowledge base for steps in handling hierarchies in Items from QuickBooks.
...
- Login into www.mydbsync.com and click on Customer Login.
- Enter your DBSync User Name and Password and click on Login.
- Once logged in, click on the "My home" tab from the menu and . Then, click on the Launch button.
- Click on the Project MSCRM Online to QuickBooks. Then, click click on the Connectors button on the left panel.
- You will see connectors MSCRM & QuickBooks.
- Click on Microsoft 365/CRM Connector. Then, enter your Microsoft 365/CRM global administrator username and password. Make sure you modify the "MSCRM Soap URL" according to the domain name provided to you by Microsoft at the time of registration for Microsoft Dynamics 365/CRM Online application. A sample example is shown. Microsoft 365/CRM Soap URL : https:// (https://**)<<server_name>/.
- In the above example, your server_name should be prefixed in place of the default value.
- Scroll down to the bottom of the section and click on the Validate Connection button to validate your Microsoft 365/CRM credentials & click on Save.
- If you are using it for the first time, click on the Activate button. A screen will appear. Enter your global administrator username, and accept the terms and conditions. You can now connect to your MS online account and see all your schemas.
...
- Login into www.mydbsync.com and click . Click on My Account then click .And then, click on Customer Login.
- Enter your DBSync User Name and Password and click on Login.
- Click on the Development Studio.
- Click on the Project MSCRM Online to QuickBooks Online then . Then, click on the Connectors button on the left panel.
- You will see connectors MSCRM & QuickBooks Online.
- In the Quick Setup tab, set the Environment as Production/Developer Instance and click . Then, click on Connect To QuickBooks.
- Enter QuickBooks User ID, Password and click Sign In.
- Once Sign Insigned in, the page gets will be redirected to the DBSync Connector page.
- This completes the configuration of your DBSync profile with Microsoft Dynamics 365/CRM Online instance and QuickBooks online.
...
Overview
Content Tools