2022
Page History
...
It is necessary that on-premise version of DBSync is used for Salesforce and Microsoft Dynamics NAV Integration. In order to use DBSync On Premise, DBSync should be installed locally and DBSync account should be switched to On Premise from On Demand.
The process of installing DBSync is explained in the below link.
link http://help2.mydbsync.com/docs1/display/dbsync/DBSync+On-Premise+Installation
The process of switching DBSync Account from On Demand to On Premise is explained in the below link
link http://help2.mydbsync.com/docs1/display/dbsync/DBSync+On+Demand+to+On+Premise
...
- After successful import of the Salesforce & Microsoft Dynamics NAV into your account, the user is re-directed to connector listing page.
- You will see MS NAV & Salesforce connectors.
- Click on the Edit of the MS NAV to configure NAV connector to connect to your NAV instance.
- Nav requires following parameters to connect to your NAV instance.
- username: The username to connect to MS Dynamics NAV instance.
- password: The password to connect Navision is hosted
- Nav requires following parameters to connect to your NAV instance.
- Click on Save and Validate Connection to save and validate your NAV connector.
- Click on the Edit of the Salesforce connector to connect to your Salesforce instance.
- select the End Point you wish to connect toand under Quick Setup tab click on Connect to Salesforce button which will open up the Salesforce pop up window.
- username: Input the username of the salesforce instance you wish to connect with
- password: The password to connect with your salesforce instance.
- select the End Point you wish to connect toand under Quick Setup tab click on Connect to Salesforce button which will open up the Salesforce pop up window.
- Once you login to Salesforce, your Salesforce connector is connected to your Salesforce instance. If you want to connect using different Salesforce instance, click on Disconnect in Quick Setup tab. Then, connect using credentials with which you wish to connect with.
- You can also use Advanced Properties tab to connect to your Salesforce instance. Go to Advanced Properties, fill in the Salesforce Username, Password & Security Token for your Salesforce Instance. Select the appropriate End Point. Once you enter all the required details, click on Validate Connection. If the validation is successful, click on Save to Save the Salesforce details. If the validation fails, you will see Validation Errors on the top right corner. Refer the details in Validation Errors section and make the necessary changes in Advanced Properties and click on Validate Connection again.
- Click on Save and Validate Connection to save and validate your salesforce connector.
| Panel |
|---|
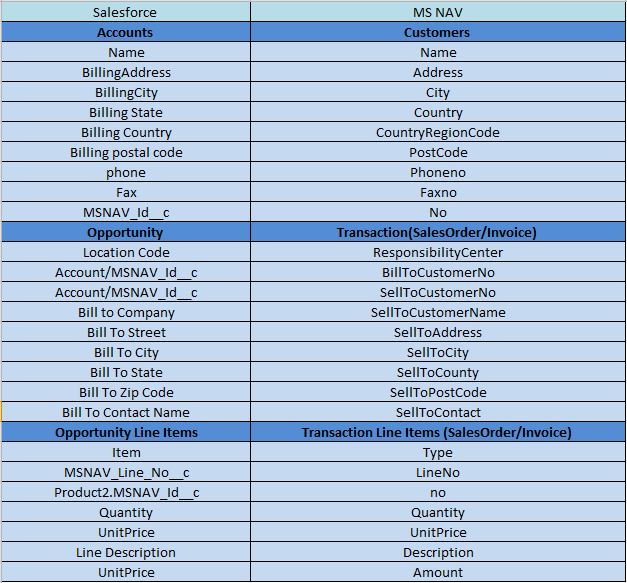
Salesforce To MS NAV Field Mapping |
| Panel |
|---|
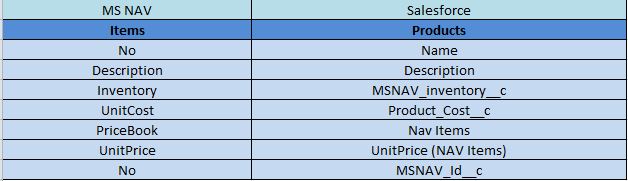
MS NAV To Salesforce Field Mapping |
| Panel |
|---|
Running the integration |
DBSync integration for Salesforce & Microsoft Dynamics NAV can be run automatically using Scheduler or manually using the Run Button.
The detailed process of using Scheduler to run the integration is shown in the below wiki link.
link http://help2.mydbsync.com/docs1/display/dbsync/Scheduler
...
- Login into www.mydbsync.com with your Username & Password.
- Once logged in, click on My Home from the menu and click on the Launch buttonDevelopment Studio.
- Once launched, you will be redirected to DBSync Project page in the next tab.
- Click on the project SalesforceGreatPlains: BiDirectional and then click on Connectors on the left panel.
- Upon successful validation of your connectors, you can click on Processes on the side panel. Click on the Run Now button available there.
- Salesforce & MS NAV: Bidirectional
- On the left side, of navigation click on the process menu which will open up the process listing page.
- Hit the Run Now button on any of the processes to for syncing the data between Salesforce and MS NAV.
| Panel |
|---|
Related References |
The below are the related references to learn about Salesforce and MS NAV connectors.
Microsoft Dynamics NAV Connector
Overview
Content Tools