Database to Sage Intacct Integration
- Setup your Database for Integration. For this Tutorial I am using MySQL Database Named "Sage IntacctDB".
- Create tables "dbaccount" in Database with following script.
Database Script : MYSQL | Database Script : SQLSERVER | Database Script : Oracle |
create table `Sage IntacctDB`.`dbAccount` (`AccountID` varchar(100) NOT NULL , `AccountName` text NOT NULL , `BillingStreet` text , `BillingPostalCode` numeric(20) , `AnnualRevenue` decimal(30,2) , `CreatedDate` date , `LastModifiedDate` datetime , `NumberOfOfficeLocations` int , PRIMARY KEY (`AccountID`) ); | create table dbAccount (AccountID varchar(100) NOT NULL , AccountName text NOT NULL , BillingStreet text , BillingPostalCode numeric(20) , AnnualRevenue decimal(30,2) , CreatedDate date , LastModifiedDate datetime , NumberOfOfficeLocations int , PRIMARY KEY (AccountID) ); | CREATE TABLE "SYS"."DBACCOUNT"
("ACCOUNTID" VARCHAR2(20 BYTE) NOT NULL ENABLE,
"ACCOUNTNAME" VARCHAR2(100 BYTE),
"BILLINGSTREET" VARCHAR2(50 BYTE),
"BILLINGPOSTALCODE" VARCHAR2(50 BYTE),
"ANNUALREVENUE" NUMBER(30,2),
"CREATEDDATE" DATE,
"LASTMODIFIEDDATE" VARCHAR2(40 BYTE),
"NUMBEROFOFFICELOCATIONS" NUMBER(*,0),
CONSTRAINT "DBACCOUNT_PK" PRIMARY KEY ("ACCOUNTID")
);
|
- Enter a sample data in "dbAccount" table.
- Go to www.mydbsync.com. Open www.mydbsync.com in your browser and click on Customer Login.
- Enter your DBSync username and password to login. Click on Launch to navigate to Project console.
- Click on Project on the left section of console. Click on Create New Project, enter project name as Database-Sage Intacct & click on Save.
- A new Project will be created by given Name. In this tutorial I have used name Database-Sage Intacct.
- Click on Create New Process, enter process name as DatabasetoSage Intacct, click on Save to save the process.
- Click on Connectors on the left section of Project console. You need to create new connectors for Database & Sage Intacct.
- Click on Create New Connector enter the connector name as Sage Intacct & select the connector type as Sage Intacct Adapter and click on Save.
- Enter all the required details, click on Save & then Validate connection.
- Sage Intacct Connector is created and the connection is validated. Next, Database adapter need to be created.
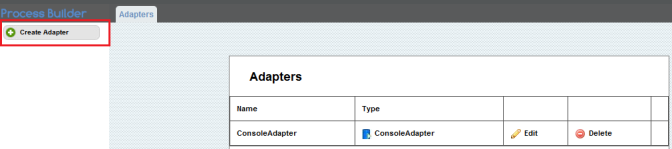
- Click on Connectors on the left section of Project console. Click on Create New Connector.
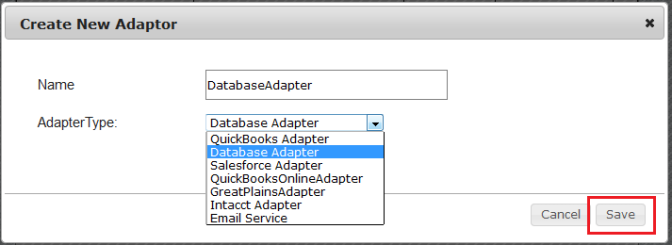
- Enter connection name as Database & select the connector type as Database Adapter and click on Save.
- Enter all the required details, click on Save & then Validate connection.
- Click on Projects, click on the project Database-Sage Intacct, there you will see the new process DatabaseToSage Intacct. Click on the newly created process DatabaseToSage Intacct.
- Using the button Create New Workflow, create the workflow "Execute".
- Click on workflow Execute, You will see two sections Trigger on the top & Rules in the bottom.
- In Trigger section, go to Advanced Query Builder select Datasource as Database.
- Click on Switch to Advanced view & enter the below query in the Query Builder. Click on Save and Close.
select AccountID, AccountName, BillingStreet, BillingPostalCode, AnnualRevenue, LastModifiedDate, NumberOfLocations from dbaccount
- In Rules section of a workflow, click on Add New Rule, Select Target Connector, Operation, Target Object as Sage Intacct, Insert, create_customer respectively.
- Click on the Map in this newly created Rule, you will see a mapping screen.
- In the mapping screen, you will see list of target fields in the left section. On the right you will the source fields under Schema.
- Drag & drop the required fields from Schema into the required source fields.
- Once you are done close the mapping screen from Save and Close button on the top right. Save the workflow and ensure that the status of workflow is On.
- You can run the integration, using the Run button or the Scheduler in the left section of Project console. Run button is available once you open the project.
- Using the button Logs in the left section, you can view the Logs.
- This concludes brief introduction on building DBSync integration data flow from Database to Sage Intacct.