Initiating DBSync integration through Rest-Call
DBSync integration can also be initiated without having to login to www.mydbsync.com. The sync can be initiated from an external application, say with a click of a button or a URL. The following section illustrates how this customization can be achieved.
When a post request is made to DBSync server, the following parameters are verified.
- Authentication variable
- Profile variable
- Payload - Process Definition Language
HTTP Post Request
Post URL: http(s)://<<server>>:<<port>>/cw/dbsyncrestservice.m
Post Parameters:
1. authenticationXML: It provides the authentication username/password and name of the profile.
2. profileXML: Defines the connection profile for the integration process to execute. See "Profile" section below
3. payload: Defines the process to execute. The name is in the form of "processdefinition_"<<process_name>>".xml
All post parameters should be UTF-8 encoded.
The following section illustrates how these parameters can be found within DBSync intallation and modify as per to your DBSync and Adapter configurations.
Authentication :
The authentication module verifies your DBSync Username, Password and Profile used for Integration. The following is a sample DBSync credential which is used for authentication.
Username : your_username@company.com
Password : Password
Profile Name : Sage Sage IntacctToDatabase
<authentication>
<userName>username@yourcompany.com</userName>
<password>your_password</password>
<profile>Sage Sage IntacctToDatabase</profile>
</authentication>
Profile :
Profile is basically an XML file and it defines the Business Process to execute. The name of a profile or the xml file is always prefixed with "processdefinition" and usually is in the form of "processdefinition_"<<process_name>>".xml
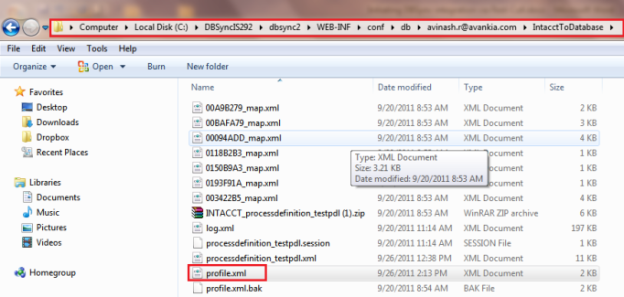
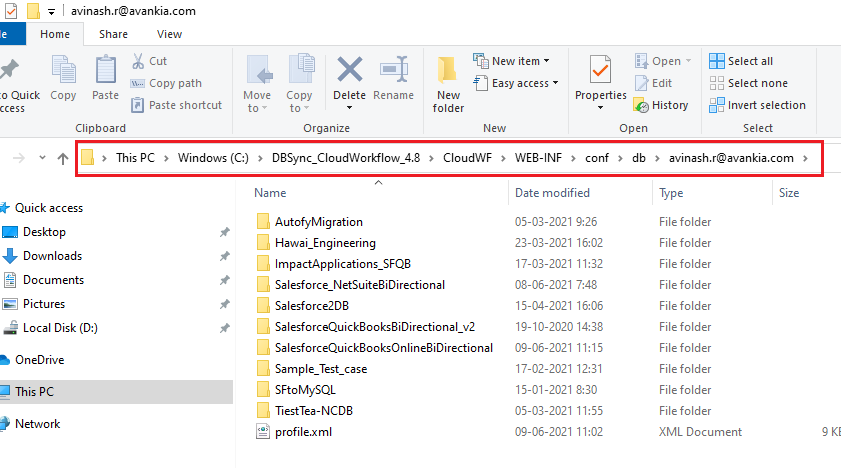
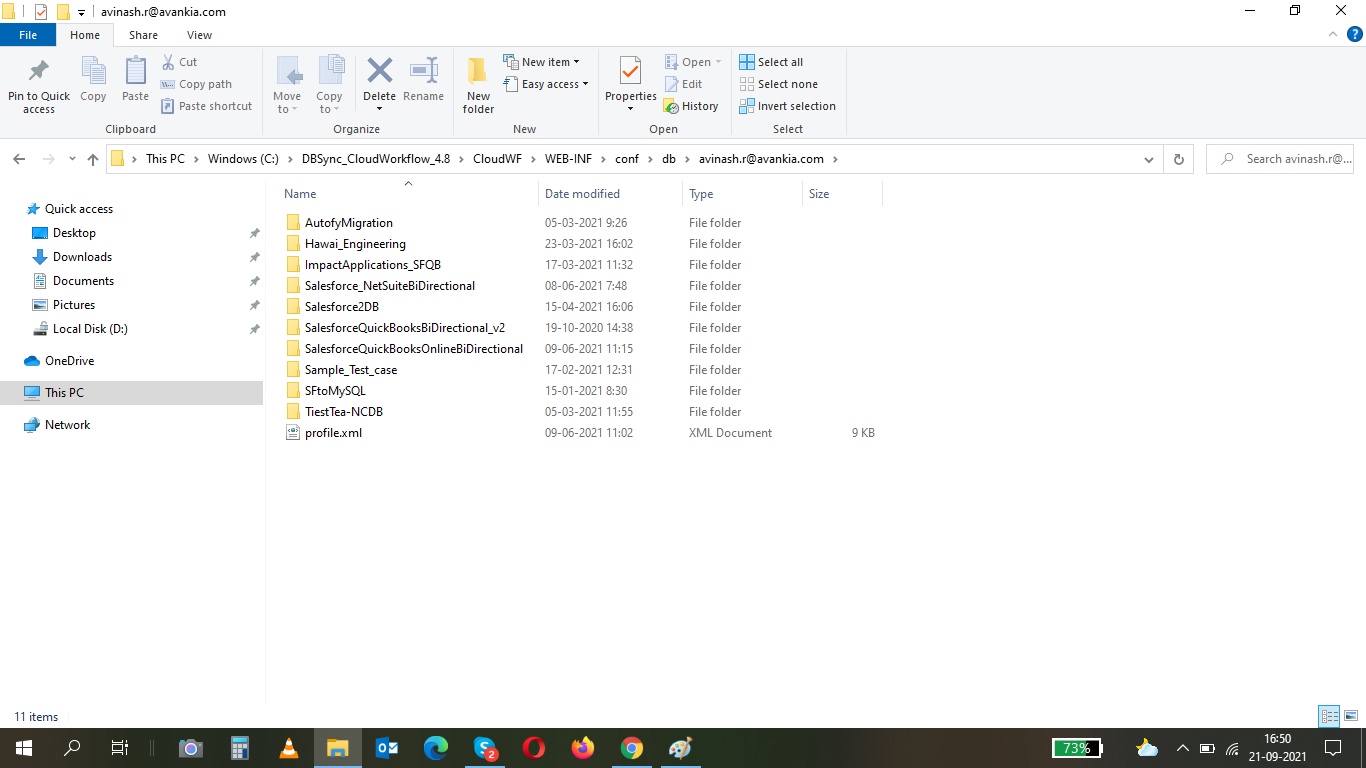
Profile.xml file stores configuration details of your integration adapters for which you have registered at the time of purchase. The default installation folder of DBSync would be "C:\DBSync_Cloudworkflow_x". Presuming that DBSync is installed in the default directory, you can find the path of the profile.xml as shown below.
C:\DBSync_CloudWorkflow_x\CloudWF\WEB-INF\conf\db\<DBSync Username>\<Profile Name>\ profile.xml

A sample profile.xml file is shown below with configuration details of the adapters that are used for integration.
<?xml version="1.0" encoding="UTF-8"?>

<!-- DBSync User Details -- >

<profile id="your_username@company.com" name="Sage Sage IntacctToDatabase" loglevel="ALL" email="" guid="0006FBC6">

<!-- Sage Sage Intacct Adapter Configuration -- >

<adapter name="Sage Sage Intacct" type="com.avankia.appmashups.adapter.Sage Sage Intacct.Sage Sage IntacctAdapter">
<property name="userid">username</property>
<property name="password" encrypted="true">XXXXXX</property>
<property name="senderid">avankia</property>
<property name="dtdversion">2.1</property>
<property name="hostUrl">www.Sage Sage Intacct.com</property>
<property name="companyid">company-DEV</property>
<property name="controlpassword">XXXXXXX</property>
</adapter>
<adapter name="ConsoleAdapter" type="com.avankia.appmashups.engine.conversion.adapters.ConsoleAdapter" />

<!-- Database Adapter Configuration  -- >

<adapter name="database" type="com.avankia.appmashups.engine.conversion.adapters.DatabaseAdapter">
<property name="password" encrypted="true">XXXXXX</property>
<property name="url">jdbc:sqlserver://localhost:1433;databaseName=Sage Sage Intacct</property>
<property name="autocommit">true</property>
<property name="driver">sqlserver</property>
<property name="dbname">Sage Sage Intacct</property>
<property name="username">sa</property>
</adapter>
</profile>
Payload – Process Definition Language :
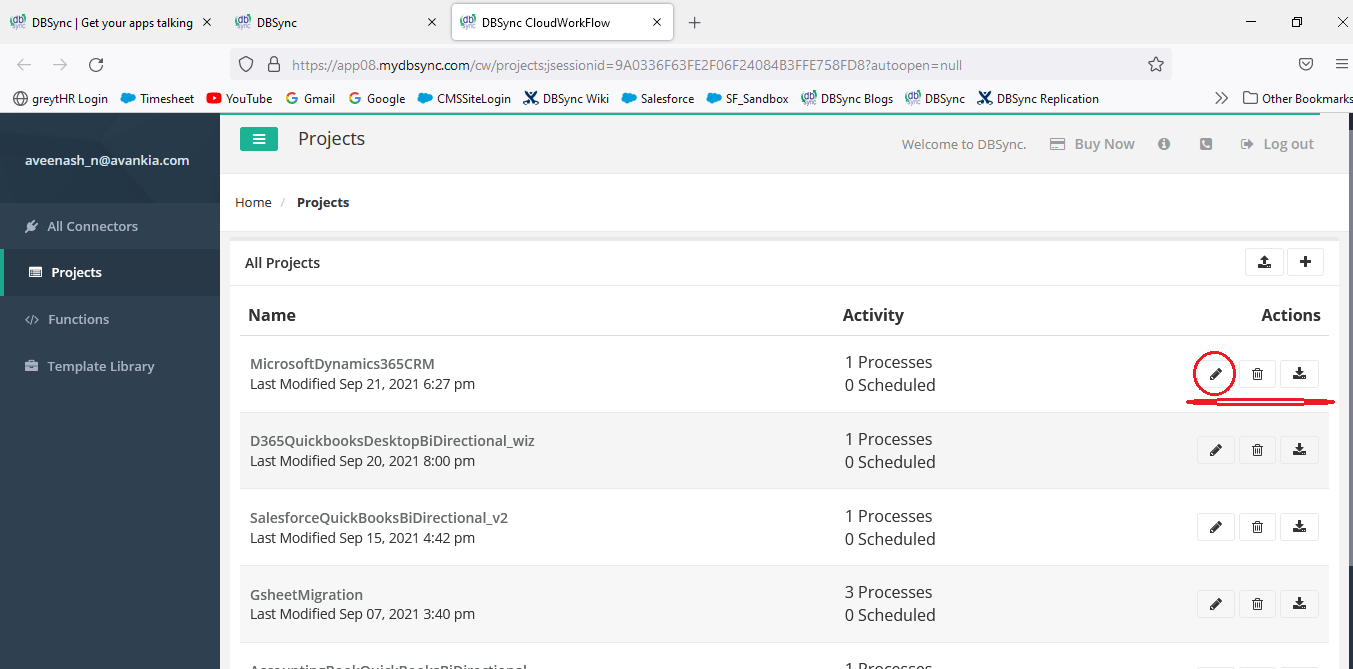
The PDL file (Process Definition Language) can be found in the same directory as the profile.xml file or you can also download the PDL file from DBSync. A screenshot below illustrates step-by-step instructions to download the same.
- Login to www.mydbsync.com and click on Customer Login tab
- Login with the provided DBSync Username & Password
- Click on My Home link from the Menu, you will be re-directed to Launch page.
- Once into DBSync Home page, Click on Launch Development Studio button and you will be directed to workspace page of DBSync.
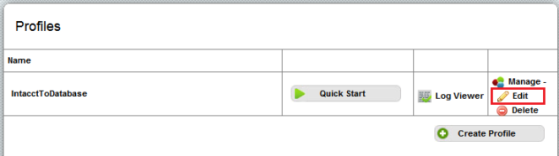
- Once inside the profile page, click on Manage --> Edit as shown below. You will be re-directed to Process-Builder page
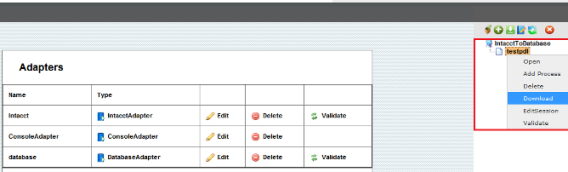
- Right-Click on the Process-Definition on the top right hand corner and select Download form the right-click menu as shown.
- Save the zip file to a desired location and extract the same.
The following section shows a Sample Java Code which can be used to make a REST-CALL. The highlighted section shows the modified parameters as per to your DBSync, Database and Sage Sage Intacct credentials.
Sample Java Code :
package com.avankia.appmashups.rest;

import java.io.File;
import java.net.URLEncoder;
import org.apache.commons.io.FileUtils;

public class TestClient
{
public static void main(String[] args) throws Exception
{

String authenticationXML = "<authentication>" + "<userName>username@company.com</userName>" + "<password>password</password>" + "<profile>Sage Sage IntacctToDatabase</profile>" + "</authentication>";
String profileXML2="";
String profileXML = "<?xml version=\"1.0\" encoding=\"UTF-8\"?>"\+

/*
Sage Sage Intacct Adapter Configuration
*/

"<profile id="localhost@avankia.com" name="Sage Sage Intacct" loglevel="ALL" email=""guid="01F6CCDC">"+
"<adapter name="Sage Sage Intacct" type="com.avankia.appmashups.adapter.Sage Sage Intacct.Sage Sage IntacctAdapter">"+
"<property name="userid">admin</property>"+ // Sage Sage Intacct UserId
"<property name="password" encrypted="true">XXXXXXXXX</property>"+ //Encrypted Sage Sage Intacct Password
"<property name="senderid">company</property>"+  // Sage Sage Intacct SenderId
"<property name="dtdversion">2.1</property>"+   //  Sage Sage Intacct DTD Version
"<property name="hostUrl">www.Sage Sage Intacct.com</property>"+  // Host URL
"<property name="companyid">Company-ID</property>"+  // Sage Sage Intacct Company Id
"<property name="controlpassword">YYYYYYYY</property>"\+ // Sage Sage Intacct Control Password
"</adapter>"+


/*
Database Adapter Configuration
*/

"<adapter name="database" type="com.avankia.appmashups.engine.conversion.adapters.DatabaseAdapter">"+
"<property name="password" encrypted="true">XXXXXXX</property>"\+ //Database Password
"<property name="url">jdbc:mysql://localhost:3306/yourdb</property>"+ // Database Connection String
"<property name="autocommit">true</property>"+
"<property name="driver">mysql</property>"+ // Database Driver
"<property name="dbname">mysql</property>"+
"<property name="username">root</property>"+  // Database User
"</adapter>"+
"</profile>";
\\
StringBuilder content = new StringBuilder();
content.append("authenticationXML=");
content.append(URLEncoder.encode(authenticationXML, "UTF-8"));
content.append("&");
content.append("profileXML=");
content.append(URLEncoder.encode(profileXML, "UTF-8"));
content.append("&");
content.append("payload=processdefinition_testpdl.xml");
String response = Http.post("http://localhost:8080/dbsync2/dbsyncrestservice.m", content.toString(), "application/x-www-form-urlencoded");
System.out.println("HTTP Response:\n"+response);
}
}
Return Value
If successfully submitted, the return value is "success"
If there is an error, an HTTP Error is returned with HTTP Error string with the error message.