2022
Page History
Email Adapter
- Go to www.mydbsync.com, Select Customer Login. Enter your User Name and Password and click Login Button.
- Go to My Home and click on Launch Button in Console Area.
- In this tutorial I have used profile named Salesforce-Database. The Profile will be listed in the profile area as shown below:
...
- Click the Create Adapter Button on the left hand side.

- Click the Create Adapter Button on the left hand side. Enter the Adapter Name, from AdapterType Drop Down Select Intaact Email Service and Click on Save Button.

- Adapter will be created and will be listed in the Adapter section of the Process Builder.
- Click on Edit link in front of the Email adapter and you will be presented with properties for the Adapter at the bottom left of the window. Enter values for all the properties and click on Save Properties. Both the sections of the window are shown below sequentially.


- Click on Validate Link Next to Email Adapter. A message box is displayed; if the message says "Connection Settings are valid" you are good to go. Else Click on Edit and enter correct values for Adapter properties and repeat the steps. Click OK.

- Right Click \ Open on the Process Name "SalesforceDatabase" to open the process in the Control flow for DatabaseSync process.

- The process will contain 3 States by default:
- Start_state
- Sf2db
- End_state
Drag the Create State Button onto the control flow Area to create a new state. Enter the state name as "Email" and click on OK Button. A new state will be created and placed on control flow area. 
Wiki Markup Click on *\[X\]* icon on *sf2db* to delete the control flow from *sf2db* to *End_state.*
- Right Click\connect on sf2db followed by left click on Execute will create a control flow from sf2db to Execute.
- Right Click\connect on Email followed by left click on End_state will create a control flow from Execute to End_state. All the control flows are displayed using arrows from one state to other state. Below you will find 2 screenshots one containing no control flow and second containing control flow as Start_state to sf2db to Execute to End_state. Once done click on Save button at the top right corner of the window.

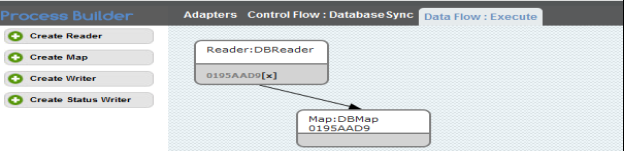
- Double click on Execute state to open data flow for Execute state. Drag the Reader button onto the data flow area and enter the Name for reader and click on OK Button. In this tutorial I am using "DBReader" as the reader name.
...
- Right Click\Connect on DBReader followed by left click on DBMap will create a control flow from DBReader to DBMap.

- Right Click\Connect on DBMap followed by left click on DBWriter will create control flow from DBMap to DBWriter. All control flows will be displayed using arrows. A screenshot is shown below displaying the control flow after following the above process.
...
- Right Click\Properties on DBWriter. The properties will be displayed in the bottom left area of DBSync Console. Select Email from Adapter Drop Down. Once Email Adapter is selected, all the properties for DBWriter will be listed in the properties area. Enter the values for body, recipients, subject and sender (sender Email ID). Click on Save button once done.

- Right Click\Properties on DBMap. Enter 1 in the sequence text box. Enter description for the mapping. Click on Edit link for *****_map.xml file. You will be presented with a new window with source and target columns. Just keep the mapping *Validate = "true"* to execute this state.

- Once you are done close the mapping screen from close button on the top right. In the DBSync Console click the RUN button to run the sync (A screenshot is shown below). Once Sync is complete you will receive an Email with the settings in writer adapter.
Overview
Content Tools