2022
Page History
Have you ever thought about integrating Quickbooks QuickBooks to a database of your choice? The benefits are legion. From backing up your data in QuickbooksQuickBooks, to copying selected data for use in Analytics or other business tools.
...
The integration process involves nine steps, which are explained via an example.
| Panel |
|---|
Preliminary step |
In order to show how to integrate Quickbooks QuickBooks into a database, we will use an example on how to transfer Accounts data from Quickbooks QuickBooks to a MySQL database.
In order to repeat this example, you first need to create a MySQL database named “qbtodb”. This database must contain a table named “Accounts”, which contains two fields: “AccountName” and “AccountAmount”.
Although the example shows how to transfer records from Quickbooks QuickBooks to a database, the process could be defined inversely. That is, you could do a transfer from a database to Quickbooks QuickBooks in a similar manner, by just changing the source and destination data.
So, let’s start with our integration process.
| Panel |
|---|
Step 1: Create a project |
In order to integrate Quickbooks QuickBooks to a database, the first thing that you need to do, is to create a project that will contain all the necessary information.
...
Figure 2: List of projects.
| Panel |
|---|
Step 2: Create theQuickbooksQuickBooks connector |
Your second step is to create a connector that will allow you to send and retrieve information from your Quickbooks QuickBooks app.
In order to do so, you need to click on the Create New Connector button. The system will ask for a connector’s name and type. Enter any name. Just remember that a connector’s name cannot include any space between letters. For the connector’s type, select Quickbooks QuickBooks Online Rest Connector.
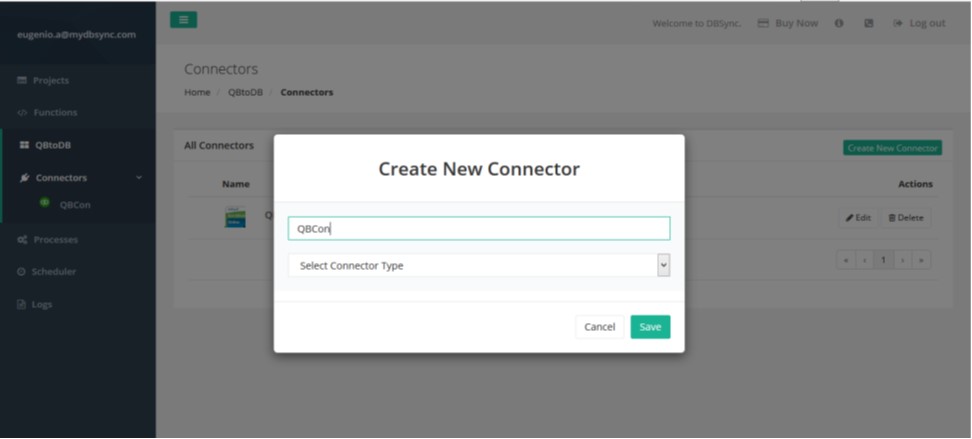
Figure 3: Connector’s name
...
Figure 6: Connector’s details.
| Panel |
|---|
Step 3: Create the database connector |
Your next step is to create a connector to your database. In order to do this, click on the Create New Connector button again.
...
Figure 8: Database connection details.
| Panel |
|---|
Step 4: Create a process |
In order to create a new process, click on the Create New Process button. The system will ask you for a process’ name. Enter a name of your choice. Just, once more, remember that the name cannot include blank spaces. Then, click on the Save button. Your process will be added to the list of processes.
...
Figure 9: Create a new process.
| Panel |
|---|
Step 5: Create a workflow |
Now that you have created a process, you need to include at least one workflow. Workflows define the data transfer, that is, what data is transmitted, the source and the destination.
...
As explained earlier, workflows include the data transfer information. Therefore, you need to define a data source or trigger, and a data destination or rule. The rule must include a mapping between the source and destination data.
Create a trigger
In order to define a trigger, you need to input the data source or connector first, which in this case is the Quickbooks’ QuickBooks’ connector.
The system will now load all the objects available in that data source. Select one of them. In this example, we will use the “Account” object.
...
Figure 11: Create a trigger.
Create a rule
Now, you need to define a data destination. This is done via a rule definition. However, notice that now you can define more than one rule or data destination.
...
Figure 12: Create a rule.
Create a mapping
Up to this point, you have defined a data source and a data destination. The next step is to define the relationship between the two. In order to do so, click on the Map link. A screen showing both, data source objects and data destination objects will appear.
Mapping fields on the Mapping Screen is very easy. You just need to drag and drop fields from the data source schema into the target or data destination list.
In this example, the Quickbooks QuickBooks fields “Name” and “Current Balance” are mapped to the database fields “AccountName” and “AccountAmount” respectively.
...
Figure 13: Mapping Screen
Save your workflow
Although it may not look so important, this step is crucial, because if you don’t save the workflow details, you will lose the information and have to redo all of it again.
...
Figure 14: Save the workflow.
| Panel |
|---|
Step 7: Run the process |
Figure 15 shows the screen with all the processes available. The example has one process with one workflow.
...
Figure 15: Run the process.
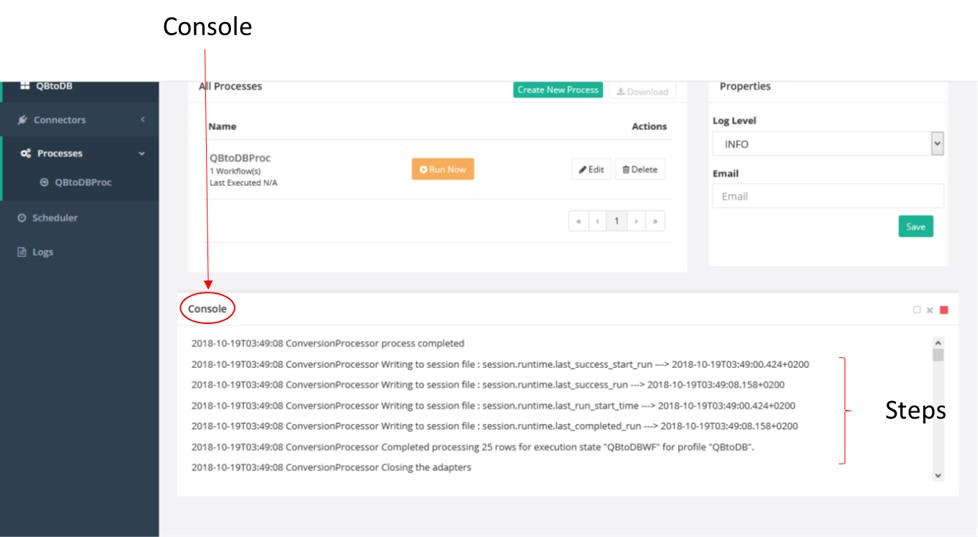
Figure 16: Console.
| Panel |
|---|
Step 8: Check the logs |
Once the run is done, you can go to the Logs section that appears on the menu on the left-hand side. The Log Summary shows information about the run, such as the number of records read from the source and number of records written on the destination. There is also an icon showing success (green background, check symbol) or failure (red background, exclamation symbol). There is also a link to the logs, which can be handy in case of running problems.
In our example, the process was successfully run, and 25 records were read from QuickbooksQuickBooks, and sent to the MySQL database.
...
Figure 17: Log Summary.
| Panel |
|---|
Step 9: Check the results |
Now that you know that your process was successfully run, it is wise to check the database.
...
Figure 18: Database with records transferred from QuickbooksQuickBooks.
| Panel |
|---|
Scheduler |
A useful feature of DBSync is its Scheduler. It allows you to automate your processes by defining running schedules.
...
Figure 19: Scheduler
| Panel |
|---|
Final words |
Throughout this series of three articles, you have seen how to integrate Quickbooks QuickBooks with a database, by using the DBSync application.
In the first part, you have learnt how to create a project, and connectors for Quickbooks QuickBooks and a database respectively.
In the second part, you have seen how to define your integration flow. That is, to define a process and a workflow. A key aspect of this section was to define a mapping between Quickbooks QuickBooks objects and database fields.
...
The example showed how to transfer data from Quickbooks QuickBooks to a MySQL database. Similarly, you could have transferred to another database, such as Oracle or MSSQL. DBSync integration also works bi-directionally, meaning that you can transfer data from Quickbooks QuickBooks to a database and vice versa.
Overview
Content Tools