2022
Page History
3. Organise your pages
Here are some tips for organising your content.
Change the page order
The sidebar on the left displays your pages in a hierarchy. If you have Space Administrator permissions you can click "Space Tools" > "Reorder Pages" to move pages around.
Add labels
Labels help keep pages organised and make it easier for you to find the information you need. Click "Labels" at the bottom of a page to add or edit. The "Related pages" section on this page uses labels too!
Make templates
Standardise and speed up the page creation process with templates. You can create and format a template with page layouts, standard headings and instructional text for hints and guidelines. Check out our sample page on "Making a template"
Related pages
Create Profile
Login to the local host of DBSync Salesforce Replication instance using respective username and password.
Get started by clicking on the Add App to create a profile for configure replication.
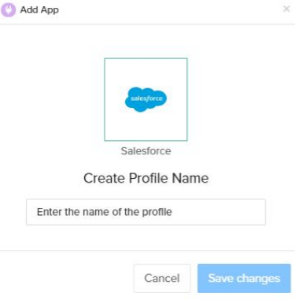
Enter the desired profile name and click Save.
New profile will now be created.
Click on the profile name.
You will be redirected to setup your Salesforce instance.
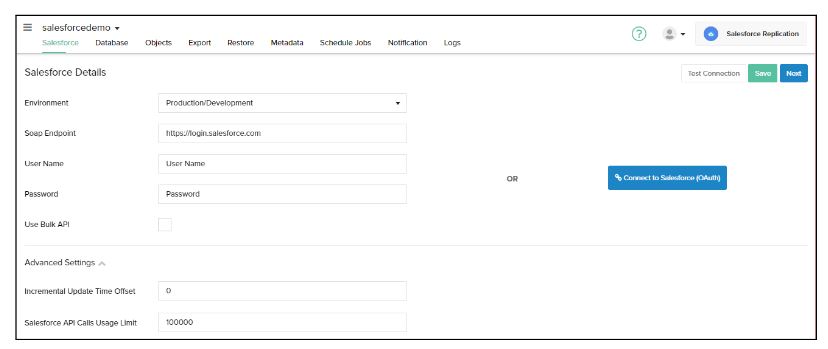
Salesforce Setup
There are two ways to setup your Salesforce profile
1. Enter the "username" and "password" credential to manually . Save and Test the connection.
Note : Environment and soap end details would be pre-filled. Do not change unless necessary.
2. Click on Connect to Salesforce for instant web authentication.
Now click on Next to Setup Database
Database Setup
Select the Type of database to which you wish to replicate the Salesforce instance linked in the previous step.
To start with, the database credentials of the user are required such as Host, Port, Username, Password, Database name, and Schema.
Based all the details entered by the user, URL field gets auto-filled.
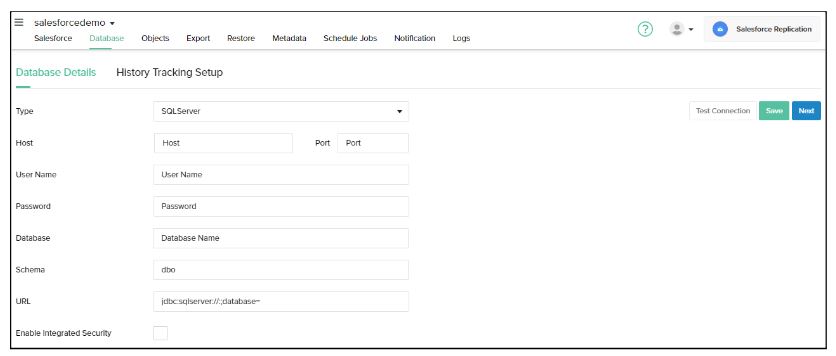
Now click on Next to select the Objects of your Salesforce instance.
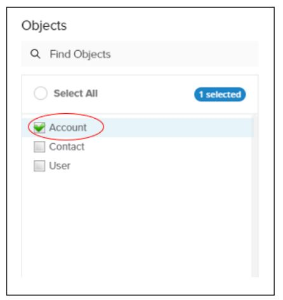
Object Selection & Run Command
Once, a user has connected to Salesforce then objects will get synced and it will show on the objects tab.
Select any "Salesforce objects" to sync into the database objects table section as shown below.
- Select the object fields you want to sync into the database from the "Available Fields" section and use the "exclude fields" section to filter out fields you don't want to sync into the database.
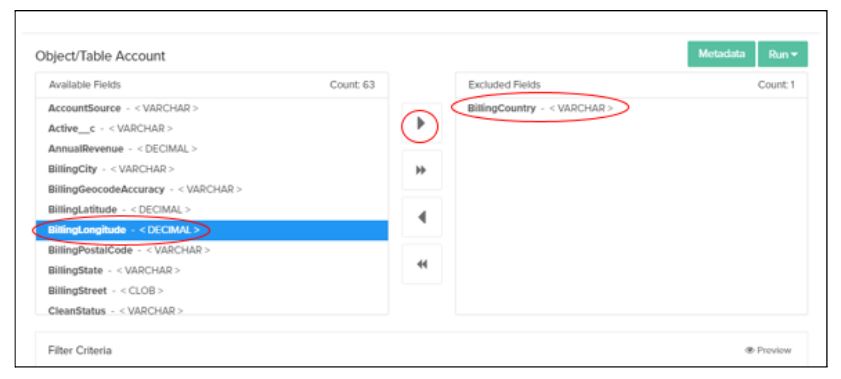
- Click the RUN button and select Clean Copy command to get an exact copy of your Salesforce selected objects.
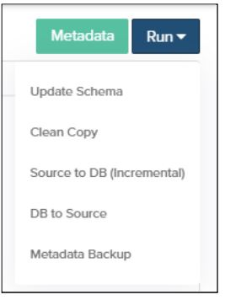
Attributes of Run Command
Run Process | Actions Performed |
Update Schema | Creates source apps schema into database for the selected source apps objects. |
Clean Copy | Inserts a clean copy of Salesforce object records into respective database tables & columns. |
Source to DB | Performs incremental sync from Salesforce to the database based on the changes/edits made in the Salesforce |
DB to Source | Performs incremental sync from Database to the Salesforce based on the changes/edits made in the Database |
Metadata Backup | Backs up your metadata for the objects selected from you Salesforce instance |
Overview
Content Tools