2022
Page History
| Panel |
|---|
Introduction |
- The
...
- purpose of
...
- Migration is to migrate the user's historical data on a single integration run.
...
- Update functionality updates records in QuickBooks and Salesforce.
The section 'QuickBooks to Salesforce Migration Process' below, provides step by step instructions on how to initiate the migration of your Quickbooks records
...
into Salesforce objects
...
using Salesforce & Quickbooks
...
Bidirectional Process Template.
...
| Panel |
|---|
QuickBooks to Salesforce Migration Process |
- Go to www.mydbsync.com
...
- . Click on Customer Login.
- Enter your
...
- Username and Password. Click on Sign in
...
- .
- Click on Launch
...
- DBSync Profile will open in the next tab, click on Process Template, scroll to the bottom of the page and navigate to page 2 to select the Salesforce & Quickbooks Migration template as shown in the screenshot below.

- Click on View More Button besides the Template and on the next screen click on Add Now Button to add the Migration Template to your DBSync profile. The below screenshot illustrates the same.


- Once you click on the Add Now button, you will be re-directed to the properties window.
Enter your login information in the properties window for Salesforce and click on validate button to validate the login credentials of Salesforce. Once you receive the message "Connection settings are valid" click on Continue button at the bottom. If you receive the message "Connection settings are invalid" then please check for the following
- Check whether User ID and Password for Salesforce is correct.
- Is there any invalid Network Access Settings.
- Make sure that security token is added in your password (for Salesforce Adapter)

- The validation for the Salesforce adapter is a must for proceeding further in the properties window.
- Click on QuickBooks link from the left Menu to open QuickBooks settings. Enter you QuickBooks Desktop file path in the 'file:' section and click on Save Properties button.
- You can retrieve full path / location of your Quickbooks file by pressing 'F2' key on your keyboard when in Quickbooks 'Home' page as shown below.

- Click on configuration Link at the bottom of the Edit Properties Area. A Pop-up box will appear, asking to open the file with "QuickBooks Web Connector (default)" click on OK button as highlighted below in screenshot.

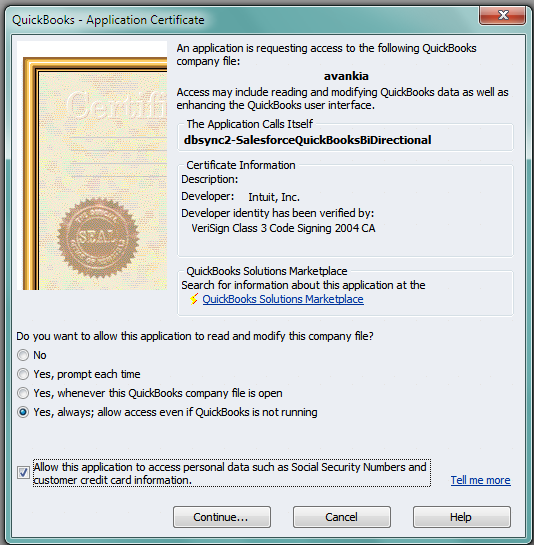
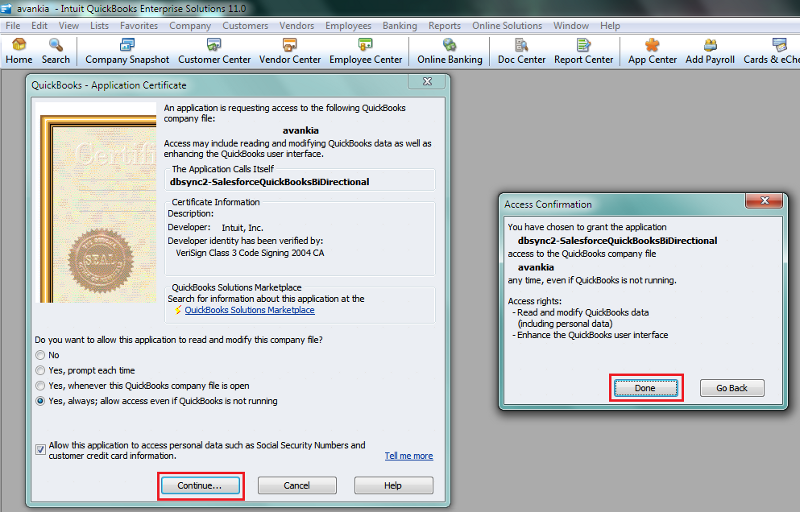
- Click on OK in the next window (first screenshot below) and on the next window select the option button "Yes, always; allow access even if QuickBooks is not running" and check the check box for "Allow this application to access personal data" and click on continue button (second screenshot below).

- In the Access Confirmation window click on the Done button. And the profile will get added to your QuickBooks Web Connector. A screenshot of the QuickBooks Web Connector is displayed.
- Click on the Advanced Properties on the left column and select Log Level as ALL from the drop down. The below image illustrates the same.

- For Validating the process click on the button Click to Validate Process. This process will check all the Adapter settings, mappings and states for the sync and present you with a report. In the report all the valid actions are marked with a green check icon as and all invalid actions are marked with red minus icon as . If all the actions are valid ( ) then click on continue button at the bottom.
Customer to Account Migration
- Select CustomerToAccount from the left column and enter in the details as required. Hovering your mouse cursor on the blue Question mark icon indicates how to fill-up the fields. Care should be taken to make sure that the data is entered in the prescribed format as it is case sensitive. A simple example is illustrated in the below screenhot

- There are generally four maps for each state as update and upsert as for example the CustomerToAccount has been shown. The maps are for updating the already existing Customer or for creating a new Customer.
| Panel |
|---|
|
Items to Product Migration
...
- to check if Salesforce and QuickBooks Bidirectional Process Template is added to the profile.
- If Salesforce and QuickBooks Bidirectional Process Template is not included in the profile, go back to the Home page. Click on Process Template to see the list of process templates.
- Click on SalesforceQuickBooks:Bidirectional to add this template to your profile.
- Click on Launch. DBSync Projects page will display in the next tab.
- Click on Projects > SalesforceQuickBooks:Bidirectional > Connectors.
- Configure DBSync with QuickBooks Web connector. For a detailed step by step configuration process click on Configuring DBSync with QuickBooks Web Connector link.
- Based on the requirements, appropriate steps must be enabled before running the integration.
- To migrate QuickBooks Customer to Salesforce Accounts, click on Processes > SalesforceQuickBooks:Bidirectional > turn on CustomerToAccount work flow. In the “Last Success Run”, edit the date from which you want to Migrate the data. Click on Save.
- To migrate QuickBooks Items to Salesforce Products, click on Processes > SalesforceQuickBooks:Bidirectional > turn on ItemServiceToProduct work flow. In the “Last Success Run” edit the date from which you want to Migrate the data. Click on Save.
- To migrate QuickBooks Invoice to Salesforce Opportunity, click on Processes > SalesforceQuickBooks:Bidirectional > turn on InvoiceToOpportunity work flow. In the “Last Success Run” edit the date from which you want to Migrate the data. Click on Save.
- Follow similar procedure to migrate Items belonging to Item types Inventory, Non-Inventory, Discount, Other Charge and Sales Tax
...
- and the transactions of type Estimate, SalesOrder, SalesReceipt and CreditMemo.
Overview
Content Tools