2022
Page History
Salesforce &
...
QuickBooks BiDirectional Template
- Go to www.mydbsync.com, click on Customer Login. Enter your User Name and Password and click on Sign in. Click on Launch to access DBSync Integration ConsoleProject page.
- In DBSync console click on Quick Start Link.
...
- Validate your connection settings for Salesforce . Enter Your Salesforce Username and Password and click on Validate button.
...
- Go to QuickBooks configuration, enter you QuickBooks file path and click on Save Properties Button.
...
- Go to Opportunity to invoice configuration and uncheck the check box for mapping "Sync Opportunities as jobs in QuickBooks"
...
- & QuickBooks.
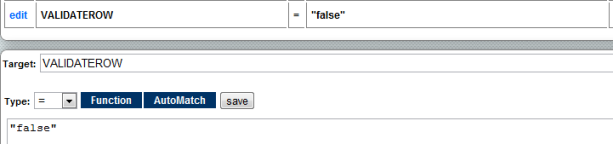
- Go to workflow Opportunity to invoice, in the Rules section open the map for Sequence No.2 and replace the mapping of VALIDATE ROW from "true" to "false".
- After making above changes, DBSync will not create jobs in your QuickBooks.
- The above procedure can be replicated for other mapping states like OpportunityToSalesOrder, OpportunityToSalesReceipt, OpportunityToEstimate and OpportuintyToCreditMemo.
Salesforce &
...
QuickBooks Online Template
Disabling jobs in Quickbooks Online template requires one to access the dbsync console as it cannot be disabled via Quickstart window. The following section provides you step-by-step instruction on the same.
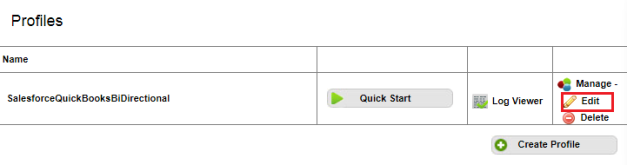
- Login to your dbsync console as shown in the above Quickbooks desktop section.
- Click on Manage--> edit link as shown below.
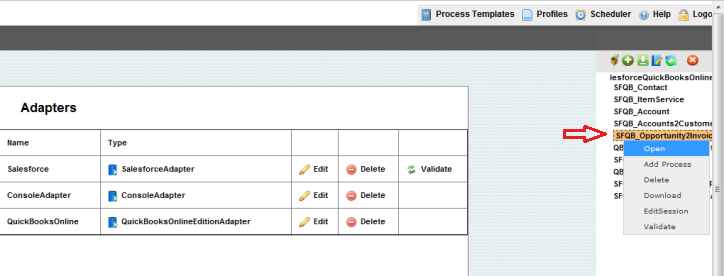
- Once you are into the Process Builder page, open the SFQB_Opportunity2Invoice PDL either by double-clicking on the the PDL or by doing right-click and selecting Open as illustrated in the below screenshot.
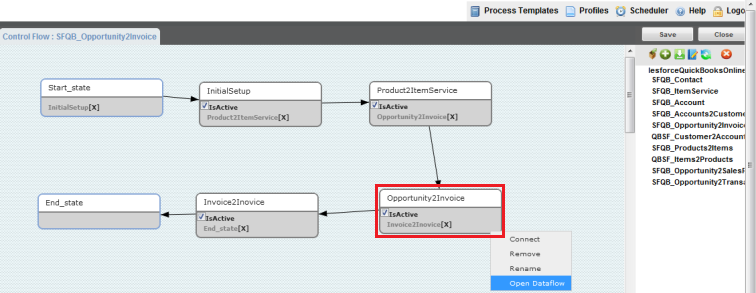
- Once you have opened the SFQB_Opportunity2Invoice PDL, click on the Opportunity2Invoice box as shown either by double-clicking on it or by doing a right-click and selecting Open from the menu.
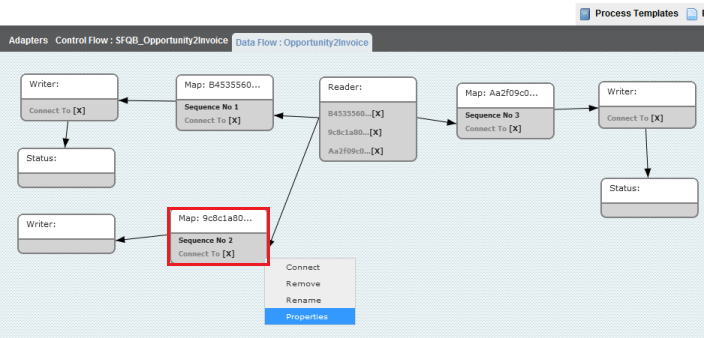
- Once you have opened the Opportunity2Invoice workflow, right-click on the mapping Sequence No 2 and select Properties from the menu as shown.
- Scroll to the bottom of the page and click on the edit link to open the mapping in a new tab or a new window as shown.

- Make the following changes to the Validate Row as "false" as shown.
- Now, open mapping Sequence No 3 page the same way you opened Sequence No 2 and Go to www.mydbsync.com, click on Customer Login. Enter your User Name and Password and click on Sign in. Click on Launch to access DBSync Project page.
- Validate your connection settings for Salesforce & QuickBooks Online.
- Go to the process SFQB_OpportunityToInvoice, open the workflow OpportunityToInvoice, open the map for Sequence No.2 and replace the mapping of VALIDATE ROW from "true" to "false".
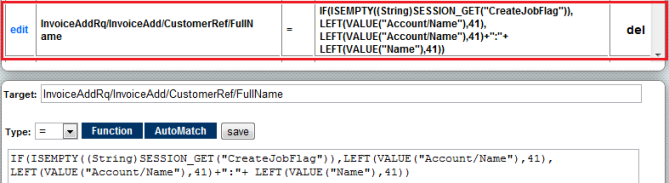
- Now, open mapping for Sequence No 3 and make the following changes to Source and Target Mappings.
...
| Code Block |
|---|
IF(ISEMPTY((String)SESSION_GET("CreateJobFlag")),LEFT(VALUE("Account/Name"),41),
LEFT(VALUE("Account/Name"),41)+":"+ LEFT(VALUE("Name"),41))
|
* The following screenshot illustrates the same.
- This completes disabling of Jobs for your Salesforce & Quickbooks QuickBooks Online solution template.
Overview
Content Tools