2022
Page History
| Table of Contents |
|---|
| Panel |
|---|
Overview |
DBSync for MS for Microsoft Dynamics 365/CRM On-Premise & QuickBooks Desktop Integration is easy to use application. It integrates MS integrates Microsoft Dynamics 365/CRM Accounts, Products, Opportunity, Invoice with QuickBooks Customers, Items, Job & Invoice. DBSync is also useful in migrating historical QuickBooks data into MS into Microsoft Dynamics 365/CRM On-Premise or vice versa. DBSync provides Bi-directional sync with a pre-built field-to-field mapping along with flexibility for more complex and dynamic mapping capability. DBSync's automatic online update enables its customers to enjoy all the product updates and features that come with every new release.
...
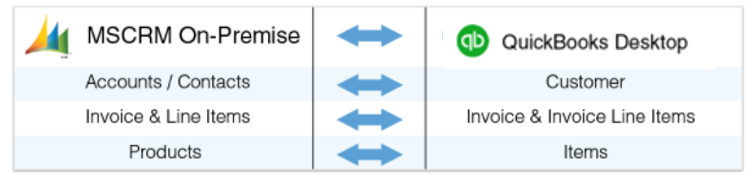
Data flow of Bi-directional integration between MS between Microsoft Dynamics 365/CRM On-Premise & QuickBooks Desktop is shown in the table below.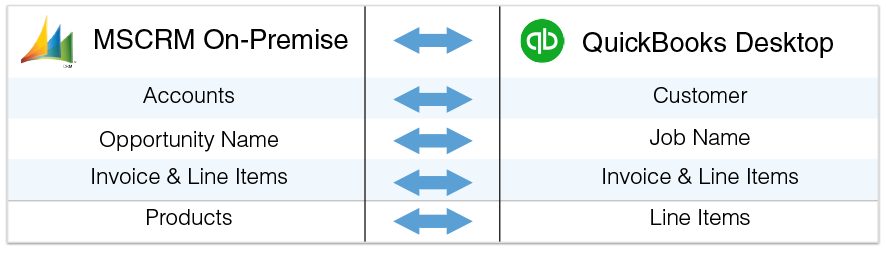
| Panel |
|---|
Process Map |
Process Map of Bi-directional integration between MS 365/CRM between On-Premise & QuickBooks Desktop is shown in the image below:
...
| Panel |
|---|
Pre-requisite for integration |
- Integration from MS from Microsoft Dynamics 365/CRM to QuickBooks Invoice is invoked if the Generate field in MS in Microsoft Dynamics 365/CRM Invoice is selected as Invoice.
- It is mandatory that MS that Microsoft Dynamics 365/CRM Invoice (to be integrated with QuickBooks Invoice) is associated with the respective MS Microsoft Dynamics 365/CRM Account. In addition to that, it should also have Products with Price List attached to it for DBSync to invoke integration.
...
- Download the DBSync Microsoft Dynamics 365/CRM-Quickbooks solution package from the following URL - https://dbsync01.appmashups.com/appmanager/library/DBMSQB_1_0.zip.
- Download another solution package from the following URL. This creates a new Price List "Pricelist" & all the new products created will be added in this Price List. https://dl.dropbox.com/u/9495163/QuickPrice_0_9_001_managed.zip.
- The downloaded solution packages will be in a.ZIP format.
- Upload the zipped "DBMSQB_X.zip" solution package & "QuickPrice_0_9_001_managed.zip" to your Microsoft your Microsoft Dynamics 365/CRM On-Premise instance as shown. Settings > Customizations > Solutions > Import.
- Browse for the location on your hard drive where "DBMSQB_X.zip" was downloaded and click on Next.
- Similarly, browse for the location on your hard drive where "QuickPrice_0_9_001_managed.zip" was downloaded and click on Next.
- Once the Solution Packages are uploaded to your MS your Microsoft Dynamics 365/CRM On-Premise instance, you should be able to see the same in the Solutions list as shown below. Click on Publish All Customizations button to commit all the changes done to your MS Microsoft Dynamics 365/CRM instance.
- After successfully importing the solution packages, you will find a section called "DBSync" within Account, Contact, Opportunity, Invoice and Order objects with the custom fields that are essential for the Integration process.
- The Price List Item will include the List Price defined on the Product. If you only have one Price List in your system, the Price List Item will be linked to that Price List. If you have multiple Price Lists, the first Price List created in your system will be used.
...
"QuickPrice_0_9_001_managed.zip" is a third party solution package built by MCC Partner.
| Panel |
|---|
ConfigureMSMicrosoft Dynamics 365/CRM On-Premise for DBSync Integration |
- Microsoft .NET Framework 4.5 should be installed. The following link can be referred for installation.
http://www.microsoft.com/en-us/download/details.aspx?id=30653.
- Windows Service Proxy for MS for Microsoft Dynamics 365/CRM should be installed & the steps are available in the link below.
http://help.mydbsync.com/docs/display/dbsync/MS+CRM+Service+Proxy.
| Panel |
|---|
DBSync Setup |
- Login into www.mydbsync.com. Click on Customer Login.
- It is necessary to use the on-premise version of DBSync for the integration of MS of Microsoft Dynamics 365/CRM On-Premise with QuickBooks. The below link can be referred to install an on-premise version of DBSync http://help.mydbsync.com/docs/display/dbsync/DBSync+On-Premise+Installation. Enter your DBSync global administrator username and password and click on Login.
- Once logged in, click on "My Home" tab from the menu. Then, click on the Launch button.
- Click on the Project MSCRM Online to QuickBooks. Then, click on the Connectors button on the left panel.
- You will see connectors MSCRM & QuickBooks.
- Click on MSCRM Connector. Enter your Microsoft your Microsoft Dynamics 365/CRM CRM global administrator username and password. Scroll down to the bottom of the section and click on Validate Connection button to validate your Microsoft 365/CRM credentials & click on Save.
...
- Login into www.mydbsync.com. Then click on Customer Login.
- Enter your DBSync User Name and Password and click on Login.
- Once logged in, click on "My Home" tab from the menu and click on the Launch button.
- Click on the Project MSCRM Online to QuickBooks. Then, click on the Connectors button on the left panel.
- You will see connectors MSCRM & QuickBooks.
- Click on Quickbooks connector, enter the full path to your QuickBooks file on your desktop into QuickBooks File. Select the appropriate QuickBooks Version and enter the required Process Name. Click on Save.
- Note: QuickBooks must be accessed as an Admin and should be in single user mode. You can retrieve the full path/location of your QuickBooks file by pressing 'F2' key on your keyboard when in QuickBooks 'Home' page.
- Click on Download Web Connector to download the .qwc file. Open this downloaded file with QuickBooks Web Connector.
- Click on OK on the Authorization screen.
- Select the option 'Yes, always; allow access even if QuickBooks is not running' and click on continue.
- Click on Done to confirm Access.
- Web connector will be launched with the selected integration Project. Select the integration Project and enter DBSync password and finally click on "Update Selected" to run the integration.
- Note: Any changes made in the mapping window will change the Project file and very likely will affect the data flow and integration as well.
- This completes the configuration of your DBSync profile with your Microsoft your Microsoft Dynamics 365/CRM Online instance and QuickBooks desktop.
| Panel |
|---|
Profile Setup |
Microsoft Dynamics 365/CRM
Configuration | Instructions |
Username | <<Username>> |
Password | <<Password>> |
| MSCRM Port URL / End Point | https:// (https://**)<<server_name>>/ |
Overview
Content Tools