2022
Page History
Overview
DBSync Jumpstart package for Salesforce & QuickBooks Integration is an easy to use solution template. You can buy the template to do receivable automation between your Salesforce CRM and QuickBooks accounting software. The solution template acts as a plug & play solution. It automates integration of Customers, Orders & Invoicing with your QuickBooks software based on incremental updates and increased visibility across both the systems.
The solution provides Bi-directional data-exchange with a pre-built field-to-field mappings along with flexibility for complex and custom mapping capability. DBSync also has an automatic online update. This enables DBSync customers to enjoy all the product updates and features with every new release.
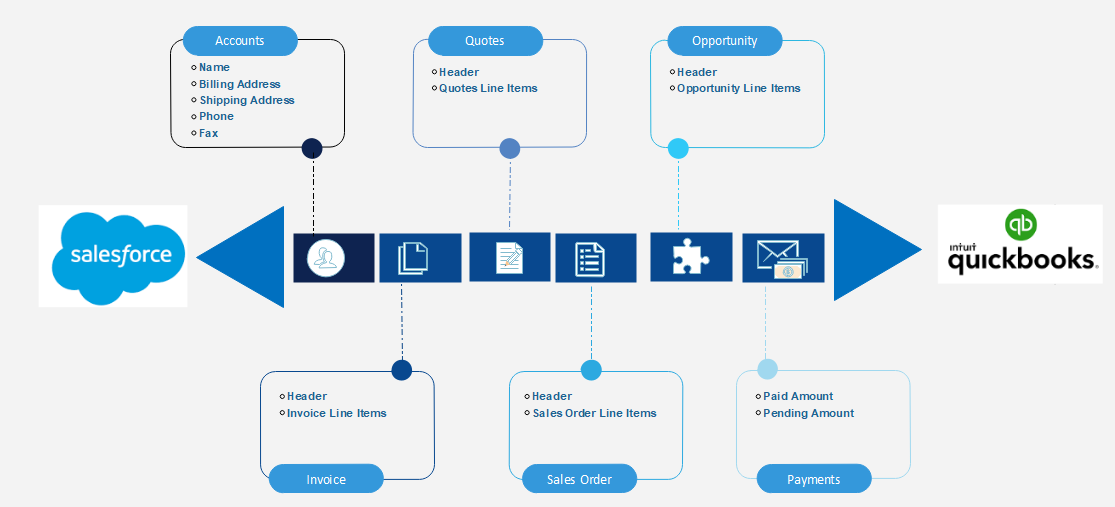
Data Flow
Below steps will allow the user to setup DBSync for integration between Salesforce and QuickBooks.
General Steps:
1. Go to www.mydbsync.com and click on Customer Login.
2. Login to DBSync using the provided Username and Password.
3. Once logged in, you will be able to see the landing page. Click on the “Development Studio” button located on the top right side of the page.
4. The next page comprises of working environment for all DBSync Projects, Processes and Workflows.
5. From the list of “Projects”, click on the required project to work with.
6. Once in the Project list, users will be able to see the Processes available under the selected project.
7. Click on the “Connectors” from the Left Menu and configure the Salesforce connector using your Salesforce Account credentials and Click on SAVE once its Authenticated.
8. Next, click on the available Process by clicking on the “Processes” link on the Left Menu.
9. On the process page, you will see the “Workflows” available for integration.
Workflows:
1. Accounts to Customer: This Workflow will be unidirectional integrating data from Salesforce to QuickBooks. Salesforce Accounts will be integrated as QuickBooks Customers.
Steps:
- Switch ON the Accounts to Customer Workflow and click on EDIT button next to he workflow.
- On the EDIT screen, the TRIGGER sections will allow the users to Query data from Source (Salesforce) and the RULE section will allow user to configure the mappings for the target System (QuickBooks).
- Once the mappings are finished, click on SAVE WORKFLOW located on the TOP RIGHT side of the page.
2. Quote to Estimate: This Workflow will be unidirectional integrating data from Salesforce to QuickBooks. Salesforce Quotes and Quotes Line Items will be integrated as Estimates and Line items in QuickBooks.
a. This Workflow also allows the users to configure Rules to create Customers and Products in the same integration transaction.
Steps:
- Switch ON the Quotes to Estimate Workflow. Then, click on the EDIT button placed next to the workflow.
- On the EDIT screen, the TRIGGER sections will allow the users to Query data from Source (Salesforce) and the RULE section will allow users to configure the mappings for the target System (QuickBooks).
- Once the mappings are finished, click on SAVE WORKFLOW located on the TOP RIGHT side of the page.
3. Opportunity to Sales Order (QuickBooks Desktop): This Workflow will be unidirectional integrating data from Salesforce to QuickBooks. Salesforce Opportunity and Opportunity Line items will be integrated as Sales Order and Sales Order Line Items in QuickBooks.
a. This Workflow also allows the users to configure Rules to create Customers and Products in the same integration transaction.
Steps:
- Switch ON the Opportunity to Sales Order Workflow. Then, click on the EDIT button next to the workflow.
- On the EDIT screen, the TRIGGER sections will allow the users to Query data from Source (Salesforce) and the RULE section will allow users to configure the mappings for the target System (QuickBooks).
- Once the mappings are finished, click on SAVE WORKFLOW located on the TOP RIGHT side of the page.
4. Salesforce Opportunity to QuickBooks Invoice: This Workflow will be unidirectional integrating data from Salesforce to QuickBooks. Salesforce Opportunity and Opportunity Line items will be integrated as Invoice and Invoice Line Items in QuickBooks.
a. This Workflow also allows the users to configure Rules to create Customers and Products in the same integration transaction.
Steps:
- Switch ON the Salesforce Opportunity to QuickBooks Invoice Workflow. Then, click on EDIT button next to the workflow.
- On the EDIT screen, the TRIGGER sections will allow the users to Query data from Source (Salesforce) and the RULE section will allow users to configure the mappings for the target System (QuickBooks).
- Once the mappings are finished, click on SAVE WORKFLOW located on the TOP RIGHT side of the page.
5. QuickBooks Payments to Salesforce Invoice: This Workflow will be unidirectional integrating data from QuickBooks to Salesforce. QuickBooks Payments applied against the Invoice will be integrated as Salesforce Invoices/ Invoice Payments.
Steps:
- Switch ON the QuickBooks Payments to Salesforce Invoice Workflow. Then, click on EDIT button next to the workflow.
- On the EDIT screen, the TRIGGER sections will allow the users to Query data from Source (Salesforce) and the RULE section will allow users to configure the mappings for the target System (QuickBooks).
- Once the mappings are finished, click on SAVE WORKFLOW located on the TOP RIGHT side of the page.
6. QuickBooks Items to Salesforce Products (Types = Inventory, Service, Non-Inventory): This data flow will be unidirectional integrating data from QuickBooks to Salesforce. QuickBooks Items will be integrated as Salesforce Products as flat structure.
Steps:
- Switch ON the QuickBooks Items to Salesforce Products process. Then, click on the EDIT button next to the workflow.
- On the EDIT screen, the TRIGGER sections will allow the users to Query data from Source (Salesforce) and the RULE section will allow users to configure the mappings for the target System (QuickBooks).
- Once the mappings are finished, click on SAVE WORKFLOW located on the TOP RIGHT side of the page.
Running the Sync.
- QuickBooks Online: Integration can be initiated using a “RUN NOW” button located next to each workflow in DBSync; or, it can be scheduled in DBSync Scheduler.
- QuickBooks Desktop: Integration can be initiated or scheduled using QuickBooks Web connector.
Overview
Content Tools