2022
Page History
...
Using the OAuth protocol for connecting to Salesforce, makes it highly secure and easy to use.
Data Flow
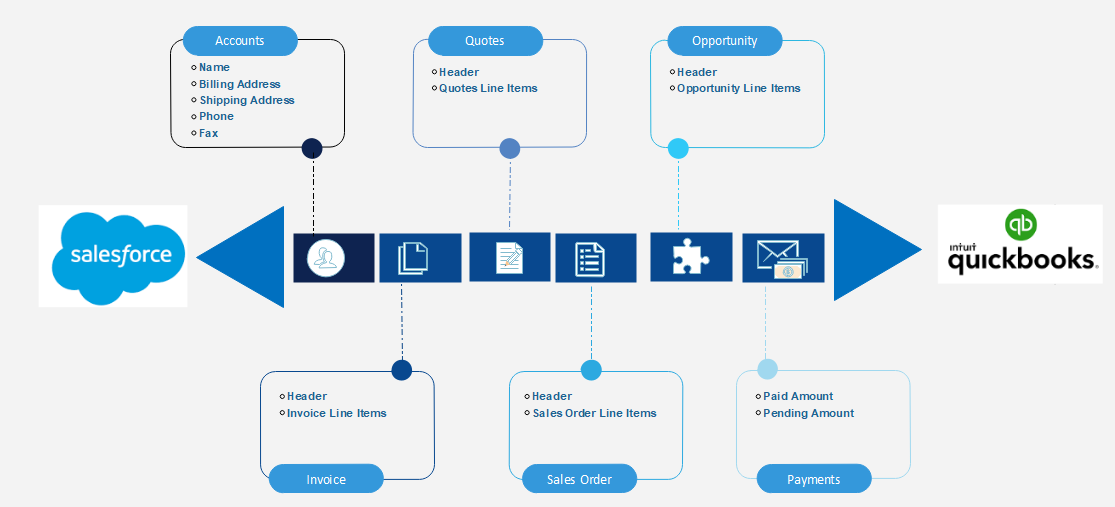
Below steps will allow the user to setup DBSync for integration between Salesforce and QuickBooks.
...
1. Accounts to Customer: This data flow will Workflow will be unidirectional integrating data from Salesforce to QuickBooks. Salesforce Accounts will be integrated as QuickBooks Customers.
Steps:
- Switch ON the process and Accounts to Customer Workflow and click on EDIT button placed along side of the workflow.
- In the EDIT screen, the TRIGGER sections will allow the users to Query data from Source (Salesforce) and the RULE section allows to configure the mappings for the target System (QuickBooks)
- Click on SAVE WORKFLOW located on the TOP RIGHT side of the page, once the mappings are finished.
...
2. Quote to Estimate: This data flow will Workflow will be unidirectional integrating data from Salesforce to QuickBooks. Salesforce Quotes and Quotes Line Items will be integrated as Estimates and Line items in QuickBooks.
...
- Switch ON the Quotes to Estimate process and Workflow and click on EDIT button placed along side of the workflow.
- In the EDIT screen, the TRIGGER sections will allow the users to Query data from Source (Salesforce) and the RULE section allows to configure the mappings for the target System (QuickBooks).
- Click on SAVE WORKFLOW located on the TOP RIGHT side of the page, once the mappings are finished.
...
3. Opportunity to Sales Order (QBD): This data flow will Workflow will be unidirectional integrating data from Salesforce to QuickBooks. Salesforce Orders Opportunity and Order Opportunity Line items will be integrated as Sales Order and Sales Order Line Items in QuickBooks.
...
- Switch ON the Opportunity to Sales Order process and Workflow and click on EDIT button placed along side of the workflow.
- In the EDIT screen, the TRIGGER sections will allow the users to Query data from Source (Salesforce) and the RULE section allows to configure the mappings for the target System (QuickBooks).
- Click on SAVE WORKFLOW located on the TOP RIGHT side of the page, once the mappings are finished.
4. Salesforce Invoice Opportunity to QB Invoice: This data flow will Workflow will be unidirectional integrating data from Salesforce to QuickBooks. Salesforce Invoice Opportunity and Invoice Opportunity Line items will be integrated as Invoice and Invoice Line Items in QuickBooks.
...
Steps:
- Switch ON the Salesforce Invoice Opportunity to QB Invoice process and Workflow and click on EDIT button placed along side of the workflow.
- In the EDIT screen, the TRIGGER sections will allow the users to Query data from Source (Salesforce) and the RULE section allows to configure the mappings for the target System (QuickBooks).
- Click on SAVE WORKFLOW located on the TOP RIGHT side of the page, once the mappings are finished.
5. QB Payments to Salesforce Invoice: This data flow will Workflow will be unidirectional integrating data from QuickBooks to Salesforce. QuickBooks Payments applied against the Invoice will be integrated as Salesforce Invoices/ Invoice Payments.
...
- Switch ON the QB Payments to Salesforce Invoice process and Workflow and click on EDIT button placed along side of the workflow.
- In the EDIT screen, the TRIGGER sections will allow the users to Query data from Source (Salesforce) and the RULE section allows to configure the mappings for the target System (QuickBooks).
- Click on SAVE WORKFLOW located on the TOP RIGHT side of the page, once the mappings are finished.
...
Overview
Content Tools