2022
Page History
Quick Start: Use DBSync
...
replication with different
...
source apps (Salesforce/Microsoft CRM) to connect a
...
database.
(Note: Source Apps includes Salesforce and Microsoft CRM Application)
The quickstart walks through how to create Profile profile under different Source Applications source applications like Salesforce and Microsoft CRM. The DBSync Replication replication is offering you to connect the Source Apps source apps like Salesforce and Microsoft CRM with different Databases databases like MySql, SQL Server, Oracle, DB2, PostgreSQL, Cassandra, Redshift, Sybase and MongoMongoDB.
This quickstart shows you how to get started by creating a profile under Source Applications source applications and how to Replicate replicate the data with the help of DBSync from Source Applications source applications to different databases.
Log in to the DBSync
...
replication portal
Sign in to the DBSync Replication Portalreplication portal.
Fill the configuration details in
...
global settings
Start DBSync Replication Console replication console to configure the proxy settings under the Global global settings option on the home page.
...
- Once, you have logged in then click to "Main Menumain menu" in the right hand top corner on the home page of DBSync Replication Portalreplication portal.
- Next, enter the required proxy credentials in different text boxes like proxy host, proxy port, proxy username and proxy password under the global settings section.
- Click on save changes button to save a global settings details.
Figure:1

Create a
...
source application profile
Source Application application profile Includes Salesforce and Microsoft CRM. The Source App source app profile is created within DBSync Replication Platformreplication platform.
Follow these steps to create a profile under Source Application source application like Salesforce and Microsoft CRM.
- Click to "Add Profileadd profile" in the right hand-corner of the Profiles profiles section of DBSync Replication Portalreplication portal.
- Select, the required source name application from the drop down menu under the Product product header.
- Next, enter the name of the profile like Testprofile "testprofile" under the Name name section.
- Click on save changes button to create a new Replication Profilereplication profile.
Figure:2

Source
...
application setup details
Start with Source Application source application setup details includes Salesforce and Microsoft CRM.
The Source source setup applications details required to configure your Salesforce and Microsoft CRM credentials like "username" and "Passwordpassword".
Follow these steps to configure your Source Application source application like Salesforce and Microsoft CRM.
- Click to "Salesforce and Microsoft CRM" Setup setup tab on the left hand corner in the Profiles profiles section of DBSync Replication Portalreplication portal.
- Don't change the "Environment environment and Soap soap end details", all these details are pre-filled.
- Next, enter the "Usernameusername" and "Passwordpassword" credential for Salesforce and Microsoft CRM.
Figure:3
- "OR", "Other option for Salesforce" Click on connect to to Salesforce (OAUTH) to to enter Salesforce login credentials like "Username" and "Password" to to connect the Salesforce Application.
Figure:4
- Click on Test Connection button to validate your Source Application login details.
Figure:5
- Click Click on Save button to save your Source Apps login details.
Figure:6
- Once completed, click on Next button to proceed to Database Setup tab.
Configure
...
database setup details
Start with Database Setupwith database setup tab, to fill all the necessary details and follow the same procedure for testing and validating your Database database credentials.
Follow these steps to configure your Database database credentials with different databases like MySQL, SQL Server, Oracle, DB2, PostgreSQL, Cassandra, RedShift, Sybase and MongoMongoDB.
- Click to "Databasedatabase" Setup setup tab on the left hand corner in the Profiles profiles section of DBSync Replication Portalreplication portal.
- Select, the required "Typetype name" from the drop down menu options like "MySql, SQL Server, Oracle, DB2, PostgreSQL, Cassandra, Redshift, Sybase and MongoMongoDB" under the "Database Setupdatabase setup" section.
Figure:7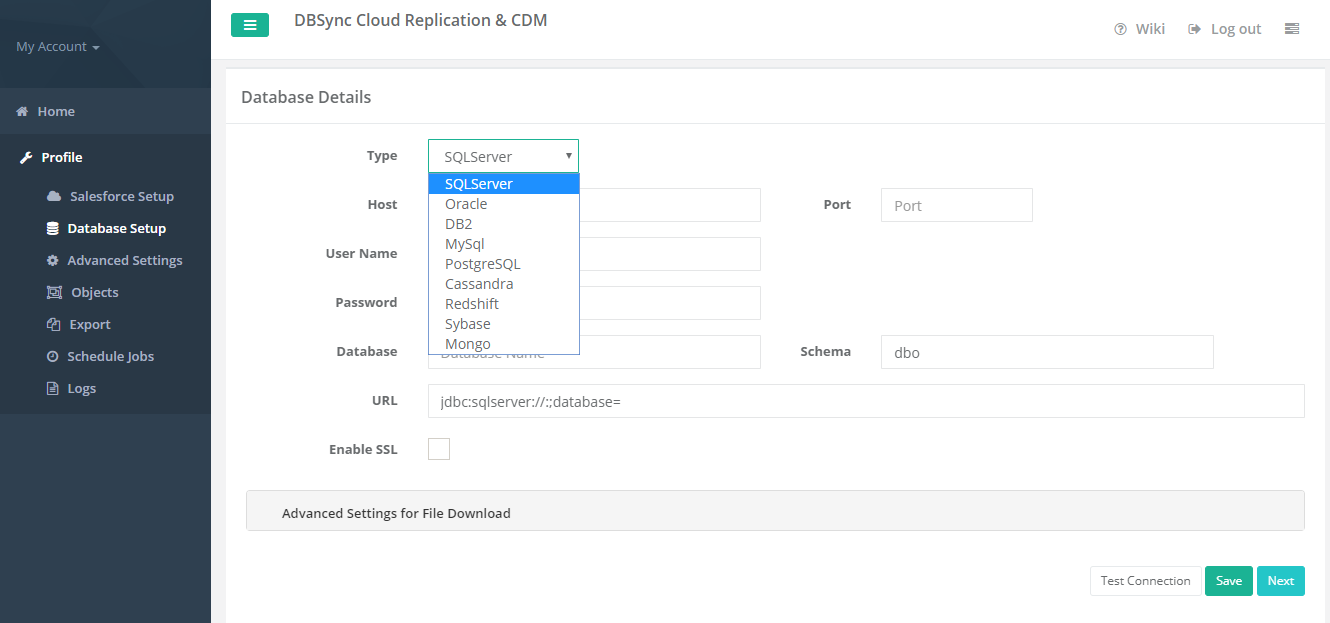
(Note: The The database URL can also can also be entered manually if you know your database Connection database Connection string.) - To start with database credentials user has to entered all the configuration details like host, port, username, password, database name and schema.
- To start with Database database credentials user has to entered all the configuration details like Host host, Portport, Usernameusername, Passwordpassword, Database Name database name and Schemaschema.
- Once, all the details enter by the user then URL details will get autofilled. (Note: The database URL can also be entered manually if you know your database Connection string.)
- Click on Test test Connection button to validate your Source Application source application login details.
- Click on Save save button to save your Source Apps source apps login details.
- Once completed, click on Nextnext button to proceed to advanced settings Advanced Settings tab to write the email Id to get the Notificationsthe notifications.
Note Note:
- While replicating with Cassandra, please refer the following wiki link for specific details on Replication with Cassandra.
- http://help.mydbsync.com/docs/display/CloudReplication/3+-+Big+Data+Support
While replicating with Amazon Redshift database, please refer the following wiki link for specific details on Replication with Amazon Redshift.
http://help.mydbsync.com/docs/display/CloudReplication/Amazon+Redshift
Advanced
...
settings tab
...
details
Start with Advanced Settings tab, to fill all the necessary details and follow the same procedure for testing and validating Advanced settings credentials.
...
- Click to "Advanced" Settings tab on the left hand corner in the Profiles section of DBSync Replication Portal.
- Mark the checkbox to "Enable Database logging" to create auto created table in the database.
- Next, Mark the checkbox of "Email only on Error" to get an email message when error will occur.
- Enter an email for "Email Recipient" to get the notification when any run command is executed.
- Click on Save button to save your Advanced settings details.
- Once the process is completed then click on Save & Next buttons to proceed further.
Figure:8

Source
...
application objects tab
Start with Source Application Objects tab, to get synced all the objects when user will get connected to different source applications like Salesforce/Microsoft CRM.
...
Overview
Content Tools