2022
Page History
This setup document is very handy for Developers and Partners Partners
Problem Statement:
While developing a widely used integration template, we often run into user specific customizationcustomizations. This leads to having the developer create templates for very tasks in which customization's every task in which customizations are made as per end user requirements. This makes the process every very lengthy and tedious. Motive
Motive:
This feature of Setup Wizard will enable developers to integrate with a few pre-built templates to answer a few questions/queries and also set up a form like feature which the end user is accustomed to using in respective connectors. This is a one -time configuration and hence once configured , the end user can easily get started, schedule it and forget it.
With the help of Custom Variable creation, the end-user can now answer a few Custom questions and run the workflow as they desire. This automated process is one of a kind making the job easier for Developers and end-users making the system user friendly.
Hence there are 2 views to this Advance Setup Wizard,
1. the PDL developer configuration Setup Wizard - designing Canvas.
2. Client view - Setup Form with dropdowns, which they can select and forget.
Aim:
PDL developer view :
To understand how to create a Custom Question Form design with Custom Variables using the Canvas , let's consider an example
Need a custom variable, 'to Create Job or not' ,
Under Opportunity of Salesforce developer instance with Invoice creation of QuickBooks sandbox. (online integration). Steps:
Solution :
DBSync Setup wizard is a new feature for automating the mapping process in DBSync Cloud Workflow. It enables the user to define predetermined templates for all their mappings and can enable this Setup Wizard for any workflow process.
Follow the steps:
Once a customer raises a query, the PDL team needs to create the mapping for that process.
Steps:
Login into your DBSynccloud workflow instance
.- Under Template Library > Using the link below, choose Salesforce & QuickBooks Online Bidirectional
https://staging.mydbsync.com/appcenter/wapi/30/ext/controller.pdl.PDLController/sys_adapter_list?adapterId=salesforce_quickbooks_online
On click of ![]() button, entire Workspace step up can be achieved by just a few clicks.
button, entire Workspace step up can be achieved by just a few clicks.
(Or)
The Step-by-Step process to create the Workspace is as follows:
Step 1: Adding Required Connectors
- Under the left Navigation, Click on Connectors tab.
- In the connectors module click on
 button, a pop opens up, where connector name and connector type are added.
 - In case of our example, we require 2 Connectors - Salesforce and QuickBooks:
1.Connecting Salesforce
Step 1 : Post entering connector name and connector type as shown in the image below , click ![]() button.
button.
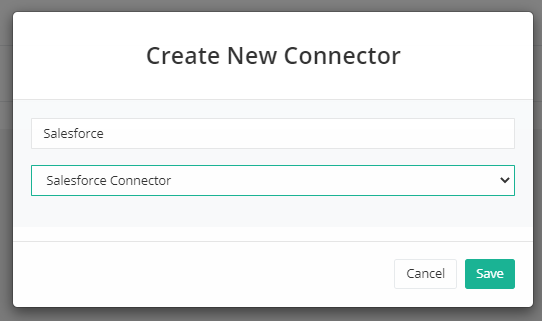
This will Open to a new Tab, where the Salesforce instance connection will be established by adding your Salesforce Credentials.
2. Connecting QuickBooks
Post entering connector name and connector type as shown in the image below , click ![]() button.
button.
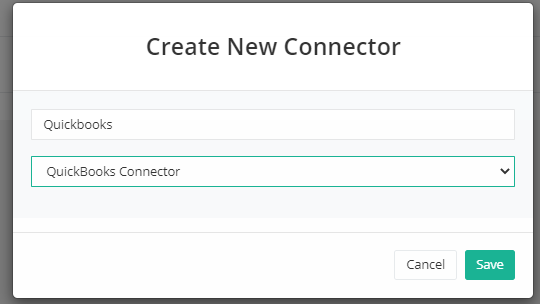
This will Open to a new Tab, where the Quickbooks instance connection will be established by adding your QuickBooks Credentials.
Once the Connectors configuration setup is ready, let's start by creating a new Project by clicking on the Left Navigation > Projects tab.
It's always a good practice to start from creating a new project for new tasks, this way the exercise seems to be more effective.
...
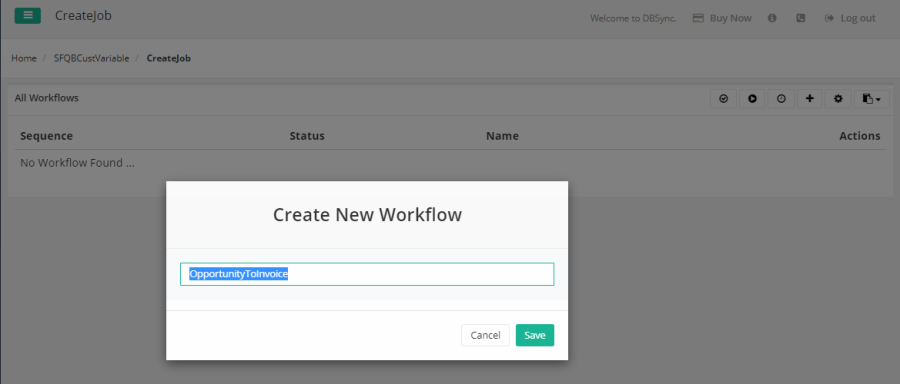
Step 3: Creating a New Process
Project 'SFQBCustVariable' > create a new Process – Createjob
Step 4: Creating a New Workflow
Process 'Createjob' > New Workflow is named 'OpportunityToInvoice' .
Defining a Custom Question and assigning a Variable to it.
The developer needs to create a custom variable by defining the ID, to tag along with the custom question which the user is expected to ask. With the help of this variable, the user (please view step 7), can now respond to the question and the expected result can be viewed in the respective instance immediately, by just 1 click.
In the Trigger Screen , At the top Navigation , click on ![]() to find the 'User Input form', where the custom task and the variable can be created.
to find the 'User Input form', where the custom task and the variable can be created.

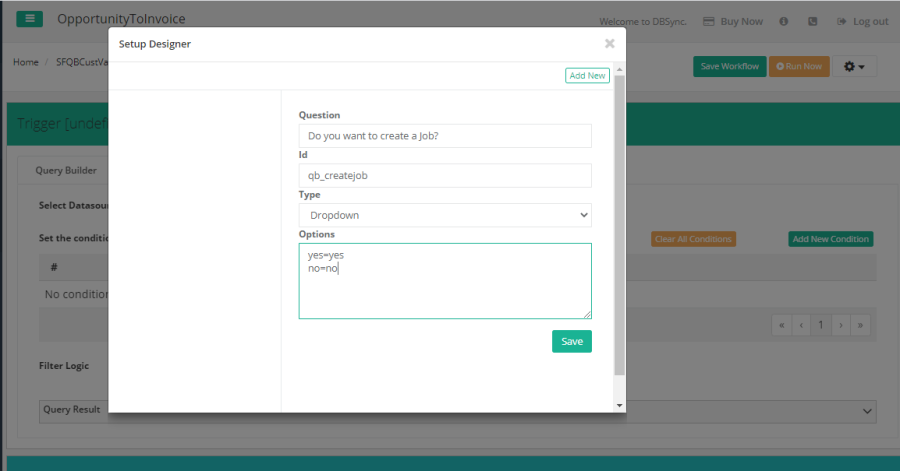
- On Click of User Input Form , pop up stating 'Setup Designer' opens up with
 button in it.
 - Click on Add new and fill in the details as per the requirement. In the below image, you can find an example of how it can be done.
Please note, the ID field is case sensitive.
- Post adding the details, click on
 button.
 - And in the Workflow screen > click on
 .
.
...
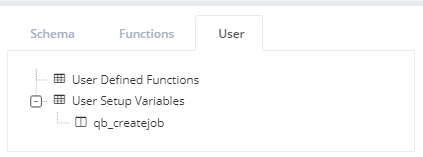
How to Access Custom Variables?
Also, the created ID - qb_createjob can be found on the right section, under User tab of the mapping screen as shown below,
Mapping Setup
Workflow 'OpportunityToInvoice', Edit the workflow > Trigger Setup
Here it is necessary to ensure the Connectors and the Rules are configured. Example instance is shown below,
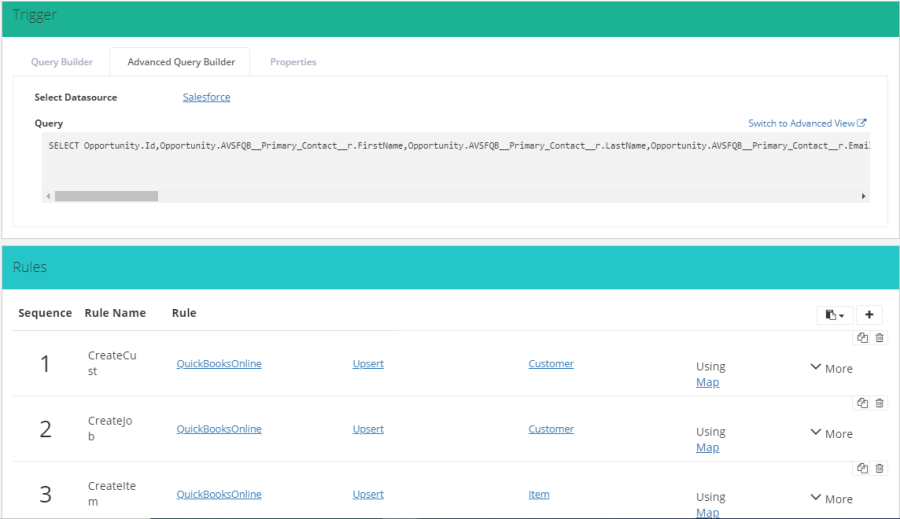
Please note, in this example, Rules > Mapping Screen has to be altered. Fields inside the mapping have to be based on the requisite.
In our Example instance, Under Rules section > 2 Createjob - Click Map 
Since the task is to Create a job or not as per user input, please note, custom variables can be accessed same as Source Schema variables, by using drag and drop feature or by double-clicking on a custom variable. Post addition of custom variables, the developer can make necessary changes in the mapping using this field as per expected output.
In our example instance, the following fields were altered in the Mapping Screen,
![]()

...
The setup Wizard
- Go back to the Workflow page (1 level back), where a new
 button will be created.
 - On click of the Setup button, a popup window with all the Custom questions that were set in the previous step will show up. Example of the same is depicted in the image below.

- Use the Setup button to choose the required action and click on
 button and then click
  .
. - And
 'Run' the Workflow.
Outcome of the Process
When the end-user uses these custom questions to perform a certain action, the outcome can be viewed in respective instances. Here we can view the result in QuickBooks instance. Under the Wizard, the outcome of the example custom question created with the help of a custom variable can be viewed below under Case 1 and Case 2.
Case 1: Let's consider that we choose 'Yes' to Create a Job in the Setup pop-up.
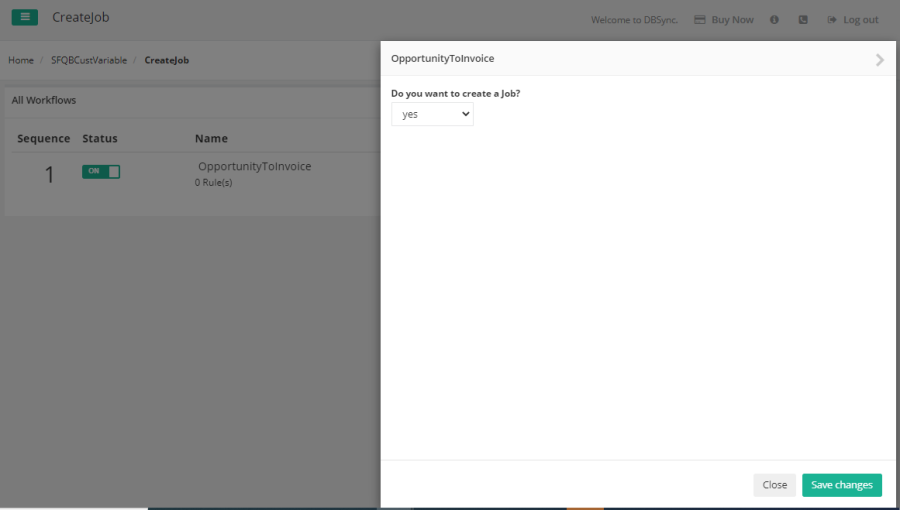
Post Saving the changes and Running the Workflow, the Output of this process in QuickBooks would be - Invoice will be created under Opportunity.
...
From the left navigation toolbar select template library

A list of pre-built templates will appear on the screen

Select the appropriate PDL from the list for which the mapping needs to be done
For instance: Salesforce to quickbooks bidirectional option(for this case)
A list of connectors will appear on the screen. Select the appropriate connector.
For instance: Salesforce connector.

Connector Settings:
You need to connect to salesforce and establish a connection to the account.
Click the Connect to Salesforce option

A pop-up window will appear asking to login to salesforce account.
Login with appropriate credentials
Once connection is established a pop-up screen will appear confirming the connection

Click on Projects from the left navigation toolbar

Fig 3 : Left Navigation Toolbar
Click on the
Pencil icon to edit a particular process
(For Instance: SalesforceQuickbookBidirectional)

Fig 4: List of processes
Click the
(For Instance: SFQB_Opportunitytoinvoice)

Fig 5: Process detail
All the workflows under this process is listed.
Click the
(For Instance: OpportunityToinvoice)

In the trigger screen, Click the
setting icon at the extreme right of the screen.
From the drop-down menu select User Input Form

A pop-window displaying a space to create custom tasks and variables is seen on the screen.
Let’s 1st start by understanding the Query and the ID’s that needs to be created for building out the form ,
SELECT Opportunity.Id,Opportunity.AVSFQB__Primary_Contact__r.FirstName,Opportunity.AVSFQB__Primary_Contact__r.LastName,Opportunity.AVSFQB__Primary_Contact__r.Email,Opportunity.AVSFQB__Quickbooks_Id__c,Opportunity.AccountId,LastModifiedDate,Opportunity.Account.Id,Opportunity.Account.Name,Opportunity.Account.BillingStreet,Opportunity.Account.BillingCity,Opportunity.Account.BillingState,Opportunity.Account.BillingPostalCode,Opportunity.Account.BillingCountry,Opportunity.Account.ShippingStreet,Opportunity.Account.ShippingCity,Opportunity.Account.ShippingState,Opportunity.Account.ShippingPostalCode,Opportunity.Account.ShippingCountry,Opportunity.Account.Fax,Opportunity.Account.Phone,Name,Description,CloseDate ,
(SELECTQuantity,TotalPrice,UnitPrice,Description,Opportunity.owner.FirstName,Opportunity.owner.LastName,Opportunity.Id,Opportunity.CloseDate,PricebookEntry.Name
,PricebookEntry.Product2.ProductCode,PricebookEntry.Product2.Name,PricebookEntry.Product2.Description,PricebookEntry.Product2.Id,PricebookEntry.UnitPrice,PricebookEntry.Product2.AVSFQB__QuickBooks_ItemType__c FROM OpportunityLineItems) ,Opportunity.Account.AVSFQB__Quickbooks_Id__c,Opportunity.AVSFQB__Generate_Object__c FROM Opportunity where Opportunity.AVSFQB__Generate_Object__c = 'Invoice' and Opportunity.Id='$profile.Salesforce.Id'
Breaking down the query into
Source Object – Opportunity
Lookup Object - Account
Opportunity Fields
Account Fields
Inner Query – OpportunityLineItem
OpportunityLineItem fields
Steps:
In this use case we are describing performing the mapping function for automating the functionality of OPPORTUNITY TO INVOICE and providing a pre-built template for the customers to use.
Follow the steps to execute the same:
Log in to Dbsync account
Click on Projects in the left navigation toolbar
Click the Edit icon next to Setup Wizard Training 2 Project

Choose the option Opportunity to invoice

Click the Edit icon next to Opportunity to invoice

Click User Input form under setting tab to create the template
Breaking down the query into
Source Object – Opportunity
Lookup Object - Account
Opportunity Fields
Account Fields
Inner Query – OpportunityLineItem
OpportunityLineItem fields
Steps for Breaking down query:
The below is a screen shot of the use case mentioned above (pre-built template)


There are 4 main radio buttons that need to be utilized to break this query:
Create a User Defined Variable
In the configuration table enter details:
i) Label : Create Job?

ii) ID: Job_mgmt

iii) Default Value: Yes

iv) User Defined:
Check the radio button next to User defined to select this option
Enter details to create two option in the drop-down menu: YES and NO.
The USer defined option is only used to create YES and NO option configuration

v) Click Save
vi) The variable will appear on the main screen as below:

Include a label as the header : Configuration salesforce
Identify the Source object : Opportunity
In this use case the(refer use case input ) : Opportunity is the source object and Account is the look up object
Opportunity : This source object contains Name , ID, Close Date
To insert a Variable icon and create the source object follow steps:
Drag and drop the Variable icon on to the main screen
Click inside the variable box next to (x)

A configuration screen will appear on the extreme left of the main screen
Enter the label name: select source object
The customer will be choosing the source object from the drop down menu.
In this case source object will be : Opportunity
Provide ID: src_obj
Default Value: Opportunity
Select the Radio button Source Table
Refer below image for the commands:

On main screen the following output is seen:

4) Identify the Lookup object : Account
In this use case the(refer use case input ) : Opportunity and Account are the source objects
To insert a Variable icon and create the lookup object follow steps:
Drag and drop the Variable icon on to the main screen
Click inside the variable box next to (x)
3) A configuration screen will appear on the extreme left of the main screen
4) Enter the label name: select lookup object
5) The customer will be choosing the source object from the drop down menu.
6) In this case source object will be : Account
7) Provide ID: lookup_obj
8) Default Value: Account
9) Select the Radio button Source Table
Refer below image for the commands:

On main screen the following output is seen:

5) Select object for line items (Relatable Table)
In this Use case there are line items which need to be built.
(SELECTQuantity,TotalPrice,UnitPrice,Description,Opportunity.owner.FirstName,Opportunity.owner.LastName,Opportunity.Id,Opportunity.CloseDate,PricebookEntry.Name
,PricebookEntry.Product2.ProductCode,PricebookEntry.Product2.Name,PricebookEntry.Product2.Description,PricebookEntry.Product2.Id,PricebookEntry.UnitPrice,PricebookEntry.Product2.AVSFQB__QuickBooks_ItemType__c FROM OpportunityLineItems)
We are creating an opportunity line item due to the inner query mentioned above. These line items are child-like items which are related to the Main source: Opportunity.
This includes items likeQuantity,TotalPrice,UnitPrice,Description etc
This specific line item is received from Relatable table
To insert Relatable table follow steps:
To insert a Variable icon and create the lookup object follow steps:
Drag and drop the Variable icon on to the main screen
Click inside the variable box next to (x)
3) A configuration screen will appear on the extreme left of the main screen
4) Enter the label name: select object for line items
5) The customer will be choosing the source object from the drop down menu.
6) In this case source object will be : Opportunity
7) Provide ID: lineitem_obj
8) Default Value: OpportunityLineItems
9) Select the Radio button Related Table
Refer below image for the commands:

On main screen the following output is seen:

6) Insert label Configuring lineitem object
Quantity,TotalPrice,UnitPrice,Description etc
7) Create two new source Tables :
Pricebook Entry (Source table)

Main screen will appear like below:

Product 2 (Source table)

Main screen will be seen as below:

7) Opportunity fields
Use Case Name,ID,Description,Close date
These fields do not have any attachments to them. Neither an opportunity nor Account because they are object fields under opportunity.
Create Opportunity Fields:
Enter details as below:
Label: Opportunity ID
ID: Opp_ID
Default value: Id
Select object fields radio button : Select src_obj
Follow commands:


Main Screen View:

Repeat same steps for creating:
2) Opportunity name

Mian Screen looks as below:

3) Opportunity Description


4) Opportunity Close date


8) Create Account Fields:
Enter details as below:
Label: Account Name
ID: acc_name
Default value: Name
Select object fields radio button : Select lookup_obj

We need to insert object fields under Lookup object Account.
Repeat for Account Name, Account ID
9) Create Table
Repeat steps:

10) Customer View:


Other Instruction: (Additional information to create new Setup Wizard)
Follow steps below to create new Setup wizard

There are 3 sections under the set-up designer:
a) Text: to create section headers
b) Variable 
c) Table 
Text Icon:
‘Text’ is used to create Heading for the particular section of the form.
This drag and drop feature generates an editable text field, which the user can place anywhere in the Canvas.The 8 dots next to the
Text Icon shows that this button has a drag and drop feature.
To insert a Text Icon:
Drag and drop the Text icon on to the main screen
An editable text area where a label name can be provided will appear on the screen
Click the
Pencil icon next to Enter label to provide a label name
Click anywhere on the screen to save the label
A pop-up confirming label creation: Label successfully created will appear on the screen
This text icon is used mainly to add the titles for any function.
Add as many labels as required and place them anywhere on the screen
b) Variable Icon:
Variables are used to create dropdowns from which the end-user can select from the form.
This drag and drop feature creates placeholders to generate Variables with Label and Dropdown .The 8 dots shows that this button has a drag and drop feature.
The user can design the drop down features in 4 ways :
i) User Defined
ii) Source Table
iii) Related Table
iv) Object Fields
To insert a Variable icon:
Drag and drop the Text icon on to the main screen
Click inside the variable box next to (x)
A configuration screen will appear on the extreme left of the main screen
Enter the desired Label name for the variable
Provide an ID
Enter a default value for the variable
Choose from the 4 options (User defined, Source table, Related Table or Object Fields)
Click Save

For Instance:
A) To Create User Defined variable:
Drag and drop the variable icon to the main screen
Click inside the variable box next to (x)
In the configuration table enter details:
i) Label : Create Job?
ii) ID: Job_mgmt
iii) Default Value: Yes
iv) User Defined:
Check the radio button next to User defined to select this option
Enter details to create two option in the drop-down menu: YES and NO.
The USer defined option is only used to create YES and NO option configuration
v) Click Save
vi) The variable will appear on the main screen as below:

B) To Create Source Table variable:
Drag and drop the variable icon to the main screen
Click inside the variable box next to (x)
In the configuration table enter details:
i) Label: Select Source Object

ii) ID: src_obj

iii) Default Value : Opportunity

iv) Check the radio button next to Source Tables defined to select this option

v) Click Save
vi) The variable will appear on the main screen as below:


C) To Create Related Table variable:
Drag and drop the variable icon to the main screen
Click inside the variable box next to (x)
In the configuration table enter details:
i) Label: Select Lookup Object

ii) ID: lookup_obj

iii) Default Value: Opportunity

iv) Check the radio button next to Related Tables defined to select this option
v) All the Source tables create will appear as a choice in the drop-down menu
vi) Select the correct Table
vi) This table is related to the source table

vii) Click Save
viii) The variable will appear on the main screen as below:

D) To Create Object Fields Table variable:
i) Label: Opportunity ID

ii) ID: opp_ID

iii) Default Value: Opportunity Name

iv) Check the radio button next to Object Fields to select this option
v) All the Source tables created and Related tabled will appear as a choice in the drop-down menu
vi) Select the correct Table

vii) Click Save
viii) The variable will appear on the main screen as below:

c) Table Creation
Generates a table with one column when placed on the Canvas.
To insert a Table icon:
i) Drag and drop the Text icon on to the main screen
ii) Click inside the variable box next to (x)
iii) A configuration screen will appear on the extreme left of the main screen
iv) Enter the desired Label name for the table
v) Provide an ID
vi) Enter a default value for the table
vii) Click Save
Overview
Content Tools