2022
Page History
...
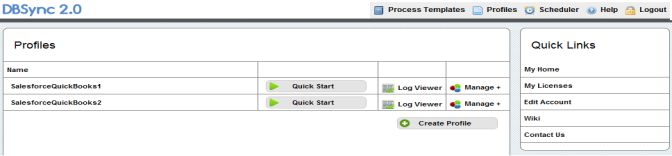
- I have created 2 profiles in DBSync Named
- SalesforceQuickBooks1
- SalesforceQuickBooks2
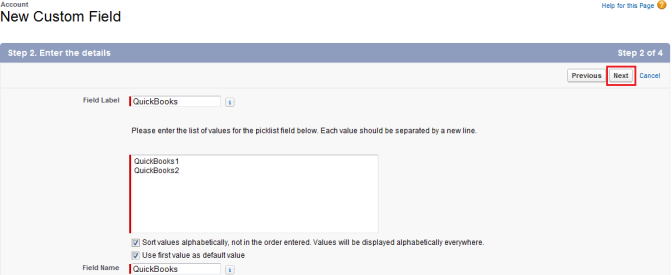
- Go to your Salesforce and Open Setup ? Customize ? Account ? Fields and click on New button in Account Custom Field and Relationships.
...
- Enter the field label, enter list of values for picklist, in this demo I am using 2 values as "QuickBooks1" and "QuickBooks2". Select all the checkboxes check boxes and click on Next.
- In the Next Screen, select the Profiles you want to make field visible and click on Next.
...
- Go to www.mydbsync.com login to your account and Launch DBSync application.

- Click on Manage ? Edit for SalesforceQuickBooks1 profile.
...
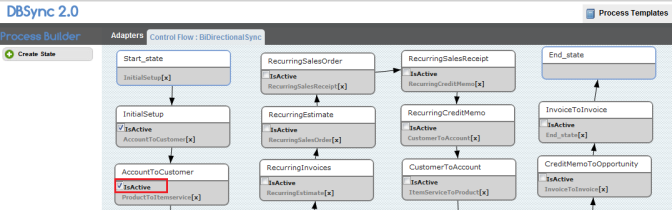
- On AccountToCustomer state, select the IsActive check box and click on Save button to save the states. Double click on the AccountToCustomer State to open it.
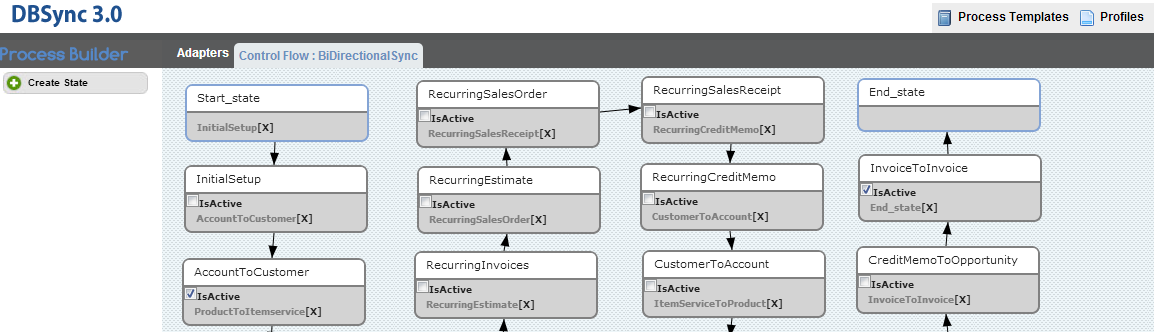
- Right Click ?on Open on the Reader:Account Dataflow to open the properties of the reader. In the query section enter query as select {!.} from Account where AVSFQB_Quickbooks_Idc='' and QuickBooks_c='QuickBooks1' and click on Save.
...
- In the Control Flow window, select the IsActive check box for CustomerToAccount and click on Save button to save the states. Double click on the CustomerToAccount State to open it.
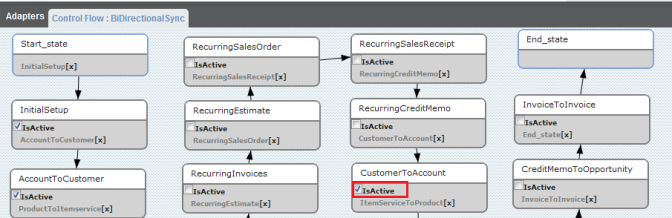
- Right Click?click on Properties on Map: QBToSF with "Sequence Number 1" to open the properties for mapping.
...
- Go back to DBSync console and Right Click?click on Properties on Map:QBToSF with "Sequence Number 2" to open the properties for mapping.
...
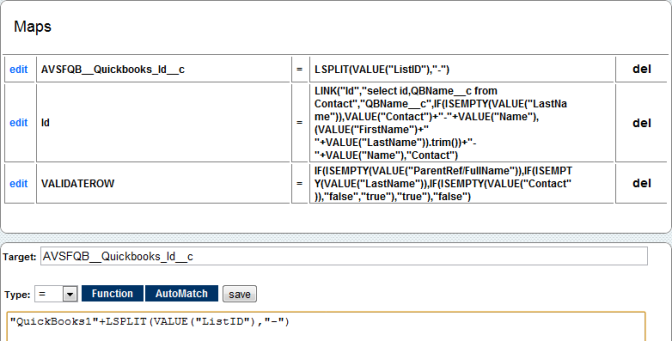
- Go back to DBSync console and Right Click ?on Properties on Map:QBToSF with "Sequence Number 3" to open the properties for mapping.
...
AVSFQB_Quickbooks_id_c = "QuickBooks1"+LSPLIT(VALUE("ListID"),"-")
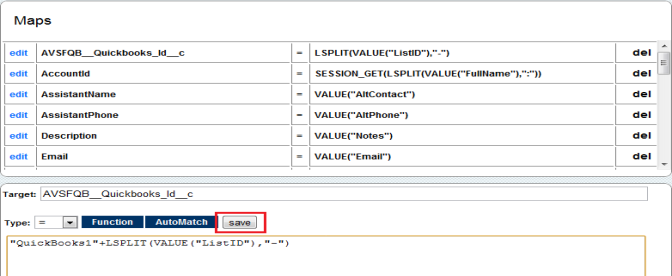
- Go back to DBSync console and Right Click ?on Properties on Map: QBToSF with "Sequence Number 4" to open the properties for mapping by using the Edit Link in properties section.
...
AVSFQB_Quickbooks_id_c = "QuickBooks1"+LSPLIT(VALUE("ListID"),"-")
- Close the mapping window and go back to DBSync console. Click on the profile link on the top right corner of the screen, to move to profiles in the DBSync.
...
- On AccountToCustomer state, select the IsActive check box and click on Save button to save the states. Double click on the AccountToCustomer State to open it.
- Right Click ?on Open on the Reader:Account Dataflow Data flow to open the properties of the reader. In the query section enter query as select {!.} from Account where AVSFQB_Quickbooks_Idc='' and QuickBooks_c='QuickBooks2' and click on Save.
...
- In the Control Flow window, select the IsActive check box for CustomerToAccount and click on Save button to save the states. Double click on the CustomerToAccount State to open it.
- Right Click?click on Properties on Map:QBToSF with "Sequence Number 1" to open the properties for the mapping.
...
Id=select id, name from account where QuickBooks__c='QuickBooks2'

- Go back to DBSync console and *Right Click?Properties* right click on Properties on Map:QBToSF with "Sequence Number 2" to open the properties for the mapping.
...
- Go back to DBSync console and * Right Click ?on Properties * on Map: QBToSF with "Sequence Number 3" to open the properties for mapping.
...
AVSFQB_Quickbooks_id_c ="QuickBooks2"+LSPLIT(VALUE("ListID"),"-")
- Go back to DBSync console and *Right Click?Properties* on Map:QBToSF with "Sequence Number 4" to open the properties for mapping.
...
AVSFQB_Quickbooks_id_c ="QuickBooks2"+LSPLIT(VALUE("ListID"),"-")
- Close the mapping window. Go to QuickBooks Web Connector, enter your DBSync password for both the profiles, select the profiles and click on Update Selected to start the sync.
...
Overview
Content Tools