2022
Page History
...
Overview
...
| Panel |
|---|
Overview: |
DBSync for Salesforce & QuickBooks Desktop Integration is an easy to use application to integrate . It integrates Salesforce Accounts / , Contacts, Products, Opportunity with QuickBooks Customers, Items, Estimate, Sales Order, Invoice , & Sales Receipt & Credit Memo. DBSync is also useful to migrate in migrating historical QuickBooks data into Salesforce or vice versa. DBSync provides Bi-directional sync with pre-built field-to-field map mapping along with flexibility for more complex and dynamic mapping capability. DBSync also has an 's automatic online update , enabling DBSync enables its customers to enjoy all the product updates and features that come with every new release.
| Anchor | ||
|---|---|---|
|
...
|
...
|
| Panel |
|---|
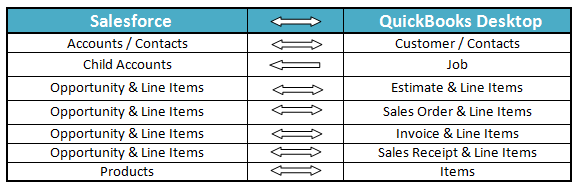
Data Flow |
Data flow of Bi-directional integration between Salesforce & and QuickBooks Desktop is shown in the table below table.
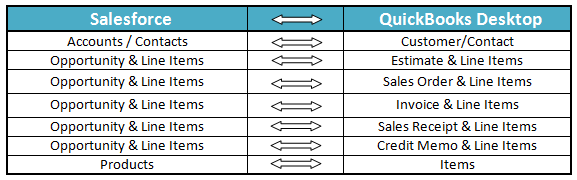 . Bi-directional integration enables inserting a new record as well as updating the existing record in either direction.
| Anchor | ||||
|---|---|---|---|---|
|
| Anchor | ||||
|---|---|---|---|---|
|
| Anchor | ||||
|---|---|---|---|---|
|
| Panel |
|---|
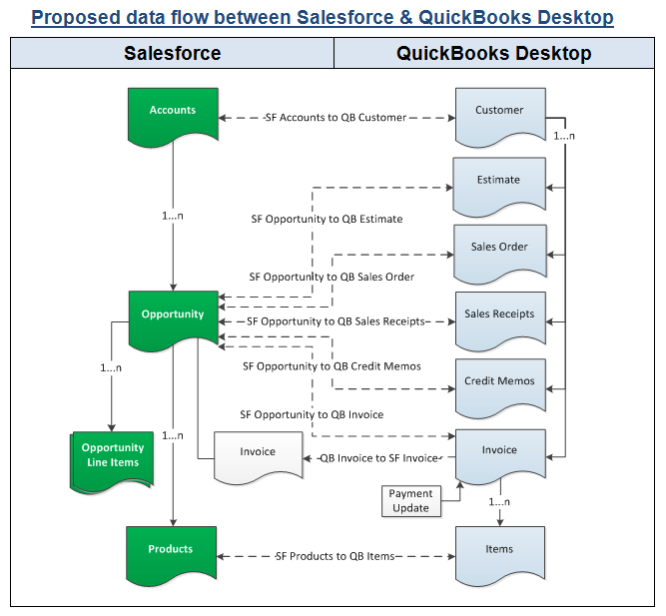
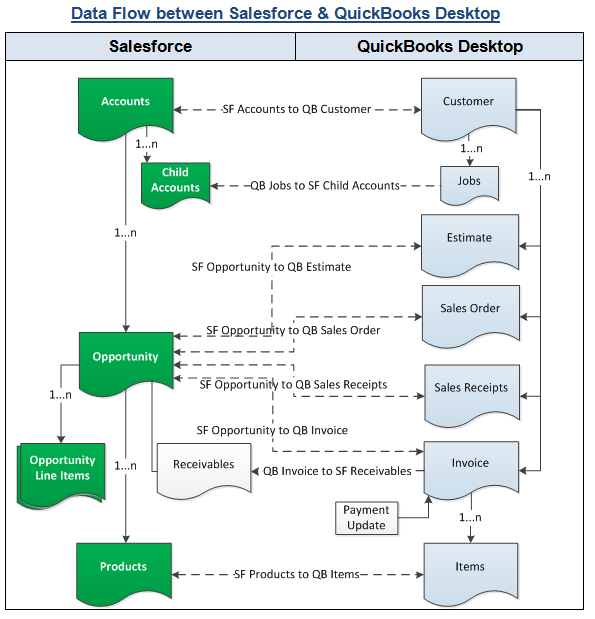
Process Map |
Process Map of Bi-directional integration between Salesforce & QuickBooks Desktop is shown in the image below image.
| Anchor | ||||
|---|---|---|---|---|
|
| Panel |
|---|
Pre-requisites for Integration |
- Integration of Salesforce to QB QuickBooks transaction is invoked provided if the Generate field in Salesforce Opportunity is selected with the required transaction.
- It is mandatory that SF Salesforce Opportunity (to be integrated with QB QuickBooks Invoice) is associated with the respective SF Account & also should Salesforce Account. And, it should also have Products with Standard Price Book attached to it for DBSync to invoke integration.
...
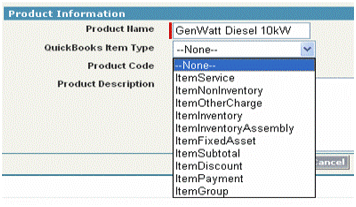
- Furthermore, Products should also have QuickBooks Item Type.
- The detailed functionality and pre-requisites of every state are explained in section Workflows and Functionality.
| Panel |
|---|
DBSync package (QuickBooks Desktop Integration) Installation in Salesforce |
- Get the following App from AppExchange for your Salesforce instance
...
- -
...
...
...
- 04t600000001jlq.
- Note: If you are installing into a Sandbox, you must replace the initial portion of the URL with http://test.salesforce.com.
- Input Username and Password of the Salesforce instance where you want to install DBSync. The Username and Password must belong to a user with administrative privileges to install.
- Next you should see the contents of the package in your Salesforce.com instance. Click on Next and then click on Install and then Click on "Deploy Now" button.
- Go to setup ? Create ? Objects menu to see whether "Invoice" object has "deployed" status. If not, click edit adjacent Invoice object, check on "Deployed", and Save.
- Go to setup ? Customize ? Account ? 'Page Layout' menu to add the "QuickbooksId", "QB Error" field on the page layout. Save the Account 'page layout.'
- Go to setup ? Customize ? Contact ? 'Page Layout' menu to add the "QuickbooksId", "QB Error", "QBName" field on the page layout. Save the Contact 'page layout.'
- Note: This is only used when you use Job in QuickBooks. If you are not using Jobs in QuickBooks, Contacts will not get updated as Contacts/Opportunity map to Jobs in QuickBooks
- Go to setup ? Customize ? Opportunity ? 'Page Layout' menu to move "Generate", "Quickbooks Id" ,"Primary Contact", "QB Error" on the Page Layout.
- In case you are using Professional version then move "Product Name" and "QuickBooks Item Type" to the layout.
- For Professional Version's not having products can use "Product Name" as a single quantity product line item in Invoice, estimate or sales order instead of having Products as in Enterprise edition
- Note: In case your salesforce.com instance uses Record Types, the "Generate" drop down might be disabled. To enable the "Generate" drop down, the page layout needs to have the right permissions setup. Contact your Salesforce.com admin if you need further assistance in enabling the "Generate" button.
- Move Invoices from the Opportunity Related List to the page layout.
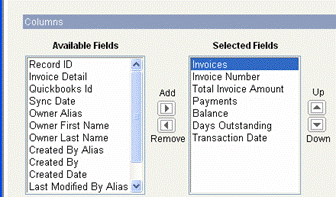
- Click on Invoices in the Related List Section and hit "edit properties" button. Select columns as Invoices, Invoice number, Total Invoice Amount, Payments, Balance, Days Outstanding, and Transaction Date. See the screenshot below for the column sequence and Save the opportunity 'page layout'.
- Go to Setup ? Customize ? Opportunity ? Opportunity Products ? Page Layout ? Edit to move 'QuickBooksID' field to the page layout.
- Go to Setup ? Customize ? Product ? 'Page Layout' to move 'QuickBooks Item type', 'QuickBooks Id', 'COGS', 'QB Error' and 'OnHand' field to the page layout.
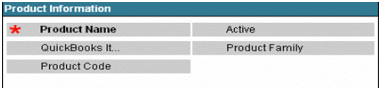
- During the Sync process, Products get automatically created in case DBSync does not find it in QuickBooks.To create the products in the QuickBooks, each product needs to be mapped in an "Item" type. See the picture below:
- Note: Out of the box DBSync supports Products/Items in a flat structure and not in Hierarchy as Products in Salesforce.com is not Hierarchical. Please look at our Knowledge base for steps for handling hierarchies in Items from QuickBooks.
- Go to Setup ? Customize ? Users ? Page Layout ? Edit to move 'QB SalesRep ID' onto the page layout.
- At this point, you have successfully completed your Salesforce.com instance setup.
...
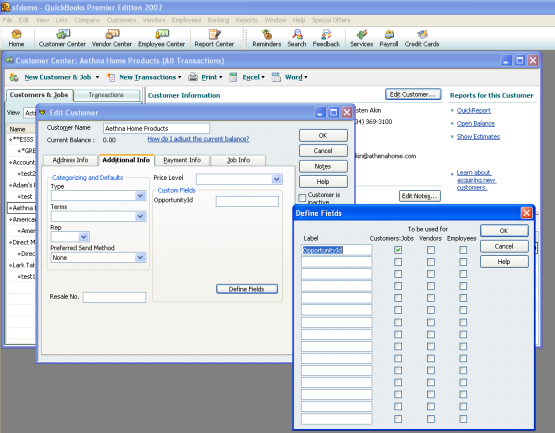
QuickBooks needs to be setup in case you do not want to create Jobs in QuickBooks for every Opportunity in Salesforce.com.
- Open QuickBooks and go to Customer Center.
- Edit or create a new Customer.
- Go to Edit Customer ? Additional Info ? Define Fields and create a new label as – OpportunityId (this is case-sensitive).
...
- You can see details like App Name, Publisher, Version Name, Version Number along with Components & API Access.
- Select a profile - Admin, All Users or a specific profile. The selected profile will have access to the installed package. Then, click install or upgrade.
- Once the installation is complete, you will see a message - Installation or Upgrade complete.
- Assign DBSync Page Layouts to Accounts, Contacts, Opportunity, Opportunity Products and Products objects. Refer to the following steps to assign DBSync Page layout to Accounts Object. Existing Page Layout will be replaced by DBSync Page Layout. Any custom fields available in the existing page layout should be moved to DBSync Page Layout if required.
- Go to Salesforce Setup > Customize > Accounts > Page Layouts. This will show the list of available Page Layouts for Accounts Object. Click on the Page Layout Assignment.
- You will find the list of default Page Layouts assigned for every Salesforce Profile. Click on Edit Assignment to proceed.
- Click on the Page Layout next to the required profile. Account Layout is the existing Page Layout for the System Administrator's profile. The profile should be assigned to DBSync's Page Layout. In this case, Account Layout should be selected next to System Administrator.
- Select DBSync Account Layout from Page Layout To Use picklist. Page Layout will be changed from Account Layout to DBSync's Account Layout. Click on Save to save the new Page Layout assignment.
- Similarly, assign DBSync's Page Layout to follow Salesforce Objects - Contacts, Opportunity, Opportunity Products, and Products.
| Panel |
|---|
DBSync Profile Setup |
- Go to www.mydbsync.com & register for Free Trial.
...
...
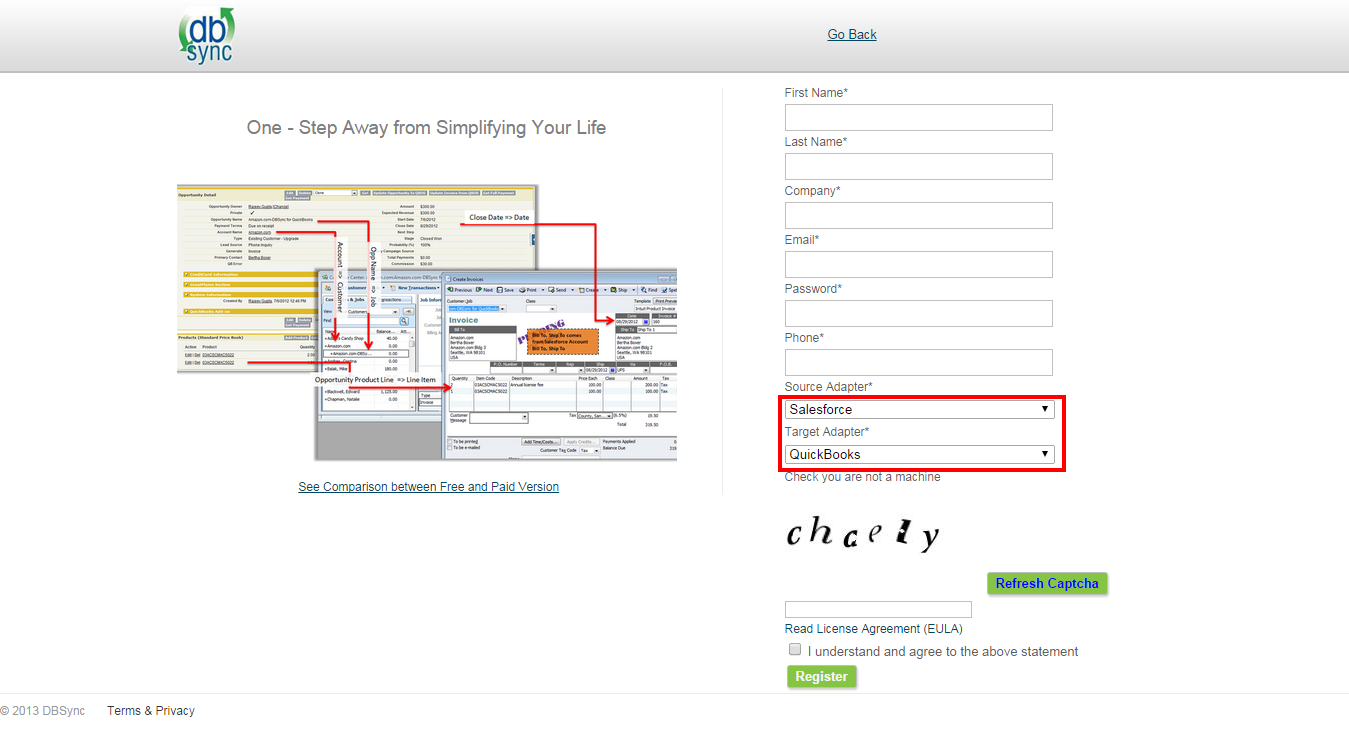
- Ensure that Source & Target Adapters are Salesforce & QuickBooks respectively.
...
- Save Salesforce credentials and QuickBooks location
...
- in your DBSync
...
- 's profile. Then, configure the QuickBooks Web Connector. For details, please click on the following http://
...
...
| Anchor | ||
|---|---|---|
|
...
|
...
|
| Panel |
|---|
Run Integration from QuickBooks Web Connector |
...
- Considered following points carefully before integrating Standard DBSync Salesforce QuickBooks Bi-directional.
- Integration of Salesforce to QuickBooks transaction is invoked
...
- if the Generate field in Salesforce Opportunity is selected with the required transaction.
- It is mandatory that Salesforce Opportunity (to be integrated with QuickBooks
...
- Transaction) is associated with the respective Salesforce Account
...
- , And, it should also
...
- have Products with Standard Price Book attached to the Salesforce Opportunity for DBSync to invoke integration. Furthermore, Products should also have QuickBooks Item Type.
- The Primary Contact updated in Salesforce Opportunity will sync with QuickBooks Contacts.
- QuickBooks to Salesforce Integration works on
...
- timestamp. Any new or modified Customer, Items or transaction in QuickBooks, will be integrated with Salesforce based on the Mapping selection.
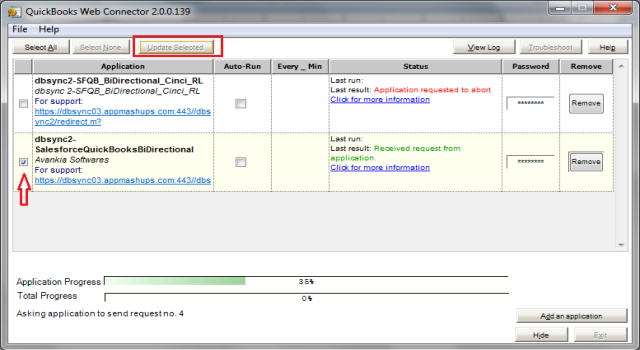
- Once you are done with the mappings, go to your QuickBooks Web Connector
...
- by clicking on Start
...
- > Programs
...
- > QuickBooks
...
- > Web Connector
...
- . Then, click on the
...
- Password text box for profile dbsync2-SalesforceQuickBooksBiDirectional as highlighted below:
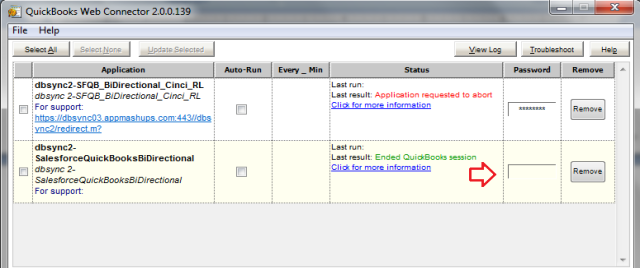
- Enter your DBSync
...
- Password in the
...
- text box and
...
- click Enter on your keyboard.
...
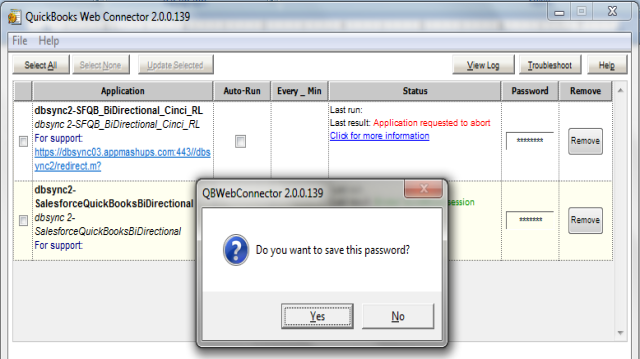
- When asked, "Do you want to save this password"
...
- , click Yes
...
- . DBSync Password will be saved in the
...
- Web Connector.
- Check the DBSync2-SalesforceQuickBooksBiDirectional
...
- checkbox. Click on the Update Selected button
...
- . Sync will start and complete automatically. Auto-Run can also be used in Web Connector to run integration
...
- at regular intervals. For example, if you select a 60 minutes
...
- time interval. After every 60 minutes, the integration will run by itself,
...
- as long as Web Connector is open.
...
- Data for all the mappings will be updated in Salesforce and QuickBooks accordingly.
Overview
Content Tools