2022
Page History
The Map Component
This section provides details as to how to operate the Map component of the application. Follow the instructions and the screen shots provided below.
1. Open an existing process that you have already created (see section 4.2 on how to create a process)
2. Right-click on the created process in the Navigation section of the Process Builder and select 'Open'.
3. Next select the rectangular process in the process map labeled "execute" (this rectangular box is called an "action"), right click on the selected box and click on "open dataflow" in the menu.
4. At this point, a process map with the action "Map" should be visible on the canvas as illustrated in the screen shot below:
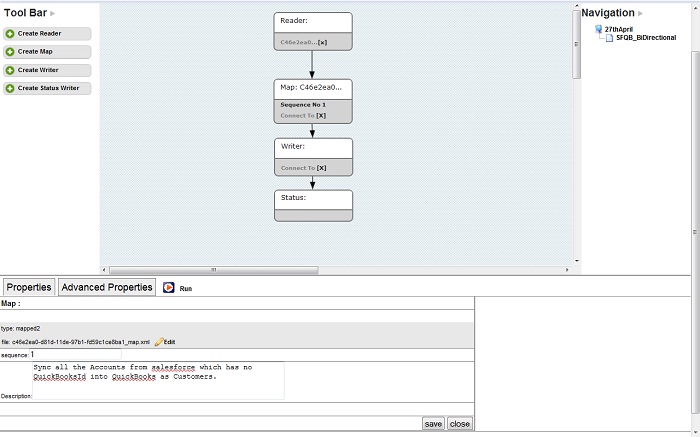
5. Right click on the action "Map" and select "properties"
6. Next you will find that you can edit the map file and sequence in the properties tab.
7. The sequence is useful when you have more than one map in the process so that you can specify as to which map should execute first. The maps execute in the ascending order as specified. As soon as you drag and drop the map on the canvas it asks for a name to be specified for it. Providing the name is necessary for each action.
Note: If the sequence number is not present for the map then please enter it manually if you need to do so.
8. Click Delete to delete the specific Map component.
9. Click Close to close the Map window.
Table of fields for “Add Scheduled Cron” section of the application page:
Field Name | Description | Example |
|---|---|---|
Profile | Select the profile name from the drop down list. | SalesforceDatabaseBiDirectional |
Process | Select the process from the drop down list. |
|
Table of Cron Settings
Field Name | Description | Example |
|---|---|---|
Cron Settings | Allows you to set the profile cron settings in the database. |
|
Seconds | Enter the “seconds” value Note: Allowed Values:0-59 Allowed Special characters: , - * / | 0 |
Minute | Enter the “minute” value Note: Allowed Values:0-59 Allowed Special characters: , - * / | 2 |
Hour | Enter the “hour” value | 1 |
Day of Month | Enter the “day” of month value | 2 |
Month | Enter the “month” value | Nov |
Day of the week | Enter the day of week value | 3 |
A process is a collection of workflows that makes integration work. Any process can be scheduled to run at regular intervals.
The process listing page has download functionality. A user can download a whole set of processes - i.e download project in a zipped format to the local file system.
The below screenshot illustrates a process listing from where a single process can run. DBSync allows processes to run concurrently.

| Panel |
|---|
Create, Update and Delete Process |
To create a new Process- "Create New Process" -
A user can navigate to process listing in two ways - either by clicking on the process name from the menu available in the navigation or by clicking on any particular project.#.
- Enter a preferred name and "Save" to view the process on the listing page.
- "Edit"- To edit/change the process name.
- "Delete"- To Delete the process and all of its components from the system. Once deleted, a user will not be able to recover process, or any of its components, from the system.
- "Download"- Download the process in a zipped format in the Downloads folder of the local file system.
Overview
Content Tools