2022
Overview
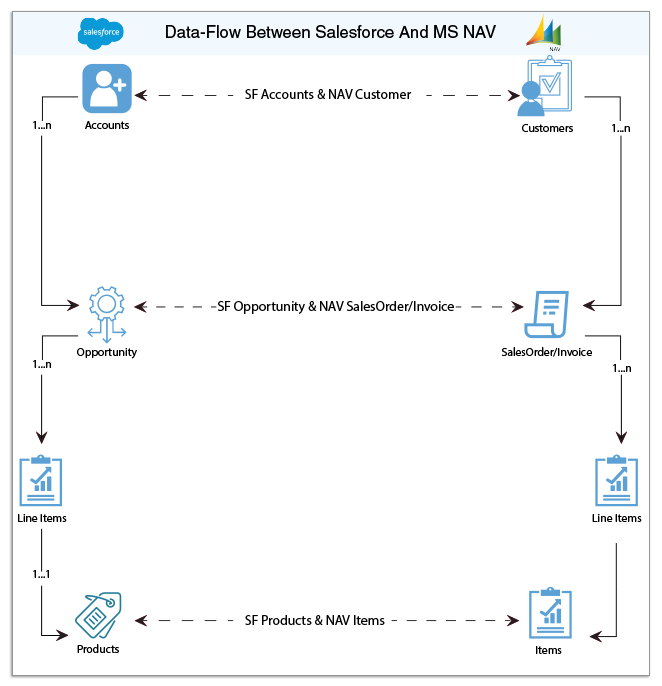
DBSync for Salesforce and Microsoft Dynamics NAV Integration template is easy to use integration solution. It integrates Salesforce Accounts, Products and Opportunity with NAV Customers, Items and Sales orders/Invoices respectively. This solution provides bi-directional sync between Salesforce and MS NAV with the pre-built, field-to-field mappings, along with flexibility for more complex and dynamic mapping capabilities. It is also useful in migrating historical NAV data into Salesforce or vice versa.
Data Flow
The data flow of Bi-directional integration between Salesforce & Microsoft Dynamics NAV is shown in the table below.
Process Map
The process map of bi-directional integration between Salesforce & Microsoft Dynamics NAV is shown in the image below.
Pre-requisites for Integration
To ensure DBSync is accurately configured to integrate data between Salesforce and Microsoft Dynamics NAV instance, the user must meet the following requirements:
- Have a valid license to DBSync NAV connector, Salesforce connector, Username, Password, and Microsoft Dynamics NAV Odata to be enabled to connect to DBSync iPaaS platform.
- Access to Dynamics Nav with valid Username and Password.
- Have login and password of Salesforce, to access their web service.
Related references to learn about Pre-requisites of Salesforce and MS NAV connectors are listed below.
http://help.mydbsync.com/docs/display/dbsync/Microsoft+Dynamics+NAV+Connector
Import Salesforce & MS Dynamics NAV Template
Unregistered user
- Go to www.mydbsync.com from a preferred web browser.
- Click "Start your free trial" on the home page.
- Follow the registration steps by activating your account through the activation link sent to your registered Email ID. Follow the registration steps below.
Registered User
- Go to www.mydbsync.com from a preferred web browser.
- Navigate to the login page through Account section→ Customer login.
- Input your Username and Password to login to your DBSync account.
- Navigate to the Template library menu tab and choose the PDL of Salesforce & Nav bi-direction. Click on "Import To Workspace" to start your integration between the source and target applications respectively.
- Follow the steps in the 'DBSync Configuration of Salesforce & Microsoft Dynamics NAV section, to configure your connectors. This will result in data flow between Salesforce and MS NAV.
DBSync Configuration Of Salesforce & Microsoft Dynamics NAV
- After the successful import of Salesforce & Microsoft Dynamics NAV into your account, a user will be re-directed to the connector listing page.
- You will see MS NAV & Salesforce connectors.
- Click on the Edit of the MS NAV to configure the NAV connector to connect to your NAV instance.
- Nav requires the following parameters to connect to your NAV instance.
- Username: A Username to connect to MS Dynamics NAV instance.
- Password: A Password to connect to the hosted Navision.
- URL: Connection URL for Microsoft NAV.
- Nav requires the following parameters to connect to your NAV instance.
- Click on Save and Validate Connection to save and validate your NAV connector.
- Click Edit on the Salesforce connector to connect to your Salesforce instance.
- Select an End Point you wish to connect to and, under the Quick Setup tab, click on Connect to Salesforce button. This will open up a Salesforce pop up window.
- Username: Input a Username of the Salesforce instance you wish to connect to.
- Password: Input password to connect to your Salesforce instance.
- Select an End Point you wish to connect to and, under the Quick Setup tab, click on Connect to Salesforce button. This will open up a Salesforce pop up window.
- Once you login to Salesforce, your Salesforce connector is connected to your Salesforce instance. If you want to connect using different Salesforce instance, click on Disconnect on the Quick Setup tab. Then, connect using credentials with which you wish to connect with.
- You can also use the Advanced Properties tab to connect to your Salesforce instance. Go to Advanced Properties. Fill in Salesforce Username, Password & Security Token of your Salesforce Instance. Select the appropriate End Point. Once you enter all the required details, click on Validate Connection. If the validation is successful, click on Save to Save the Salesforce details. If the validation fails, you will see Validation Errors on the top right corner. Refer the details in Validation Errors section and make the necessary information in the Advanced Properties, click on Validate Connection again.
- Click on Save and Validate Connection to save and validate your Salesforce connector.
Salesforce To MS NAV Field Mapping
MS NAV To Salesforce Field Mapping
Related References
Related references to learn about Salesforce and MS NAV connectors are listed below.
Microsoft Dynamics NAV Connector

