2022
Overview
DBSync for Microsoft Dynamics 365/CRM Online & Sage Intacct Integration is an easy to use application. It integrates Microsoft Dynamics 365/CRM Online Customer, Order, Invoices, Receivable Payments, Items with Sage Intacct Customers, Contacts, AR Transactions, AR Payments, and Items. DBSync's Sage Intacct connector to integrate any on-premise applications and legacy system. DBSync provides Bi-directional sync with pre-built field-to-field mapping along with flexibility for more complex and dynamic mapping capability. DBSync's automatic online update enables its customers to enjoy all the product updates and features that come with every new release.
Process
Microsoft Dynamics 365/CRM Online to Sage Intacct Bidirectional template provides integration between Sage Intacct and Microsoft Dynamics 365/CRM Online.
The data flow from Microsoft Dynamics 365/CRM Online to Sage Intacct is shown in the table below.
Process Map
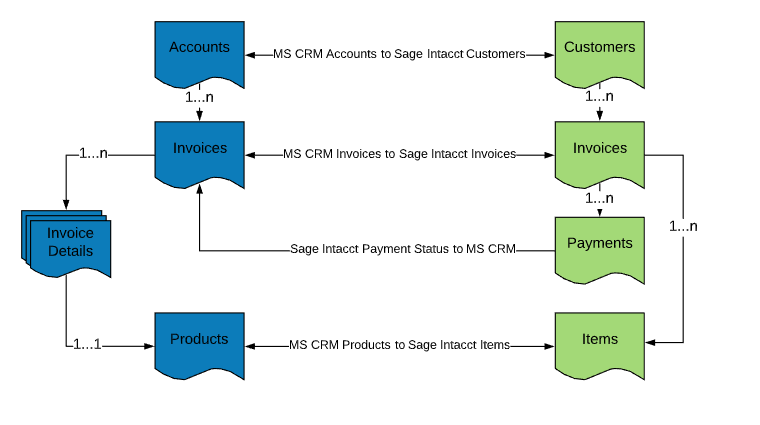
Process Map of Bi-directional integration between Microsoft Dynamics 365/CRM & Sage Intacct is shown in the image below.
Data Flow between Microsoft Dynamics 365/CRM Online & Sage Intacct
Microsoft Dynamics 365/CRM Online Setup
- Download the DBSync Microsoft CRM-Sage Intacct solution package from the following URL
- The downloaded MS CRM-Sage Intacct solution package will be in a.ZIP format.
- Upload the zipped "DBMSQB_X.zip" solution package to your Microsoft CRM Online instance by clicking Settings>Customizations>Solutions>Import.
- Browse for the location on your hard drive where "DBMSQB_X.zip" was downloaded and click on Next.
- Once the Solution Package is uploaded to your MS Dynamics CRM Online instance, you should be able to see the same in the Solutions list as shown below. Click on Publish All Customizations button to commit all the changes done to your MS CRM instance.
- After successfully importing the solution package, you will find a section called "DBSync" within Account, Contact, Opportunity, Invoice and Order objects with the custom fields that are essential for the Integration process.
- *Note: *Out-of-the-box DBSync supports Products/Items in a flat, not hierarchical, structure. This is so because Products in Microsoft CRM do not support a Hierarchical structure. Please look at our Knowledgebase for steps for handling hierarchies in Items from Sage Intacct.
Sage Intacct Setup
- Login into www.mydbsync.com and click on Customer Login.
- Enter your DBSync User Name and Password. Then, click on Login.
- Once logged in, click on the "My Home" tab from the menu and click on the Launch button.
- Click on the Project Microsoft Dynamics 365/CRM Online & Sage Intacct. Then, click on the Connectors button on the left panel.
- You will see connectors Microsoft Dynamics 365/CRM Online & Sage Intacct.
- Click on Sage Intacct Connector. Enter all the required details like Company Id, User Id, Password, Sender Id (default value: avankia), Location Id, Client Id, Control Password, DTD version (default value: 2.1), Host URL (default value: www.Sage Intacct.com).
- Click on Save and Validate button to save and validate your Sage Intacct credentials.
- At this point, you have configured your DBSync profile to connect with your Microsoft Dynamics 365/CRM Online instance and Sage Intacct account.
DBSync Setup
- Login into www.mydbsync.com and click on Customer Login.
- Enter your DBSync User Name and Password and click on Login.
- Once logged in, click on the "My Home" tab from the menu. Then, click on the Launch button.
- Click on the Project Microsoft Dynamics 365/CRM Online & Sage Intacct. Then, click on the Connectors button on the left panel.
- You will see connectors Microsoft Dynamics 365/CRM Online & Sage Intacct.
- Click on MSCRM Connector. Enter your Microsoft CRM username and password. Make sure you modify the "MSCRM Soap URL" according to the domain name provided to you by Microsoft at the time of registration for Microsoft Dynamics 365/CRM Online application. A simple example is: MSCRM Soap URL : https:// (https://%2A%2A/)<<server_name>/XRMServices/2011/Organization.svc.
- In the above example, your server_name should be prefixed in place of the default value.
- If you are using a proxy server, enter the other details Proxy Port URL, Proxy Username, Proxy Password & Domain.
- Scroll down to the bottom of the section and click on the Validate Connection button to validate your Microsoft CRM credentials & click on Save.
Running the Integration:
- Login into www.mydbsync.com and click on Customer Login.
- Enter your DBSync User Name and Password and click on Login.
- Once logged in, click on the "My Home" tab from the menu and click on the Launch button.
- Click on the Project Microsoft Dynamics 365/CRM Online & Sage Intacct.
- Click on the button Run Now to run the integration.
- You can also run the integration by clicking on the Run Now button in the specified process.
- The schedule button can also be used to schedule the integration.
Profile Setup
| Microsoft Dynamics 365/CRM Online | Sage Intacct | ||
Configuration | Instructions | Configuration | Instructions |
Username | <<Username>> | User Id | User ID to connect to Sage Intacct Account |
Password | <<Password>> | Password | The password of the Sage Intacct Account |
MSCRM Soap URL | https://<<server_name>> /XRMServices/2011/Organization.svc | Sender ID | Sender id is your API gateway credentials. Contact support or your account manager at Sage Intacct for more details |
Auth Type | Live ID | Control Password | Application Control / Sender Password is your API gateway credentials. Contact support or your account manager at Sage Intacct for more details |
ProxyHost | If you use a proxy server then, enter the <<proxy ip or host>> | DTD Version | Sage Intacct API DTD Version 2.1 and 3.0 DTD |
ProxyPort | If you use a proxy server then, enter the <<proxy port>> | Host URL | Sage Intacct Gateway Url we default to 'API. Sage Intacct.com' |
ProxyUserName | If you use a proxy server then, enter the <<proxy username>> | ||
ProxyPassword | If you use a proxy server then, ether the <<proxy password>> | ||
