2022
Introduction
DBSync for ServiceMax Salesforce & QuickBooks Desktop is an easy to use application. It integrates ServiceMax Salesforce Accounts, Contacts, Work Orders & Work Details with Customers, Jobs, Invoice & Line Items of QuickBooks Desktop.
DBSync provides pre-built field-to-field mappings along with flexibility for complex and custom mapping capability. DBSync also has an automatic online update. This enables DBSync customers to enjoy all the product updates and features with every new release.
This user guide explains the basics of integration like:
- Data Flow & Process Map
- Salesforce to QuickBooks Desktop Field Mapping
- Steps to get started with DBSync
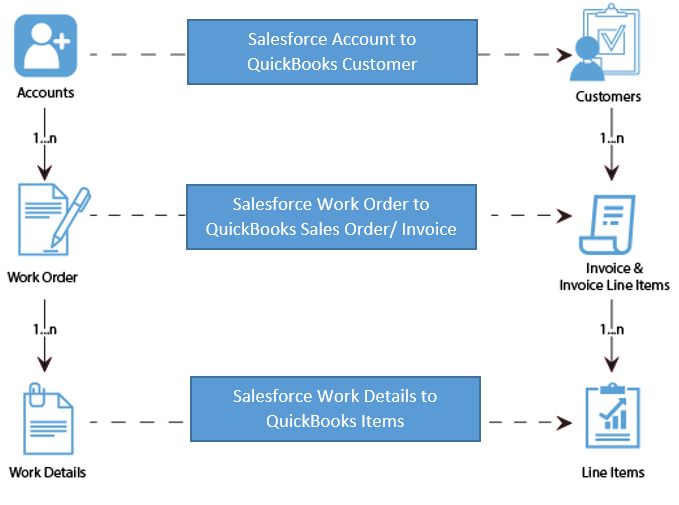
Data Flow & Process Map
ServiceMax Salesforce to QuickBooks Desktop (Unidirectional)
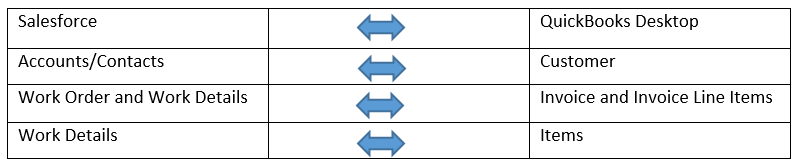
Data Flow between Salesforce and QuickBooks Desktop
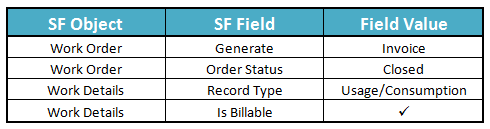
Pre-requisites for Integration
Integration dataflow is ushered when the following Salesforce fields - mentioned in the table - are selected:
It is mandatory that the SF Work Order (to be integrated with QuickBooks Desktop Invoice) is associated with the respective SF Account. And, it should also have work details attached to it for DBSync to invoke integration.
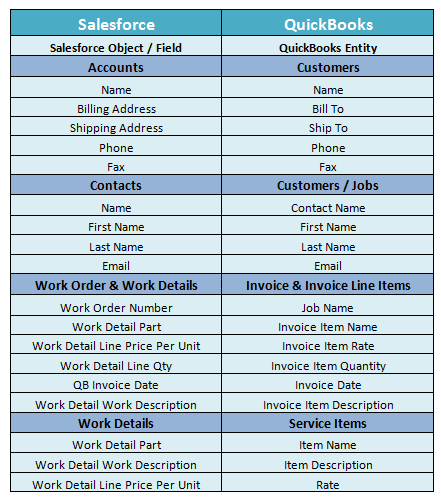
Salesforce to QuickBooks Desktop – Field Mapping
Getting started with DBSync
- To register for a Free Trial of Salesforce & QuickBooks Desktop, go to www.mydbsync.com. Then, click on Register for Free Trial to register for DBSync Account.
- Include ServiceMax Process Template to DBSync Account: Log in to your DBSync Account. Then, go to the process template tab. Next, click on ServiceMaxQuickBooks Desktop: UniDirectional to include the template to your account. Go to My home tab and click on Launch - there, you will find the new ServiceMax process template.
- Install DBSync Package into ServiceMax Salesforce instance: This topic is explained in detail at the end.
- Configure DBSync with QuickBooks Web connector: Steps involved in the configuration are available in the wiki link - http://help2.mydbsync.com/docs1/display/dbsync/Configuring+DBSync+with+Quickbook+WebConnector
- Run Integration using QuickBooks Web Connector. Then, use QuickBooks Web connector to run integration by selecting the right application in Web Connector. Whereas Update Selected helps to initiate the sync manually, Auto-Run is used to schedule integration.
Install DBSync Package into ServiceMax Salesforce instance
DBSync Package ServiceMax Accounting Integration must be installed in ServiceMax Salesforce Instance. Pre-requisites and the steps involved in the installation are explained in this section.
Pre-requisites
Package "ServiceMax", Version 14.10000 or later must be installed in Salesforce Instance to install DBSync Package "ServiceMax Accounting Integration".
Installation Steps
- Click on the following link to install DBSync Package from AppExchange - https://login.salesforce.com/packaging/installPackage.apexp?p0=04ti0000000TUr5
- Enter your Salesforce Username and Password to install DBSync Package in that Salesforce instance. Salesforce instance must have the administrative privileges to install the App.
- DBSync Package Installation Details will be displayed on your Salesforce instance. Click on 'Continue'.
- Approve Package API Access and then click on 'Next'.
- The package is ready to be installed. Click on Install to install the package.
- Once installation completes, a message will be displayed confirming that DBSync Package is installed.
Accounting Id:
Accounting Id is the unique Id for a record in QuickBooks Desktop After successful integration, Accounting Id is updated in Salesforce for every record that has been synced.
Generate:
Generate field is a picklist field to flag Work Order either Invoice or None. By default, the value of Generate field will be blank. It is necessary that Generate field is selected Invoice for successful generation of Invoice in QuickBooks Desktop during DBSync Integration.
Invoice Date:
Invoice Date is a formula field to display the date on which the Work Order is flagged as Invoice to Sync as QuickBooks Desktop Invoice.
Sync Error:
Sync Error is an error from QuickBooks Desktop which gets updated in Salesforce for every record that has failed to sync. Sync Error briefly describes the reason for failure of sync. - Once the DBSync Package ServiceMax Accounting Integration is installed, the following fields should be included in Page Layout as explained below.
- Go to setup > Customize > Account > 'Page Layout' > Edit the Page Layout. On the Page Layout, drag the fields "Accounting Id", "Sync Error" to add it under the section "System Information" on the Page Layout and save.
- Go to setup > Create > Objects > Work Order > Page Layout > Edit the required Page Layout.
- On the Page Layout, create a new section "DBSync Information" and drag the fields "Accounting Id", "Invoice Date", "Generate", "Sync Error" to add it on the Page Layout under "DBSync Information".
- Go to setup > Create > Objects > Work Detail > Page Layout > Edit the required Page Layout.
- On the Page Layout drag the field "LineItem Type" to add it on the Page Layout under "Usage/Consumption Details".
QuickBooks Desktop Setup link: QuickBooks Desktop Connector
Overview
Content Tools