Overview
The Salesforce and QuickBooks is an easy to use integration template for organizations having an integration requirement between Salesforce and QuickBooks. This ready to use solution facilitates the data to flow from Salesforce to QuickBooks desktop or QuickBooks desktop to Salesforce or bi-directional integration is also permitted. Also, This solution is useful in migrating historical desktop QuickBooks data to Salesforce and vice versa.
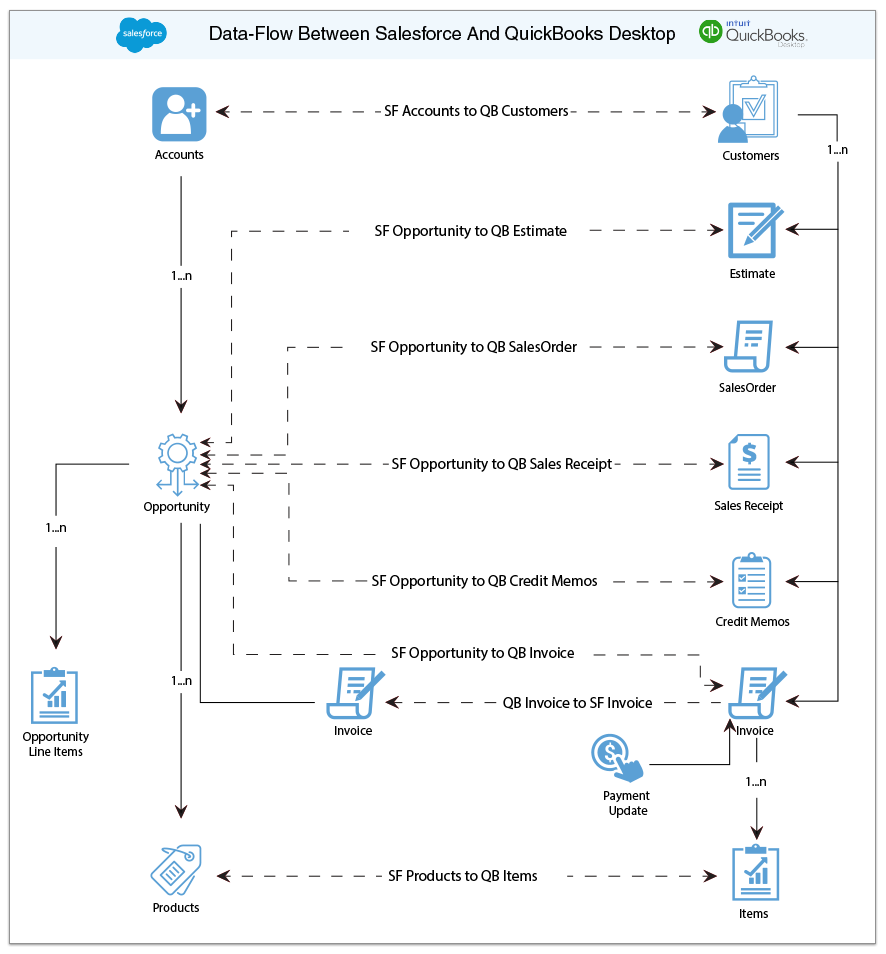
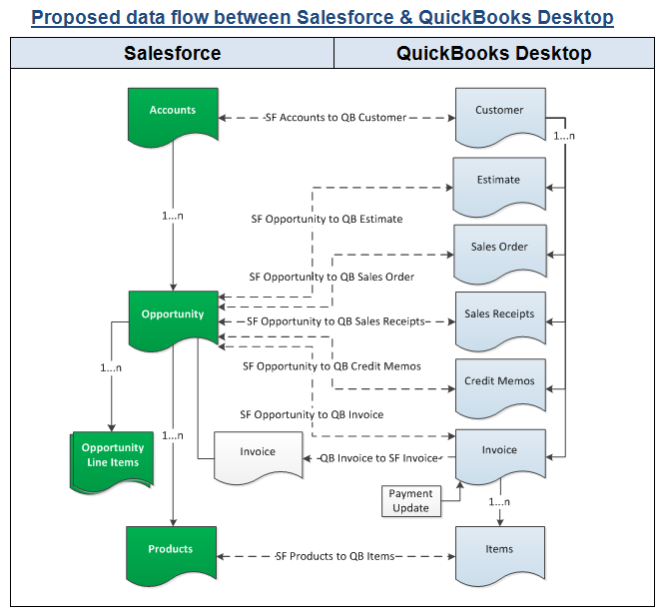
Data-Flow
The data flow illustrates the objects supported by this solution, Additionally with pre-built field to field mappings this solution is highly customizable, providing the flexibility for more complex and dynamic mapping capabilities. This solution can also be extended to support other standard, custom objects for Salesforce and also for the object in QuickBooks for which their APIs are exposed.
Field To Field Mappings
This solution is used to to integrate Salesforce Accounts / Contacts, Products, Opportunity with QuickBooks Customers, Items, Estimate, Sales Order, Invoice, Sales Receipt & Credit Memo. In the following table the field to field mappings of objects that are part of this package are detailed out.
| SALESFORCE | QUICKBOOKS |
|---|---|
| ACCOUNTS | CUSTOMERS |
| Name | Name |
| Billing Address | Bill To |
| Shipping Address | Ship To |
| Phone | Phone |
| Fax | Fax |
| CONTACTS | CUSTOMERS\CONTACTS |
| Name | Contact Name |
| First Name | First Name |
| Last Name | Last Name |
| OPPORTUNITY | TRANSACTION(INVOICES\SALESRECEIPTS\ ESTIMATES\ SALESORDER) |
| Opportunity Name | Job Name |
| OpportunityLineItem Product | Transaction Item Name |
| OpportunityLineItem Unit Price | Transaction Item Rate |
| OpportunityLineItem Quantity | Transaction Item Quantity |
| Close Date | Transaction Created Date |
| PRODUCTS | ITEMS |
| Product Name | Item Name |
| Product Description | Item Description |
| QuickBooks Item Type | Type |
| Standard Price | Rate |
Pre-Requisites For Integration
- The foremost for any integration to work is to setup the relevant connectors, in this solution one should configure Salesforce and QuickBooks connector as soon as the solution is to imported to workspace of DBSync.
- Integration of Salesforce to QuickBooks transactions are invoked by the "Generate" field of Salesforce Opportunity is selected with the required transaction.
Project Setup
For all the customers who wanted to evaluate this solution, you should your email on the DBSync platform by following the below steps
- Type in www.mydbsync.com in your browser address bar.
Note: DBSync recommends use of Mozilla Firefox or Google Chrome as preferred browsers - Click on the button "Start your Free Trial" which will open the registration tab.
- Choose the source and Target connectors respectively as Salesforce and QuickBooks.
- Select from plans that would suite your requirement by proceeding with the registration page.
- Activate your DBSync iPaaS account by clicking on the confirmation link sent to your registered email id.
- Make sure to configure Salesforce, QuickBooks desktop connectors with the instances for which you would like the Salesforce and QuickBooks desktop to be integrated.
- This solution sync can only be triggered through QuickBooks web-connector.
The registered users can login to the DBSync platform with their credentials, Import the solution to your work space, configure connectors and start syncing the data as explained in the latter section.
Running Integration
The Salesforce and QuickBooks integration is invoked through web connector and it should be configured only the server where QuickBooks company file is hosted through your QuickBooks admin account, follow the below steps to configure your web-connector.
- From the QuickBooks connector page, click on "Download web connector" button which will download an "qwc" file in your download folder.
- Double click on the file which will prompt a pop up asking to authorize to add new web service to the web connector, click on "Ok" from the pop up.
- On the QuickBooks application, an application certificate is popped out and on which you should choose the option "Yes,always; allow access even if QuickBooks is not running" and hit "Continue" button.
- Click on "Done" to confirm access, which will add the application to the web-connector and allows the application to access QuickBooks company file.
- Enter the DBSync password against the application "dbsync2-SalesforceQuickBooksBiDirectional" and save it.
- Check the check box against the application and hit the button "Update Selected" to trigger the Sync.
- If you wish to kick start the integration automatically, you should check the "Auto-Run" option and enter the minutes for which you wish the the integration to run periodically.