

Overview
Data Flow
Process Map
Pre-requisites for Integration
DBSync Profile Setup
Run Integration from QuickBooks Web Connector

Standard Integration from DBSync for Salesforce & QuickBooks Desktop is an easy to use application. It integrates Salesforce Accounts/Contacts, Products, Opportunity with QuickBooks Customers, Items, Sales Order & Invoice. DBSync provides sync with pre-built field-to-field mapping along with flexibility for more complex and dynamic mapping capability. DBSync's automatic online update enables its customers to enjoy all the product updates and features that come with every new release.
 Data Flow: Data Flow:
|
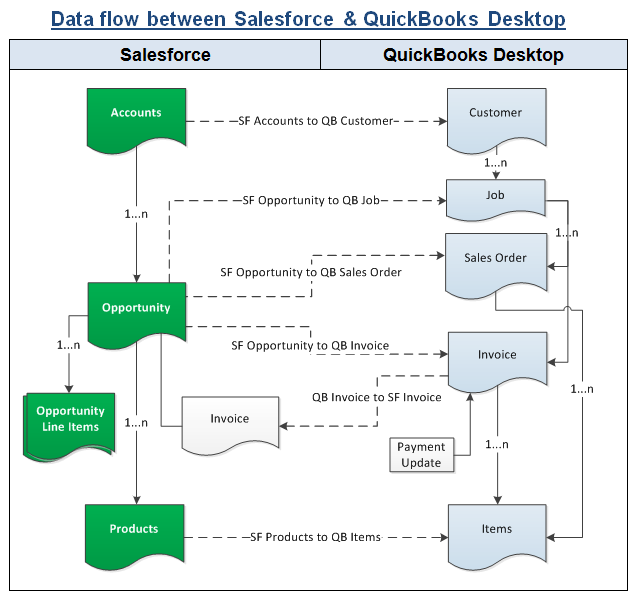
Integration data flow between Salesforce & QuickBooks Desktop is shown in the table below.


Process Map of Standard integration between Salesforce & QuickBooks Desktop is shown in the image below.


Pre-requisites for Integration: |
- Integration of Salesforce to QuickBooks Sales Order is invoked if the Generate field in Salesforce Opportunity is selected as Sales Order.
- Integration of Salesforce to QuickBooks Invoice is invoked if the Generate field in Salesforce Opportunity is selected as Invoice.
- It is mandatory that SF Opportunity (to be integrated with QuickBooks Invoice) is associated with the respective SF Account. It should also have Products with Standard Price Book attached to it for DBSync to invoke integration.
- Salesforce Products should also have QuickBooks Item Type.

DBSync Profile Setup
|
- Go to www.mydbsync.com and register for Free Trial. Ensure that Source and Target Adapters are Salesforce & QuickBooks Desktop respectively. Choose the standard package during registration.
 Run Integration from QuickBooks Web Connector Run Integration from QuickBooks Web Connector
|
- Consider the following points carefully before integrating Standard DBSync Salesforce QuickBooks Bi-directional.
- Integration of Salesforce to QuickBooks transaction is invoked if the Generate field in Salesforce Opportunity is selected with the required transaction.
- It is mandatory that Salesforce Opportunity (to be integrated with QuickBooks Transaction) is associated with the respective Salesforce Account. It should also have Products with Standard Price Book attached to the Salesforce Opportunity for DBSync to invoke integration. Products should also have QuickBooks Item Type.
- The Primary Contact updated in Salesforce Opportunity will sync with QuickBooks Contacts.
- QuickBooks to Salesforce integration works on time stamp. Payment applied on QuickBooks Invoice will be synced with DBSync custom object Invoice. This will be related to the corresponding Salesforce Opportunity.
- Once you setup integration, go to your QuickBooks Web Connector by clicking on Start > Programs > QuickBooks > Web Connector. Then, click on the Password text box for profile DBSync3-CRM_QuickBooks_dt.
- Enter your DBSync Password in the text box and click Enter. A Message Box display will ask "Do you want to save this Password". Select the Yes button. DBSync Password will be saved in the Web Connector.
- Check the DBSync3-CRM_QuickBooks_dt check box and click on Update Selected button. This will start the sync and the process will complete automatically. Auto-Run can also be used in Web Connector to run integration at regular intervals. For example, if you select 60 minutes interval, after every 60 minutes integration will run by itself provided Web Connector is open.

