2022
Page History
| Table of Contents |
|---|
| Panel |
|---|
Overview |
DBSync for Salesforce and Database Integration is an easy to use solution to integrate Salesforce objects like accounts, contacts, products, opportunity & opportunity line items. Salesforce to Database uni-directional Integration solution is also useful to migrate historical Salesforce data into database. DBSync DBSync provides uni-directional sync with pre-built field to field map along with flexibility for more complex and dynamic mapping capabilities. DBSync also has an automatic online update, enabling DBSync customers to enjoy all the product updates and features with every new release.
| Panel |
|---|
Data Flow |
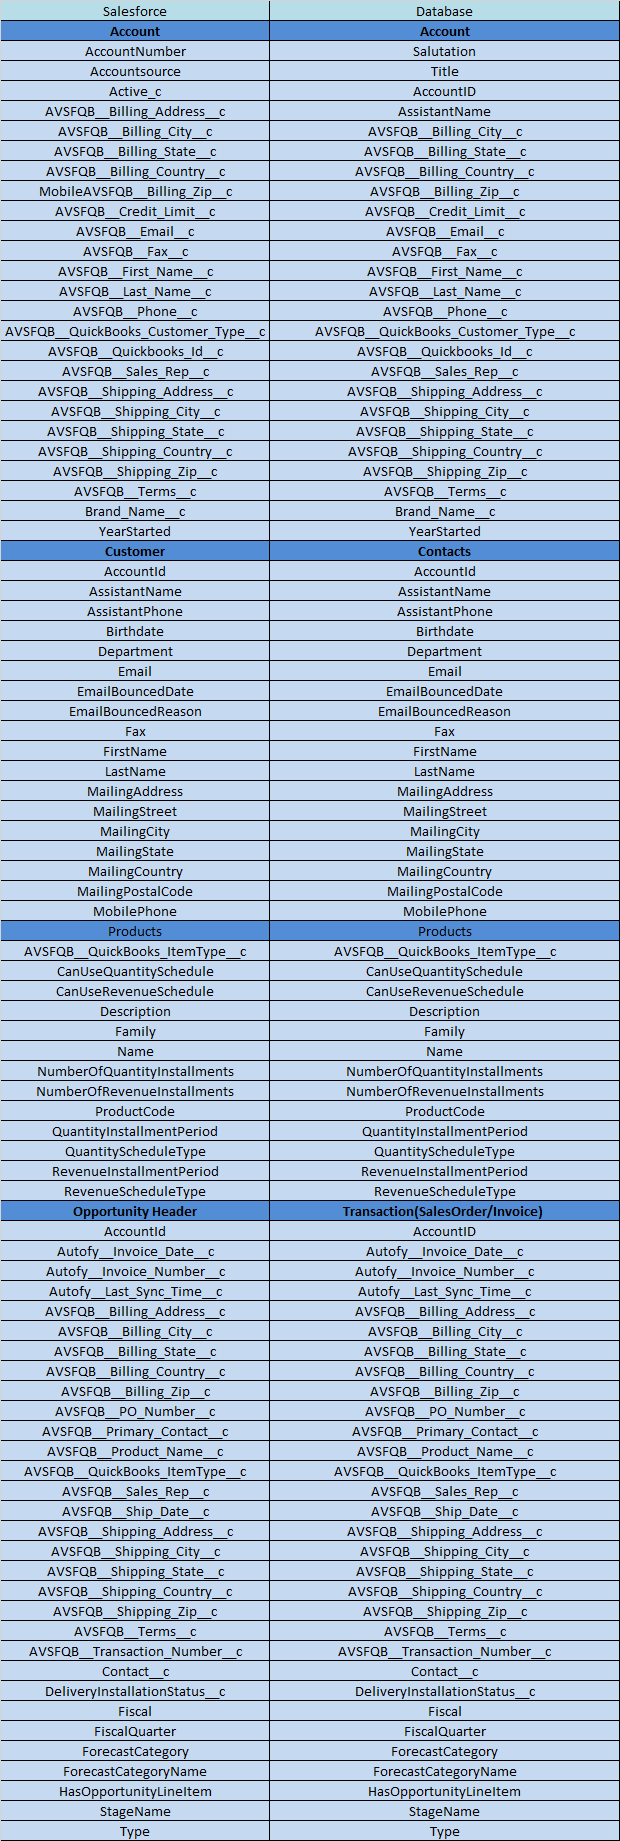
This tutorial serves as an illustration for reading various records from Salesforce and writing to the configured tables of a database. The below table depicts the data flow between various objects of Salesforce objects to the chosen database tables.
| Panel |
|---|
Process Map |
The process map of the uni-directional solution between Salesforce and a and database is as shown in below image.
| Panel |
|---|
Prerequisites For Integration |
The prerequisites for this integration are as follows
- Have a valid license licenses to DBSync Salesforce, Database connector and username, password to connect to with DBSync iPaaS platform.
- Have your both login and password of the Salesforce to access their web service.
- Setup security in Salesforce to connect through external integration.
- Should have a valid database username, password, host/IP address and port on which database is hosted.
The username and password configured for Database connector instance should have sufficient privilege to access the database which is required for integration requirement.
| Panel |
|---|
Configuring Source App |
The below are the steps to get started with your Salesforce instance and to configure the DBSync's Salesforce connector
...
Property | Description | Required |
|---|---|---|
UserName | The username to log into salesforce account. | yes |
Password | The password to login to salesforce account | Yes |
End-point | yes | |
Sid | Session Id | optional |
Transport.compression | For compression | optional |
Proxy Host | If you use a proxy server then put <<proxy ip or host>> | optional |
Proxy Port | If you use a proxy server then put <<proxy port>> | optional |
Proxy Username | If you use a proxy server then put <<proxy username>> | optional |
Proxy Password | If you use a proxy server then put <<proxy password>> | optional |
Accept Gzip | As Applicable | optional |
Send Gzip | As Applicable | optional |
| Panel |
|---|
Configuring Target App |
The below are the steps to get started with a database and to configure the database connector.
...
| Tip |
|---|
For the sake of understanding, I have chosen MySQL database with tables as contacts, customers, items, oppheader, opplineitem in which data from Salesforce is dumped. In case if you do not have existing database in which you wish to dump the data to database, you can use autocreate functionality of database connector which would create the table structure and mapping basing on the source table. |
| Panel |
|---|
DBSync Project Setup |
- Login into www.mydbsync.com and click on Customer Login.
- Enter your DBSync Username and Password and click on Login.
- Once logged in, Click on template library menu from the left side navigation.
- Search for template name Salesforce To Database : uni-directional template and import to your workspace.
- You will be re-directed to connector listing of the Salesforce To Database : uni-directional template
- In the connector listing page, You can see Salesforce and database connector.
- Click on Edit to configure connectors respectively and individual connector configuration are explained in the subsequent sections.
- Now, you can navigate to the process listing page to view the pre-defined mappings .
- The various transformations can be applied to the each field through the mapping section and save the workflow
- Click on the Run now button to initiate the integration of the chosen workflow.
- The sync can be monitored through the log section of the and in the event of the error, you can drill down the each event log to debug and to fix the error at its occurrence.
| Panel |
|---|
Guide Lines For customization And Mapping |
| Panel |
|---|
Run Integrations |
Integration can be run using scheduler or Run Now button. Scheduler job are used to trigger process at scheduled time interval automatically while as manual trigger of the sync can be initiated by hitting the Run Now button from the process listing page / workflow page.
Scheduler
To create a scheduler job , one have to follow the below steps.
- Inside a project, Navigate to the scheduler page from the left side navigation.
- From the Add Schedule schedule section, Create a schedule job by selecting the process from the drop down, start on date , start on time, repeat frequency and save the job.
- If repeat frequency is set to no repeat then scheduled job trigger sync just only once as per scheduled date and time.
- If repeat frequency is set to either minutes, hourly, weekly then the process is scheduled to run at the repeat set frequency.
...
- Hitting the Run Now button from the process listing page.
- Hitting the Run Bow button from workflow listing page.
- By hitting the Run Now button from the Trigger page.
| Panel |
|---|
Related References |
...


