2022
Overview
DBSync for Salesforce and Microsoft Dynamics NAV Integration template is easy to use integration solution to integrate Salesforce accounts, products and opportunity with NAV customers, Items and sales orders/Invoices respectively. This solution provides bi-directional sync between Salesforce and MS NAV with the pre-built field to field mappings along with flexibility for more complex and dynamic mapping capabilities. It is also useful in migrating historical NAV data into Salesforce or vice versa.
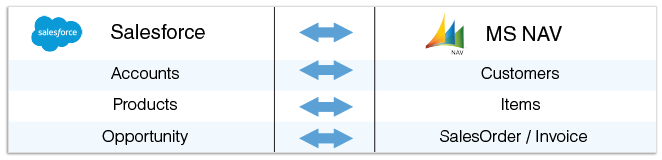
Data Flow
The data flow of Bi-directional integration between Salesforce & Microsoft Dynamics NAV is shown in the below table.
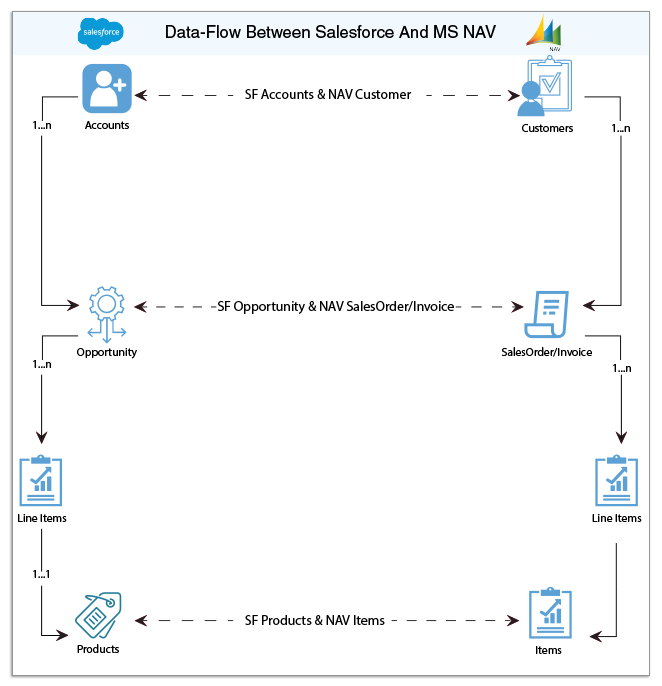
Process Map
The process map of bi-directional integration between Salesforce & Microsoft Dynamics NAV is shown in the below image.
Pre-requisites for Integration
In order to ensure that DBSync is configured to integrate data between Salesforce and Microsoft Dynamics NAV instance, the following should be ensured.
- Have a valid license to DBSync NAV connector, Salesforce connector, username and password to connect to DBSync iPaaS platform.
- Access to Dynamics Nav with valid username and password
- Have your both login and password of the Salesforce to access their web service
Import Salesforce & MS Dynamics NAV Template
Unregistered user
- Go to www.mydbsync.com using any of the web browsers
- Hit on "Start your free trial" of the home page
- choose source and target connectors as Salesforce and Dynamics NAV respectively.
- Follow the registration steps by activating your account through activation link sent to your registered email id.
- Navigate to Template library menu tab and choose the template of Salesforce & Nav bi-direction, click on "Import To Workspace" to start your integration between the source and target applications respectively.
Registered User
- Go to www.mydbsync.com using any of the web browsers.
- Navigate to the login page through Account section→ Customer login.
- Input your username and password to login to your DBSync account.
- Navigate to Template library menu tab and choose the template of Salesforce & Nav bi-direction, click on "Import To Workspace" to start your integration between the source and target applications respectively.
- Now follow the steps in the latter section to configure your connectors to experience the data flow between applications.
DBSync Installation
It is necessary that on-premise version of DBSync is used for Salesforce and Microsoft Dynamics GP Integration. In order to use DBSync On Premise, DBSync should be installed locally and DBSync Account should be switched to On Premise from On Demand.
The process of installing DBSync is explained in the below link.
http://help2.mydbsync.com/docs1/display/dbsync/DBSync+On-Premise+Installation
The process of switching DBSync Account from On Demand to On Premise is explained in the below link
http://help2.mydbsync.com/docs1/display/dbsync/DBSync+On+Demand+to+On+Premise
DBSync Configuration with Salesforce & Microsoft Dynamics GP
- Login into www.mydbsync.com with your Username & Password.
- Once logged in, click on My Home from the menu and click on the Launch button.
- Once launched, you will be redirected to DBSync Project page in the next tab.
- Click on the project SalesforceGreatPlains: BiDirectional and then click on Connectors on the left panel.
- You will see Salesforce & GreatPlains Connectors.
- Click on GreatPlains Connector and enter the details as mentioned below.
- For GreatPlains
- eConnectPort : 18888
- Datasource : DESKTOPUSERNAME\MSSQLSERVER
- Database name : <<GreatPlains Company Database name >>
- For GreatPlains
- Click on Save and Validate Connection to save and validate your GreatPlains adapter.
- Click on Salesforce Connector select the appropriate End Point under Quick Setup tab. Click on Connect to Salesforce. This will take you to Salesforce login page. Enter your username & password to login to Salesforce. Once you login to Salesforce, your Salesforce connector is connected to your Salesforce instance. If you want to connect using different Salesforce instance, click on Disconnect in Quick Setup tab. Then, connect using the required Salesforce credentials.
- You can also use Advanced Properties tab to connect to your Salesforce instance. Go to Advanced Properties, fill in the Salesforce Username, Password & Security Token for your Salesforce Instance. Select the appropriate End Point. Once you enter all the required details, click on Validate Connection. If the validation is successful, click on Save to Save the Salesforce details. If the validation fails, you will see Validation Errors on the top right corner. Refer the details in Validation Errors section and make the necessary changes in Advanced Properties and click on Validate Connection again.
Running the integration
DBSync integration for Salesforce & Microsoft Dynamics GP can be run automatically using Scheduler or manually using the Run Button.
The detailed process of using Scheduler to run the integration is shown in the below wiki link.
http://help2.mydbsync.com/docs1/display/dbsync/Scheduler
Using the Run button to run the integration manually is explained below.
- Login into www.mydbsync.com with your Username & Password.
- Once logged in, click on My Home from the menu and click on the Launch button.
- Once launched, you will be redirected to DBSync Project page in the next tab.
- Click on the project SalesforceGreatPlains: BiDirectional and then click on Connectors on the left panel.
- Upon successful validation of your connectors, you can click on Processes on the side panel. Click on the Run Now button available there.
Overview
Content Tools