2022
For activating notifications through Weebhooks on the team follow the following steps
- Login to your teams
- Go to the apps section and search for Weebhooks

- Select Incoming Webhooks
- Select the team or channel where you want to get the notifications

- To set an incoming webhook Provide a name and click create

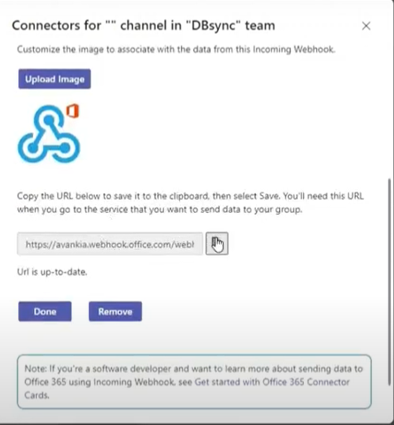
- Copy the URL to save it on the clipboard as this URL will be required to be pasted in the Notification section on the DBSync Notification page
Once Teams setup is completed go to the DBSync Notification Page
- Select 'Webhooks' as the channel type and the settings will appear on the screen as seen in the below image
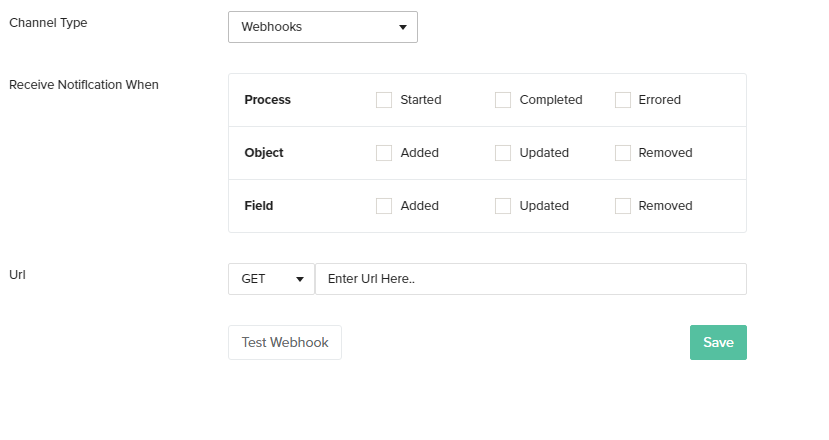
- Select 'Webhooks' as the channel type and the settings will appear on the screen as seen in the below image
Configure Webhooks Notifications Settings
- Receive Notifications
Click the checkbox next to the desired event options. There are 3 main event options that can be configured are shown in the image below:
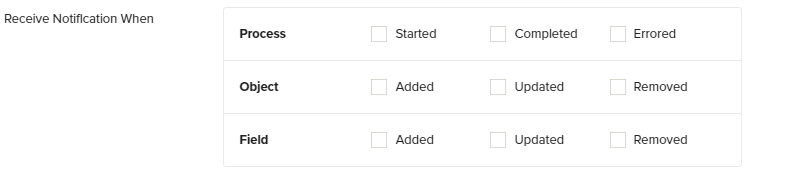
- Process
Started- Click the checkbox next to the icon 'Started' if you wish to be notified when a process is started. For eg: If you enable this option you will be notified when a process such as 'Clean Copy', 'DB to Source', etc starts running.
Completed- Click the checkbox next to the icon 'Completed' if you wish to be notified when a process is completed. For eg: If you enable this option you will be notified when a process such as 'Clean Copy', 'DB to Source', etc completes.
Errored- Click the check-box next to the icon 'Errored' if you wish to be notified when errors arrears in the process or the process fails. For eg: If you enable this option you will be notified when a process such as 'Clean Copy', 'DB to Source', etc encounters errors or fails.
- Object
Added- Click the checkbox next to the icon 'Added' if you wish to be notified when any new object is detected in your Source or Database. For eg: If you enable this option you will be notified when any new object such as 'Account', 'User' etc is detected on your Salesforce or your Database instance.
Updated- Click the checkbox next to the icon 'Updated' if you wish to be notified when any change in the object is detected in your Source or Database. For eg: If you enable this option you will be notified when any change in the object such as 'Account', 'User' etc is detected on your Salesforce or your Database instance.
Removed- Click the checkbox next to the icon 'Removed' if you wish to be notified when an object is removed/deleted from your Source or Database. For eg: If you enable this option you will be notified when an object such as 'Account', 'User' etc is removed or deleted from your Salesforce or your Database instance.
- Fields
Added- Click the checkbox next to the icon 'Added' if you wish to be notified when any new object field is detected in your Source or Database. For eg: If you enable this option you will be notified when any new object (Account) field ( 'Billing Street'),(Billing City), etc is detected on your Salesforce or your Database instance.
Updated- Click the checkbox next to the icon 'Updated' if you wish to be notified when any change in the object field is detected in your Source or Database. For eg: If you enable this option you will be notified when any change in the object (Account) field ( 'Billing Street'),(Billing City) is detected on your Salesforce or your Database instance.
Removed- Click the checkbox next to the icon 'Removed' if you wish to be notified when an object field is removed/deleted from your Source or Database. For eg: If you enable this option you will be notified when an object (Account) field ( 'Billing Street'),(Billing City), etc is removed or deleted from your Salesforce or your Database instance.
Methods of Configuration Notifications
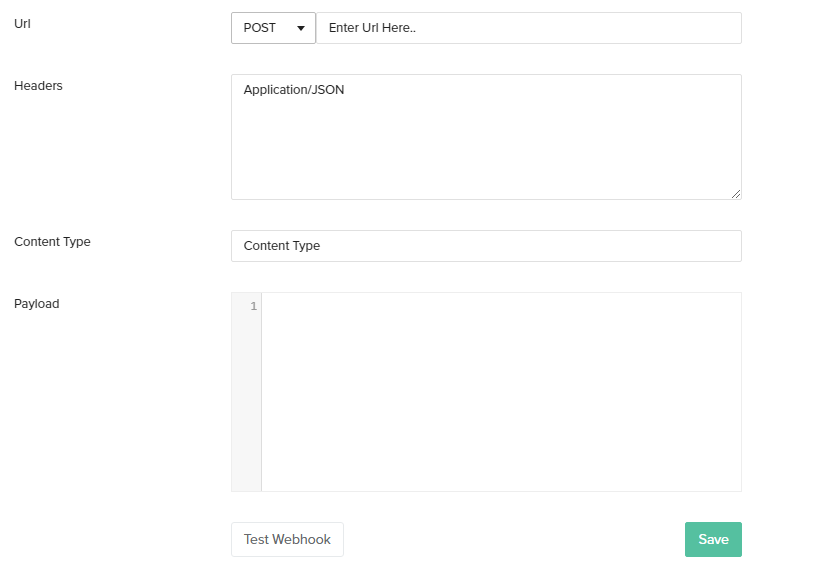
POST method:

This method is used if the user wants to define the payload.
From the URL drop-down menu choose the POST method option.
Fill in all the details: URL, HEADERS, CONTENT TYPE, and PAYLOAD
For example:
Let us consider that a user wants to get notified in TEAMS.
Enter details as follows:
URL:
POST
Content-Type:
Content-type:
Content type: application/JSON
Payload:
Payload: (Freeform)
{
'text' : 'date=$date; format ="yyyy-MM-dd hh:mm:ss"$ profile=$profile$ command=$command$ zoneId=$zoneId; default="EST"$ errorCount=$errorCount$'
}- The screen will appear as below:
You can format your calls for multiple parameters.
The above example: The user required details such as:
date, time, profile, and error.
There is a specific list of supported expressions that have to be followed for writing the various required parameters in the URL while running the POST method.
These can be found listed under “Supported Expressions”. Various conditions for these parameters can also be listed.
Once you enter all parameters Click SAVE
Click Test Connection and verify the same.
In this manner, the user can define their own Payload and provide the parameters in the standard expressions format with/without conditions to receive the respective POST notifications in their communication channel.
- Receive Notifications
Supported Expressions:
Option
Expression
Notes
Current date
$date; format=”dateformat”$
Format is an optional attribute. However, it is recommended to add one.
Do NOT escape quotes in date format as it can lead to errors.
Current event
$event$
Values: Started, Errored or Completed
Error count
$errorCount$
Denotes the number of objects that encountered an error
Is error in the backup
$isError$
Values: true if the event is errored else false
Profile Name
$profile$
Total records processed
$recordsProcessed$
Total number of records processed ie. inserted + updated for all objects
Command $command$ Provides a clear representation of the command that has been executed. Zone ID $ZoneId$ Shows the Time zone selected Using Conditions:
If else conditions are supported, however, we need to specify a boolean variable from the supported list for conditions:
Syntax:
$if(variable1)$value1$elseif(variable2)$value2$else$value3$endif$
Example
$if(isError)$$errorCount$$else$0$endif$
- Once All the steps are done you can Go to the team/channel selected to receive the notification and see if the notification is activated and received on the same as shown below

Overview
Content Tools