2022
Overview
In this article, you will learn how to transfer data from a file, residing in an FTP server, to a table in a database. First, you will see a data map. Then, you will learn the preliminary steps necessary to prepare a database. Finally, you will see how to create your integration.
Data Map
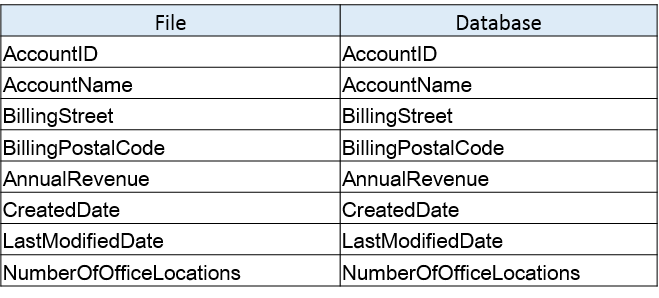
In this case, we are matching data, from a file, to the data in a database. There is no specific requirement on names. All that is necessary is that the columns, belonging to a table in the database, must be mapped by the user to the columns defined in the file. For example, the below table matches the columns of a table named Account (see below Preliminary Steps) with the fields in the file.
Example
The following is an example of a file that can be transferred to a database:

After the transfer, you should have the following data in your database:

Preliminary Steps (Database preparation):
- Setup your Database for Integration ( For this Tutorial, I will be using MySQL Database named "Accounts".)
- Create a Table "dbAccount" in Database. The scripts below show how to do it for MySQL, SQLSERVER and Oracle databases.
- Once you have created the table, insert some dummy values in it.
Database Script : MYSQL | Database Script : SQLSERVER | Database Script : Oracle |
create table `Accounts`.`dbAccount` (`AccountID` varchar(100) NOT NULL , `AccountName` text NOT NULL , `BillingStreet` text , `BillingPostalCode` numeric(20) , `AnnualRevenue` decimal(30,2) , `CreatedDate` date , `LastModifiedDate` datetime , `NumberOfOfficeLocations` int , PRIMARY KEY (`AccountID`) ); | create table dbAccount (AccountID varchar(100) NOT NULL , AccountName text NOT NULL , BillingStreet text , BillingPostalCode numeric(20) , AnnualRevenue decimal(30,2) , CreatedDate date , LastModifiedDate datetime , NumberOfOfficeLocations int , PRIMARY KEY (AccountID) ); | CREATE TABLE "SYS"."DBACCOUNT"
("ACCOUNTID" VARCHAR2(20 BYTE) NOT NULL ENABLE,
"ACCOUNTNAME" VARCHAR2(100 BYTE),
"BILLINGSTREET" VARCHAR2(50 BYTE),
"BILLINGPOSTALCODE" VARCHAR2(50 BYTE),
"ANNUALREVENUE" NUMBER(30,2),
"CREATEDDATE" DATE,
"LASTMODIFIEDDATE" VARCHAR2(40 BYTE),
"NUMBEROFOFFICELOCATIONS" NUMBER(*,0),
CONSTRAINT "DBACCOUNT_PK" PRIMARY KEY ("ACCOUNTID")
);
|
Creating Integration
Once you have your database ready, perform the following steps:
- Go to www.mydbsync.com and, click on CustomerLogin. Enter your Username and Password and click on Development Studio to open the Project console.
- Create a project with a project, process, workflow. Use the names of your choice.
- Click on Connectors on the left section of Project Console and create a DB and an FTP connector. (Note: Enter the required details in Database and FTP credentials in the fields and validate the connections).
- Click on Project ->Process -> Workflow
- From the Workflow section, proceed to the Trigger Section.
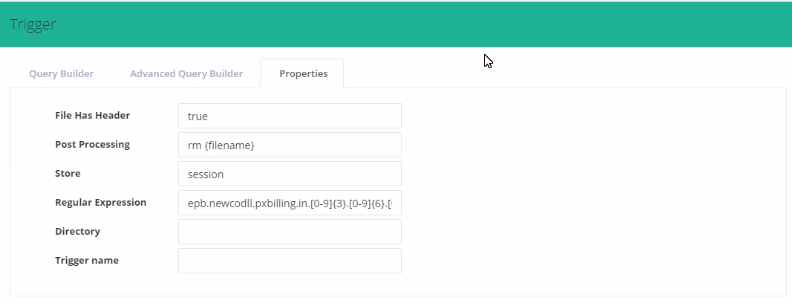
- In the Triggers section, you can use three tabs - namely, Query Builder, Advanced Query Builder, & Properties. You need to select data-source as FTP. You can make additional changes to the Query by using the Advanced View section of the Advanced Query Builder.
- In the Rules section, select target connector as "Database", operation, target object respectively.
- Click on Map to see the Mapping screen. You will see a list of Database fields in the left section. In the right section, in Schema, you see a list of selected File columns.
- Drag & drop the fields from Schema next to the required Database fields. Click on Save and Close once the mapping is completed. Now, click on Save Workflow.
- Ensure that Workflow status is On.
- You are now ready to run the sync. Click on the Run Button on the Top Right corner of the page.
- After successful sync, open the log and the table. Check and make sure that the data has been rightly inserted into the database table.
Overview
Content Tools