2022
Page History
...
- Click on configuration Link at the bottom of the page. A Pop-up box will appear, prompting you to open the file with "QuickBooks Web Connector (default)", click on OK button as highlighted below in screenshot.

- Click on OK in the next window (first screenshot below) and on the next window select the option button "Yes, always; allow access even if QuickBooks is not running" and check the check box for "Allow this application to access personal data" and click on continue button (second screenshot below).
...
- Double-click on the Process Name "SyncProcess" or the one you have created with a desired name to navigate to the Process Builder Console. The process will contain 2 States by default:
- Start_state
- End_state
- Drag the Create State Button onto the control flow Area to create a new state. Enter the state name as "Execute" and click on OK Button. A new state will be created and placed on control flow area.
Wiki Markup Click on *\[X\]* icon on *Start_state* to delete the default control flow from de-link *Start_State* to to *End_state.*
- Right Click\connect on Start_state followed by left click on Execute will create a control flow from Start_state to Execute. Right Click\connect on Execute followed by left click on End_state will create a control flow from Execute to End_state. All the control flows are displayed using arrows from one state to other state. Below you will find 2 screenshots one containing no control flow and second containing control flow as Start_state to Execute to End_state. Once done click on Save button at the top right corner of the window.
- Drag the Create State Button onto the control flow area to create a new state. Enter the state name as "DB2Customer". Similarly create another state called "DB2QBInvoice" and click on OK Button. There will be two new boxes/states in the Control flow area. Link all the states by first right-clicking on each box and left-click on the box to establish connection with. A screenshot below illustrates the same.

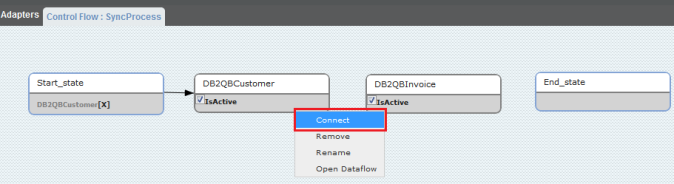

- Once the connection is established between all the boxes / states, you can see an arrow connecting each state. This constitutes the Process Definition Language for your integration profile.
- Double-click on "DB2QBCustomer" state or right-click on the same and click on "Open Dataflow" to open the state.
- Drag Create Reader, Create Map & Create Writer into the center of the console and name each one as "DBReader", "DBmap" & "QBWriter" respectively. A screenshot below illustrates the same.
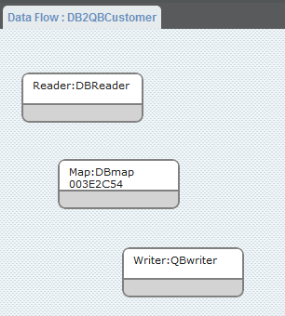
- Establish connection between Reader, Map and Writer by first right-clicking on each box and select "connect" and left clicking on the following box as shown.
Note: Always establish connection between states in the sequence of Reader: — Map: — Writer:
Overview
Content Tools