2022
Page History
- Configure your Database for Integration with your Quickbooks QuickBooks file.
- For this Tutorial I will be using use SQL Server Database Named "DBSyncDB" and 2011 US Edition of QuickbooksQuickBooks.
- Create tables "accountAccount" and "invoiceInvoice" in Database with following the SQL script.
| Code Block | ||||||||
|---|---|---|---|---|---|---|---|---|
| ||||||||
USE [DBSyncDB]

CREATE TABLE [dbo].[account](
[id] [varchar](20) NULL,[Name] [varchar](50) NULL,[firstname] [varchar](50) NULL,[lastname] [varchar](50) NULL,
[phone] [nchar](20) NULL,[fax] [nchar](20) NULL,[billingstreet] [varchar](200) NULL,[billingcity] [varchar](50) NULL,
[billingstate] [varchar](50) NULL,[billingcountry] [varchar](50) NULL,[billingcode] [varchar](50) NULL,[company] [nchar](100) NULL
) ON [PRIMARY]

GO

USE [DBSyncDB]

CREATE TABLE [dbo].[invoice](
[invoice_no] [nchar](10) NULL,[customerid] [nchar](100) NULL,[item] [nchar](100) NULL,[itemdesc] [nchar](100) NULL,
[quantity] [nchar](10) NULL,[uom] [nchar](50) NULL,[salesprice] [nchar](10) NULL,[total] [nchar](10) NULL,
[billaddress] [nchar](100) NULL,[billingcity] [nchar](100) NULL,[billingstate] [nchar](100) NULL,
[billingpostalcode] [nchar](10) NULL,[billingcountry] [nchar](100) NULL,[date] [nchar](50) NULL
) ON [PRIMARY]

GO
|
| Code Block | ||||||||
|---|---|---|---|---|---|---|---|---|
| ||||||||
CREATE TABLE `dbsyncdb`.`account` (`id` VARCHAR(20) DEFAULT NULL,`Name` VARCHAR(50) DEFAULT NULL,`firstname` VARCHAR(50) DEFAULT NULL,
`lastname` VARCHAR(50) DEFAULT NULL,`phone` VARCHAR(20) DEFAULT NULL,`fax` VARCHAR(20) DEFAULT NULL,
`billingstreet` VARCHAR(200) DEFAULT NULL,`billingcity` VARCHAR(50) DEFAULT NULL,`billingstate` VARCHAR(50) DEFAULT NULL,
`billingcountry` VARCHAR(50) DEFAULT NULL,`billingcode` VARCHAR(50) DEFAULT NULL,`company` VARCHAR(100) DEFAULT NULL
)
ENGINE=INNODB DEFAULT CHARSET=utf8;

/*Table structure for table `invoice` */

CREATE TABLE `dbsyncdb`.`invoice` (`invoice_no` CHAR(10) DEFAULT NULL,`customerid` CHAR(100) DEFAULT NULL,`item` CHAR(100) DEFAULT NULL,
`itemdesc` CHAR(100) DEFAULT NULL,`quantity` CHAR(10) DEFAULT NULL,`uom` CHAR(50) DEFAULT NULL,`salesprice` CHAR(10) DEFAULT NULL,
`total` CHAR(10) DEFAULT NULL,`billaddress` CHAR(100) DEFAULT NULL,`billingcity` CHAR(100) DEFAULT NULL,
`billingstate` CHAR(100) DEFAULT NULL,`billingpostalcode` CHAR(10) DEFAULT NULL,`billingcountry` CHAR(100) DEFAULT NULL,
`date` CHAR(50) DEFAULT NULL)

ENGINE=INNODB DEFAULT CHARSET=utf8;
|
| Code Block | ||||||||
|---|---|---|---|---|---|---|---|---|
| ||||||||
  CREATE TABLE "SYS"."ACCOUNT" ("id" VARCHAR(20  BYTE) DEFAULT NULL,"Name" VARCHAR(50  BYTE) DEFAULT NULL,"firstname" VARCHAR(50  BYTE) DEFAULT NULL,
"lastname" VARCHAR(50  BYTE) DEFAULT NULL,"phone" VARCHAR(20  BYTE) DEFAULT NULL,"fax" VARCHAR(20  BYTE) DEFAULT NULL,
"billingstreet" VARCHAR(200  BYTE) DEFAULT NULL,"billingcity" VARCHAR(50  BYTE) DEFAULT NULL,"billingstate" VARCHAR(50  BYTE) DEFAULT NULL,
"billingcountry" VARCHAR(50  BYTE) DEFAULT NULL,"billingcode" VARCHAR(50  BYTE) DEFAULT NULL,
"company" VARCHAR(100  BYTE) DEFAULT NULL
);

/*Table structure for table `invoice` */

CREATE TABLE "SYS"."INVOICE" ("invoice_no" CHAR(10 BYTE) DEFAULT NULL,"customerid" CHAR(100 BYTE) DEFAULT NULL,"item" CHAR(100 BYTE) DEFAULT NULL,
"itemdesc" CHAR(100 BYTE) DEFAULT NULL,"quantity" CHAR(10 BYTE) DEFAULT NULL,"uom" CHAR(50 BYTE) DEFAULT NULL,"salesprice" CHAR(10 BYTE) DEFAULT NULL,
"total" CHAR(10 BYTE) DEFAULT NULL,"billaddress" CHAR(100) DEFAULT NULL,"billingcity" CHAR(100) DEFAULT NULL,
"billingstate" CHAR(100 BYTE) DEFAULT NULL,"billingpostalcode" CHAR(10 BYTE) DEFAULT NULL,"billingcountry" CHAR(100 BYTE) DEFAULT NULL,
"date" CHAR(50 BYTE) DEFAULT NULL);
|
Note : Make sure both the tables have sample data in them before they can be mapped within DBSync.
| Panel |
|---|
Database Setup |
- Open www.mydbsync.com in your browser and . Then, click on Customer Login.
- Enter in your DBSync username Username and password Password to Sign in. Once logged in, click on Launch to access DBSync Integration Console.
- Once logged into the DBSync console, click on Create New projectProject button .
- You can use any naming convention for a project as long as there are no white spaces in the name of the projectProject.
- Once the project Project is created, click on Connector --- Edit to configure the Connectors.
- Click on the Create New Connector from the top right section of the page page.
- Enter the name for the connector Connector and select Database Adapter from the drop down. Click on Save button once done.
- Similarly, click on the Create New Connector button again to add Quickbooks QuickBooks Connector to your DBSync profile.
- Once both the Connectors are added, you will see them listed in the connector Connector listing page.
- Now click on the Click Edit link next to the Database Connector and enter . Enter your Database credentials as shown. In this tutorial, the database used is SQL Server 2005 and corresponding credentials are entered.
...
11.Click on Validate link for the Database adapter. If the credentials entered are accurate, you will get a pop-up message saying the "Connection Settings are Valid".
12. At this point, you have successfully validated your Database Adapter.
| Panel |
|---|
...
QuickBooks setup |
| Panel |
|---|
- Click Edit link next to the
...
- QuickBooks Connector from the Connector listing page.
- Under the file section, enter the full path of your
...
- QuickBooks file as shown.
...
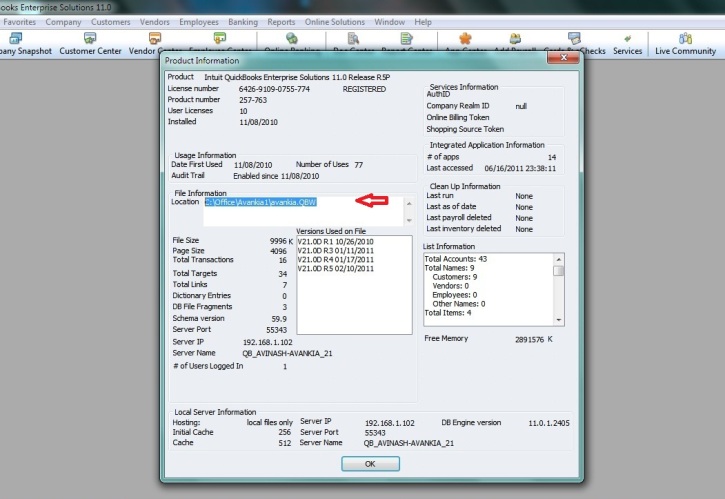
- You can retrieve full path/location of your
...
- QuickBooks file by pressing 'F2' key on your keyboard when in
...
- QuickBooks 'Home' page - as shown below.
4. Click on configuration Link at the bottom of the page. A Pop-up box will appear, prompting you to open the file with "QuickBooks Web Connector (default)"
...
. Click OK as highlighted below in screenshot.

...
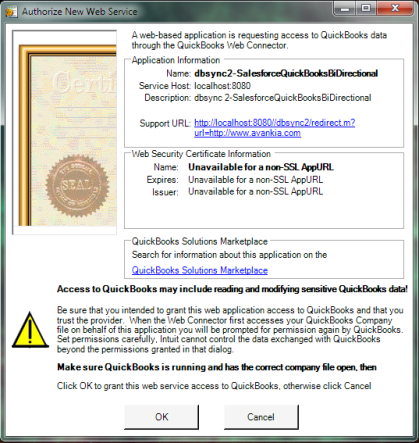
5. Click OK in the next window (first screenshot below)
...
. Then, select the option button "Yes, always; allow access even if QuickBooks is not running" and check the check box for "Allow this application to access personal data"
...
. Finally, click continue (second screenshot below).
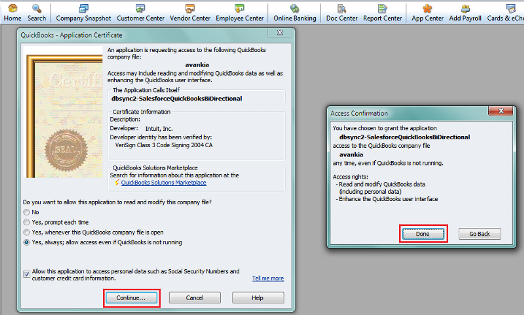
6. In the Access Confirmation window
...
, click Done - as shown above . And the profile will get added to your QuickBooks Web Connector
...
. A screenshot of the QuickBooks Web Connector is shown below.
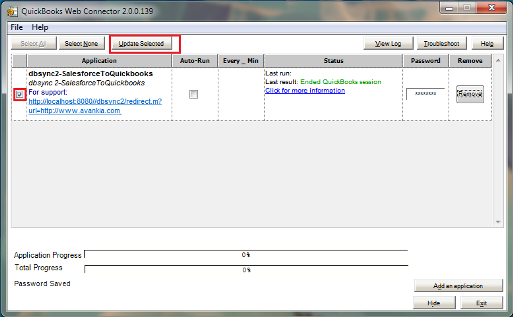
7. Please enter your DBSync password in the password section of the Web Connector and
...
Save.
8. At this point, you have successfully completed configuring your
...
QuickBooks with DBSync. You can run the integration by clicking on the Update Selected button.
| Panel |
|---|
Custom Account Mapping |
...
For Account |
...
And Invoice |
...
- Click on Manage — Edit to navigate to adapter configuration page.
- Click on Add Process Icon on the right-hand side of your screen. Enter Process Name and Click on Ok. A new process will be created and listed under profile name on the right side of the screen.

- Double-click on the Process Name "SyncProcess" or the one you have created with a desired name to navigate to the Process Builder Console. The process will contain 2 States by default:
- Start_state
- End_state
Wiki Markup Click on *\[X\]* icon on *Start_state* to de-link *Start_State* to *End_state.*- Drag the Create State Button onto the control flow area to create a new state. Enter the state name as "DB2Customer". Similarly create another state called "DB2QBInvoice" and click on OK Button. There will be two new boxes/states in the Control flow area. Link all the states by first right-clicking on each box and left-click on the box to establish connection with. A screenshot below illustrates the same.

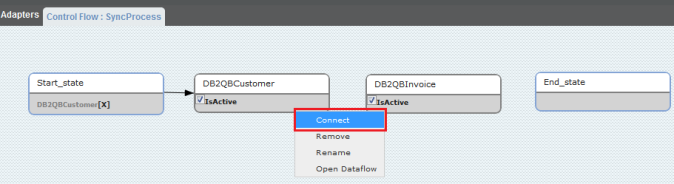

- Once the connection is established between all the boxes / states, you can see an arrow connecting each state. This constitutes the Process Definition Language for your integration profile.
Accounts Mappings:
- Double-click on "DB2QBCustomer" state or right-click on the same and click on "Open Dataflow" to open the state.
- Drag Create Reader, Create Map & Create Writer into the center of the console and name each one as "DBReader", "DBmap" & "QBWriter" respectively. A screenshot below illustrates the same.
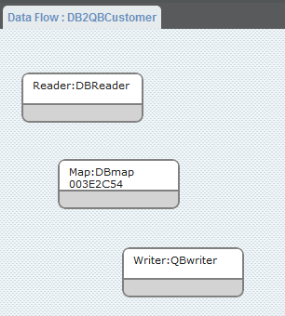
- Establish connection between Reader, Map and Writer by first right-clicking on a box and select "connect" and left clicking on the following box as shown.
Note: Always establish connection between states in the sequence of Reader: — Map: — Writer:
- Once the connection is established, all control flows will be displayed with arrows. A screenshot below illustrates the same.

- Right Click\Properties on DBReader. The properties will be displayed in the bottom left area of DBSync Console. Select Database from Adapter Drop Down.

...
| Code Block |
|---|
select * from account |
...
Tables |
- Create a Project, Process with Names of your choices.
- Create a Workflow with name "DB2Customer" *and likewise create another Workflow with name "DB2QBInvoice"*.
- Click Edit on workflow "DB2QBCustomer". This will redirect you to Workflow detail page.
- Create a rule. Then, select the Target as QuickBooks and choose the object to which you want insert/upsert the records.
- From the Trigger section, choose the DB connector. From Advanced Query builder, enter the following query. User can run the query and view the result in Query Designer.
If a user wishes to set the properties, s/he can do it from the Properties Tab
Code Block Select * from account5. For a rule created, set the following properties by selecting the Properties Tab.
Table : CustomerAddRq
maxbatchsize : 1
writetype_ _ : insert
autocreate : True
...
...
6. Click on the Map link from the available options under the Rule to set the following field to field maps.
Target | = | Source |
|---|---|---|
CustomerAddRq/CustomerAdd/BillAddress/Addr1 | = | VALUE("billingstreet") |
CustomerAddRq/CustomerAdd/BillAddress/City | = | VALUE("billingcity") |
CustomerAddRq/CustomerAdd/BillAddress/Country | = | VALUE("billingcountry") |
CustomerAddRq/CustomerAdd/BillAddress/PostalCode | = | VALUE("billingcode") |
CustomerAddRq/CustomerAdd/BillAddress/State | = | VALUE("billingstate") |
CustomerAddRq/CustomerAdd/CompanyName | = | VALUE("company") |
CustomerAddRq/CustomerAdd/Fax | = | VALUE("fax") |
CustomerAddRq/CustomerAdd/FirstName | = | VALUE("firstname") |
CustomerAddRq/CustomerAdd/IsActive | = | "true" |
CustomerAddRq/CustomerAdd/LastName | = | VALUE("lastname") |
CustomerAddRq/CustomerAdd/Name | = | VALUE("Name") |
CustomerAddRq/CustomerAdd/Phone | = | VALUE("phone") |
VALIDATEROW | = | "true" |
At this point, your DBSync is set to move Account records from your database table to
...
QuickBooks Customer.
| Panel |
|---|
Invoice Mappings |
...
- From the
...
- Workflow listing page,
...
- click on the
...
- Edit link to open the "DB2QBInovoice"
...
- worfklow.
...
- Follow the same procedure
...
- for Creating and Configuring Rule as explained in earlier section.
- Configure the
...
- Trigger for the DB2QBInvoice state with the following code from the Advanced query builder section.
| Code Block |
|---|
select invoice_no,invoice_no as invoicenumber,customerid,item,itemdesc,quantity,uom, salesprice,total,billaddress,billingcity,billingstate,billingpostalcode,billingcountry, convert(varchar,cast(date as datetime),126) as 'date' from invoice |
4. Make sure the XML Formatter section is
...
populated with the following code.
| Code Block |
|---|
customerid,billaddress,billingcity,billingstate,billingpostalcode,billingcountry,date, invoice_no,[item,itemdesc,quantity,salesprice] |
| Code Block |
|---|
5. Now configure the
...
Rule Properties
Table : InvoiceAddRq
maxbatchsize : 1
writetype_ _ : insert
autocreate : True
...
The Rule mapping can be mapped from the following table .
Target | = | Source |
|---|---|---|
InvoiceAddRq/InvoiceAdd/BillAddress/Addr1 | = | VALUE("billingaddress") |
InvoiceAddRq/InvoiceAdd/BillAddress/City | = | VALUE("billingcity") |
InvoiceAddRq/InvoiceAdd/BillAddress/Country | = | VALUE("billingcountry") |
InvoiceAddRq/InvoiceAdd/BillAddress/PostalCode | = | VALUE("billingpostalcode") |
InvoiceAddRq/InvoiceAdd/BillAddress/State | = | VALUE("billingpostalcode") |
InvoiceAddRq/InvoiceAdd/CustomerRef/FullName | = | VALUE("customerid") |
InvoiceAddRq/InvoiceAdd/InvoiceLineAdd | loop | "invoice_no/list" |
InvoiceAddRq/InvoiceAdd/InvoiceLineAdd/Desc | = | VALUE("itemdesc") |
InvoiceAddRq/InvoiceAdd/InvoiceLineAdd/ItemRef/FullName | = | VALUE("item") |
InvoiceAddRq/InvoiceAdd/InvoiceLineAdd/Quantity | = | VALUE("quantity") |
InvoiceAddRq/InvoiceAdd/InvoiceLineAdd/Rate | = | VALUE("salesprice") |
InvoiceAddRq/InvoiceAdd/IsPending | = | "true" |
InvoiceAddRq/InvoiceAdd/TxnDate | = | VALUE("date") |
VALIDATEROW | = | "true" |
- In the above mappings, we are using the operator Type as Loop so that line items are grouped as a list. For more info on the loop operator, refer to the above XML Formatter link .
At this point, you have configured your DBSync profile to integrate both the Accounts and Invoice tables that were created in your SQL Server Database. A similar procedure can be followed for other databases like MYSQL,Oracle,DB2 etc. The only thing that would be changing different, within DBSync, would be the connection strings for the respective databases.
Overview
Content Tools