2022
Page History
...
Base Path : http://staging.mydbsync.com/appcenter-2-2/appcode/v1/partner
...
- registerUser: This api can be used for creation of new users.
| Wiki Markup |
|---|
It returns json for newly registered unique user.
\\
POST [<span style="color: #1155cc"><span style="text-decoration: underline; ">/registerUser</span></span>|http://staging.mydbsync.com/appcenter-2-2/appcode/v1/partner/registerUser]
\\
Consumes : This api consumes *application/json* media type.
\\
Returns : Json object
\\
Produces : This api produces *application/json* media type.
\\
To create user we can use HTTP POST method :
 Headers :  Content-Type: application/json
Accept: application/json
Body :
\{
"partnerAppKey":"ApplicationKey",
"partnerAppToken":"ApplicationToken",
"endUserCompany":"CompanyName",
"endUserName":"UserName"
\}
**All parameters are required
\\
partnerAppKey (Required): API appkey provided by DBSync must be present in body of request. This will help to uniquely Identify application.
\\
partnerAppToken (Required): API token provided by DBSync must be present in body of request. This will help to uniquely Identify application.
\\
endUserCompany (Required): User's Company Name
\\
endUserName (Required): uniquely identifiable username.
\\
*Response :* This will be json form.
Response will always be 200 HTTP OK
ex:
 \{  "value": \[    \{      "companyId": <span style="color: #880000">"9877"</span>,      "userId": <span style="color: #880000">"5773"</span>,      "userName": <span style="color: #880000">"TestComp001_User008"</span>,      "errorMessage": \[\]    \}  \]\}
\\
If there are no error while creation of user then error message will be empty.
\\
*CURL :*
curl -X POST --header 'Content-Type: application/json' --header 'Accept: application/json' -d '\{"partnerAppKey":"appkey","partnerAppToken":"apptoken","endUserCompany":"companyName","endUserName":"userName"\}' 'http://staging.mydbsync.com:80/appcenter-2-2/appcode/v1/partner/registerUser'
\\ |
- unregisterUser: This api is used for unregister an existing user for a partner.
| Wiki Markup |
|---|
It returns json result for the unregistered user request.
\\
POST [<span style="color: #1155cc"><span style="text-decoration: underline; ">/unregisterUser</span></span>|http://staging.mydbsync.com/appcenter-2-2/appcode/v1/partner/unregisterUser]
\\
Consumes : This api consumes *application/json* media type.
\\
Returns : Json object
\\
Produces : This api produces *application/json* media type.
\\
To create user we can use HTTP POST method :
 Headers :  Content-Type: application/json
Accept: application/json
*Body :*
\{
"partnerAppKey":"ApplicationKey",
"partnerAppToken":"ApplicationToken",
"endUserCompany":"CompanyName",
"endUserName":"UserName"
\}
**All parameters are required
\\
partnerAppKey (Required): API appkey provided by DBSync must be present in body of request. This will help to uniquely Identify application to unregister for.
partnerAppToken (Required): API token provided by DBSync must be present in body of request. This will help to uniquely Identify application to unregister for.
\\
endUserCompany (Required): User's Company Name
\\
endUserName (Required): uniquely identifiable username.
\\
*Response :* This will be json form.
Response will always be 200 HTTP OK
ex:
 \{  "value": \[    \{      "success": <span style="color: #008800">true</span>,
"companyId": <span style="color: #880000">"9877"</span>,"userId": <span style="color: #880000">"5773"</span>,"userName": <span style="color: #880000">"TestComp001_User008"</span>,"errorMessage": \[\]\}\]
\}
\\
If there are no error while unregistering user then error message will be empty.
If user is unregistered then success will be true.
\\
*CURL :*
\\
curl -X POST --header 'Content-Type: application/json' --header 'Accept: application/json' -d '\{"partnerAppKey":"appkey","partnerAppToken":"apptoken","endUserCompany":"companyName","endUserName":"username"\}' 'http://staging.mydbsync.com/appcenter-2-2/appcode/v1/partner/unregisterUser'
\\ |
- authenticateUser: Authenticates an existing user (for a partnered application) to check if they have valid license to run the integration.
| Wiki Markup |
|---|
 \\
 It returns json for newly registered unique user.
\\
POST [<span style="color: #1155cc"><span style="text-decoration: underline; ">/authenticateUser</span></span>|http://staging.mydbsync.com/appcenter-2-2/appcode/v1/partner/authenticateUser]
\\
Consumes : This api consumes *application/json* media type.
\\
Returns : Json object
\\
Produces : This api produces *application/json* media type.
\\
To create user we can use HTTP POST method :
 Headers :  Content-Type: application/json
Accept: application/json
*Body :*
\{
"partnerAppKey":"ApplicationKey",
"partnerAppToken":"ApplicationToken",
"endUserCompany":"CompanyName",
"endUserName":"UserName"
\}
**All parameters are required
\\
partnerAppKey (Required): API appkey provided by DBSync must be present in body of request. This will help to uniquely Identify application to authenticate for.
partnerAppToken (Required): API token provided by DBSync must be present in body of request. This will help to uniquely Identify application to authenticate for.
\\
endUserCompany (Required): User's Company Name
\\
endUserName (Required): uniquely identifiable username.
\\
*Response :* This will be json form.
Response will always be 200 HTTP OK
ex:
 \{  "value": \[    \{      "companyId": <span style="color: #880000">"9877"</span>,      "userId": <span style="color: #880000">"5773"</span>,      "userName": <span style="color: #880000">"TestComp001_User008"</span>,      "errorMessage": \[\]    \}  \]\}
\\
If there are no error while authenticating user then error message will be empty.
\\
*CURL :*
curl -X POST --header 'Content-Type: application/json' --header 'Accept: application/json' -d '\{"partnerAppKey":"appkey","partnerAppToken":"apptoken","endUserCompany":"companyName","endUserName":"userName"\}' 'http://staging.mydbsync.com/appcenter-2-2/appcode/v1/partner/authenticateUser'
\\ |
- licenseDetails: Fetches license details of all (or single, using filter) users registered for the partner.
| Wiki Markup |
|---|
 \\
POST [<span style="color: #1155cc"><span style="text-decoration: underline; ">/licenseDetails</span></span>|http://staging.mydbsync.com/appcenter-2-2/appcode/v1/partner/licenseDetails]
\\
Consumes : This api consumes *application/json* media type.
\\
Returns : Json object
\\
Produces : This api produces *application/json* media type.
\\
To create user we can use HTTP POST method :
 Headers :  Content-Type: application/json
Accept: application/json
*Body :*
\{
"partnerAppKey":"ApplicationKey",
"partnerAppToken":"ApplicationToken",
"endUserCompany":"CompanyName",
"endUserName":"UserName"
\}
partnerAppKey (Required): API appkey provided by DBSync must be present in body of request. This will help to uniquely Identify application to authenticate for.
partnerAppToken (Required): API token provided by DBSync must be present in body of request. This will help to uniquely Identify application to authenticate for.
\\
endUserCompany (Optional): User's Company Name, If companyName in provided then all active user for that company will be retrieved.
\\
endUserName (Optional): uniquely identifiable username, If username id  provided then all available user with that company will be retrieved.
\\
Response : This will be json form.
Response will always be 200 HTTP OK
ex:
 \{  "value": \[    \{      "createDate": <span style="color: #880000">"2016-10-27 02:55:57.0"</span>,      "expiryDate": <span style="color: #880000">"2036-10-27"</span>,      "companyId": <span style="color: #880000">"9877"</span>,      "userId": <span style="color: #880000">"5764"</span>,      "userName": <span style="color: #880000">"TestComp001_User001"</span>,      "errorMessage": \[\]    \},    \{      "createDate": <span style="color: #880000">"2016-10-27 02:57:07.0"</span>,      "expiryDate": <span style="color: #880000">"2036-10-27"</span>,      "companyId": <span style="color: #880000">"9877"</span>,      "userId": <span style="color: #880000">"5765"</span>,      "userName": <span style="color: #880000">"TestComp001_User002"</span>,      "errorMessage": \[\]    \},---
  \]\}
\\
If there are no error while licensing user then error message will be empty.
\\
<span style="color: #444444"><strong>CURL :</strong></span>
curl -X POST --header 'Content-Type: application/json' --header 'Accept: application/json' -d '\{"partnerAppKey":"appkey","partnerAppToken":"apptoken","endUserCompany":"companyName","endUserName":"userName"\}' 'http://staging.mydbsync.com/appcenter-2-2/appcode/v1/partner/licenseDetails'
\\ |
...
Initialize the plugin by referencing the necessary files:
Code Block lang javascript <link rel="stylesheet" type="text/css" href="dbsyncwidget.min.css"> <script src="https://maxcdn.bootstrapcdn.com/bootstrap/3.3.7/js/bootstrap.min.js"></script> <script src="https://av-web.s3.amazonaws.com/ecw/dbsyncwidget.min.js"></script>Add div on the page:
Code Block lang javascript <div id="dbsyncwidget"></div>
...
- Add javascript initialization in the script tag:
...
- AppName - name of application to connect
...
- .
...
- ValidationUrl - API Url to check if application is connected
...
- - example: https://<your_server>/ecw/verify/<connector>/<username>.
ConnectUrl - API Url to connector page
...
- Add necessary files:
<link href="${pageContext.request.contextPath}/css/dbsyncwidget.min.css" rel="stylesheet" />
<script src="${pageContext.request.contextPath}/scripts/bootstrap.min.js"></script>
<script src="${pageContext.request.contextPath}/scripts/dbsyncwidget.min.js"></script>
- Add div:
<div id="dbsyncwidget"></div>
- Add script tag:
...
- - example: https://<your_server>/ecw/connect/<process>/<connector>/<username>/<company>.
| Code Block | ||
|---|---|---|
| ||
<script> var dbsyncwidget = null; var dbsyncButton; var options = { appName: '<Display Label of the Connecting App>', validationUrl: 'https://<your_server>/ecw/verify/<connector>/<username>', connectUrl: 'https://<your_server>/ecw/connect/<process>/<connector>/<username>/<company>' }; $(document).ready(function () { |
...
dbsyncButton = $('#dbsyncwidget'); |
...
dbsyncwidget = dbsyncButton.dbsyncwidget(options); |
...
}); |
...
</script> |
Configuring Look & Feel (Optional)
- Add custom css styles:
| Code Block | ||
|---|---|---|
| ||
<link href=" |
...
<your-site-style. |
...
css>" rel="stylesheet" /> |
...
Content of styles.css: |
...
.modal-large { |
...
width: 60%; |
...
} |
...
.dbsync-widget-logo { |
...
outline: none; |
...
text-decoration: none; |
...
border: none; |
...
background: url(../images/logo.png) no-repeat 0 0; |
...
width: 100px; |
...
height: 30px; |
...
display: inline-block; |
...
margin: 5px; |
...
} |
...
.dbsync-widget-logo:hover { |
...
filter: brightness(105%); |
...
} |
...
.dbsync-widget-logo-connected { |
...
outline: none; |
...
text-decoration: none; |
...
border: 2px; |
...
background: url(../images/logo-connected.png) no-repeat 0 0; |
...
width: 100px; |
...
height: 38px; |
...
display: inline-block; |
...
margin: 5px; |
...
} |
...
.dbsync-widget-logo-connected:hover { |
...
filter: brightness(105%); |
...
} |
...
<docker and partner props>
Changes to be done in 2 following files
- partner.properties (inside "www/WEB-INF/conf/" folder)
- partner_profile.xml (inside "www/WEB-INF/conf/" folder)
- partner.properties (inside "www/WEB-INF/conf/" folder)
This file contains the below properties
- partnerAppKey(Required)
- partnerAppToken(Required)
- partner.app.qbdesktop.pdl(Required, if you are using QuickBooks Desktop)
- partner.database.driverClassName(Required)
- partner.database.url(Required)
- partner.database.username(Required)
- partner.database.password(Required)
- partner.profile.template(Required)
- dbsync.logger(Optional)
- log.database.driverClassName(Optional)
- log.database.url(Optional)
- log.database.username(Optional)
- log.database.password(Optional)
...
|
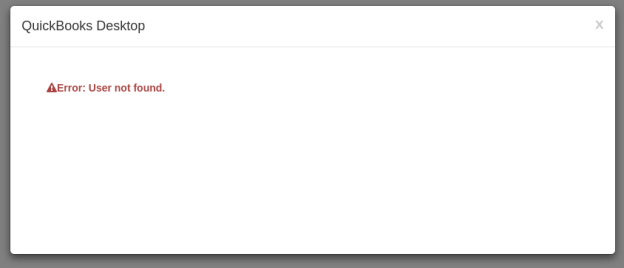
User Experience
- The user sees a "Connect" button

- On clicking the button, a Modal window opens up to, setup the connection.
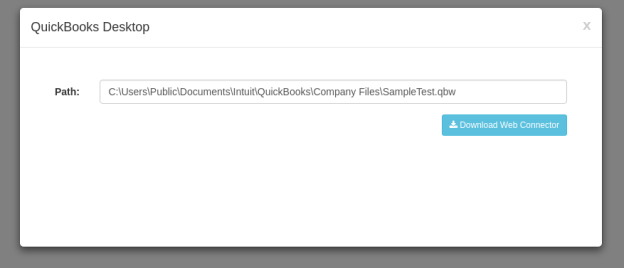
- If the connection is successful, the button changes its color and shows "Connected"

- If there is an error, you will see the following message:
Overview
Content Tools