2022
Overview
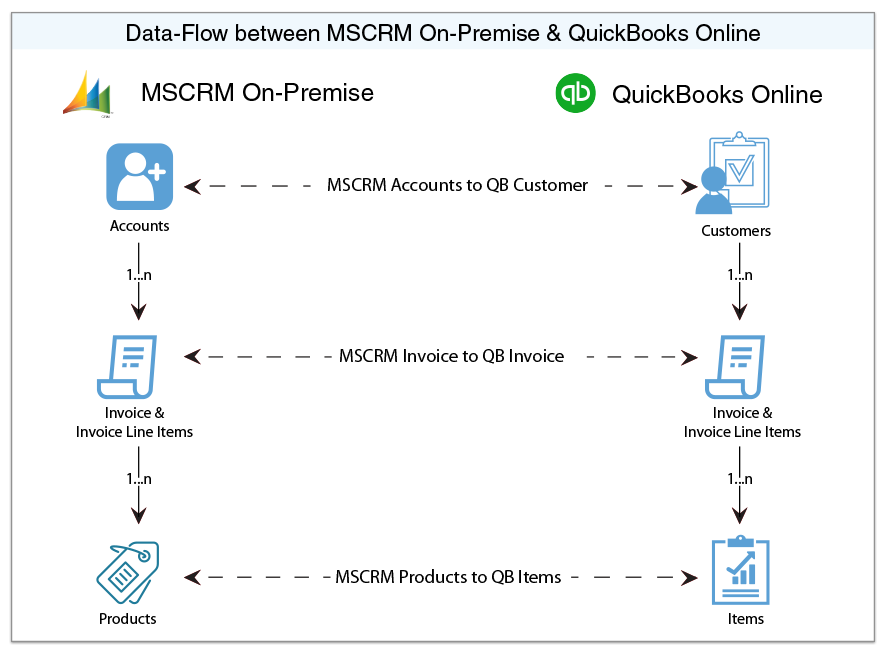
DBSync for MS 365/CRM On-Premise & QuickBooks Online Integration is easy to use an application to integrate MS 365/CRM Accounts, Products, Invoice with QuickBooks Customers, Items, Job & Invoice. DBSync is also useful to migrate historical QuickBooks data into MS 365/CRM On-Premise or vice versa. DBSync provides Bi-directional sync with a pre-built field to field map along with flexibility for more complex and dynamic mapping capability. DBSync also has an automatic online update, enabling DBSync customers to enjoy all the product updates and features with every new release.
Data Flow
Data flow of Bi-directional integration between MS 365/CRM On-Premise & QuickBooks Online is shown in the below table.
Process Map
Process Map of Bi-directional integration between MS 365/CRM On-Premise & QuickBooks Online is shown in the below image.
Pre-requisite for integration
- Integration from MS 365/CRM On-Premise to QuickBooks Online Invoice is invoked provided the Generate field in MS 365/CRM On-Premise Invoice is selected as Invoice.
- It is mandatory that MS 365/CRM On-Premise Invoice (to be integrated with QuickBooks Online Invoice) is associated with the respective MS 365/CRM Account & also should have Products with Price List attached to it for DBSync to invoke integration.
MS 365/CRM On-Premise Setup
- Download the DBSync MS 365/CRM-Quickbooks solution package from the following URL. https://dbsync-template-library.s3.amazonaws.com/DBMSQuickBooks_3_0.zip
- The downloaded solution packages will be in a.ZIP format.
- Upload solution package to your Microsoft 365/CRM On-Premise instance as shown. Settings > Customizations > Solutions > Import.
- Once the Solution Packages are uploaded to your MS Dynamics CRM On-Premise instance, you should be able to see the same in the Solutions list as shown below. Click on Publish All Customizations button to commit all the changes done to your MS 365/CRM instance.
- After the successful import of the solution packages, you will find a section called "DBSync" within Account, Contact, Opportunity, Invoice and Order objects with custom fields that are essential for the Integration process.
- The Price List Item will include the List Price defined on the Product. If you only have one Price List in your system, the Price List Item will be linked to that Price List. If you have multiple Price Lists, the first Price List created in your system will be used.
Note:
Out of the box, DBSync supports Products/Items in a flat structure and not in Hierarchy as Products in Microsoft 365/CRM does not support a Hierarchical structure. Please look at our Knowledgebase for steps in handling hierarchies in Items from QuickBooks.
Configure MS 365/CRM On-Premise for DBSync Integration
- Microsoft .NET Framework 4.5 should be installed. The following link can be referred for installation.
http://www.microsoft.com/en-us/download/details.aspx?id=30653
- Windows Service Proxy for MS 365/CRM should be installed & the steps are available in the below link
http://help.mydbsync.com/docs/display/dbsync/MS+CRM+Service+Proxy
DBSync Setup
- Login into www.mydbsync.com and click on Customer Login.
- It is necessary to use the on-premise version of DBSync for the integration of MS 365/CRM On-Premise with QuickBooks. The below link can be referred to install an on-premise version of DBSync http://help.mydbsync.com/docs/display/dbsync/DBSync+On-Premise+InstallationEnter your DBSync global administrator username and password and click on Login.
- Once logged in, click on "My Home" tab from the menu and click on the Launch button.
- Click on the Project MS 365/CRM Online to QuickBooks, click on the Connectors button on the left panel.
- You will see connectors MS 365/CRM & QuickBooks.
- Click on MSCRM Connector, enter your Microsoft 365/CRM global administrator username and password. Scroll down to the bottom of the section and click on Validate Connection button to validate your Microsoft 365/CRM credentials & click on Save.
QuickBooks Online Setup:
- Login into www.mydbsync.com and click on My Account then click Customer Login.
- Enter your DBSync User Name and Password and click on Login.
- Click on the Development Studio.
- Click on the Project MSCRM Online to QuickBooks Online then click on the Connectors button on the left panel.
- You will see connectors MSCRM & QuickBooks Online.
- In the Quick Setup tab, set the Environment as Production/Developer Instance and click Connect To QuickBooks.
- Enter QuickBooks User ID, Password and click Sign In
- Once Sign In, the page gets redirected to DBSync Connector page.
- This completes the configuration of your DBSync profile with Microsoft Dynamics CRM Online instance and QuickBooks online.
Profile Setup
Microsoft 365/CRM
Configuration | Instructions |
Username | <<Username>> |
Password | <<Password>> |
MSCRM Port URL | https:// (https://**)<<server_name>>/ |

