2022
Backing Up Projects
Before you upgrade to the latest version of DBSync on premise mode, It is suggested that you back up all your integration projects created using earlier versions. Even though installer do not purge or installs a clean copy of local db of DBSync while upgrading but as a caution it is advised to take the back up as explained in the following bulleted points.
- Go to My Computer and navigate to the DBSync installed directory which by default is (C:\DBSync_CloudWorkflow ) or the directory which you chose to be install the earlier version of DBSync <<DBSync Install Dir>> \dbsync2\WEB-INF\conf\db
- Now copy all the files and folders of "db" folder to your designated directory or drive.
- For example, if DBSync is installed on the default path chosen by DBSync installer which is "C:\DBSync_CloudWorkflow", you local database path shall be "C:\DBSync_CloudWorkflow\dbsync2\WEB-INF\conf\db".
Download Latest Installer
You can download the latest version of DBSync Cloud Workflow from the DBSync App center / DBSync landing page as shown in the below image. Follow the listed steps to download the installer, By default the installer is downloaded to the "Downloads" folders of the logged in user of the system. The installer has the name as "DBSync_CloudWorkflow_VX.X.X.X" which follows the naming convention i.e. the first part "DBSync_CloudWorkflow" specifies the product line of DBSync and second part "VX.X.X.X" specifies the version of the downloaded installer.
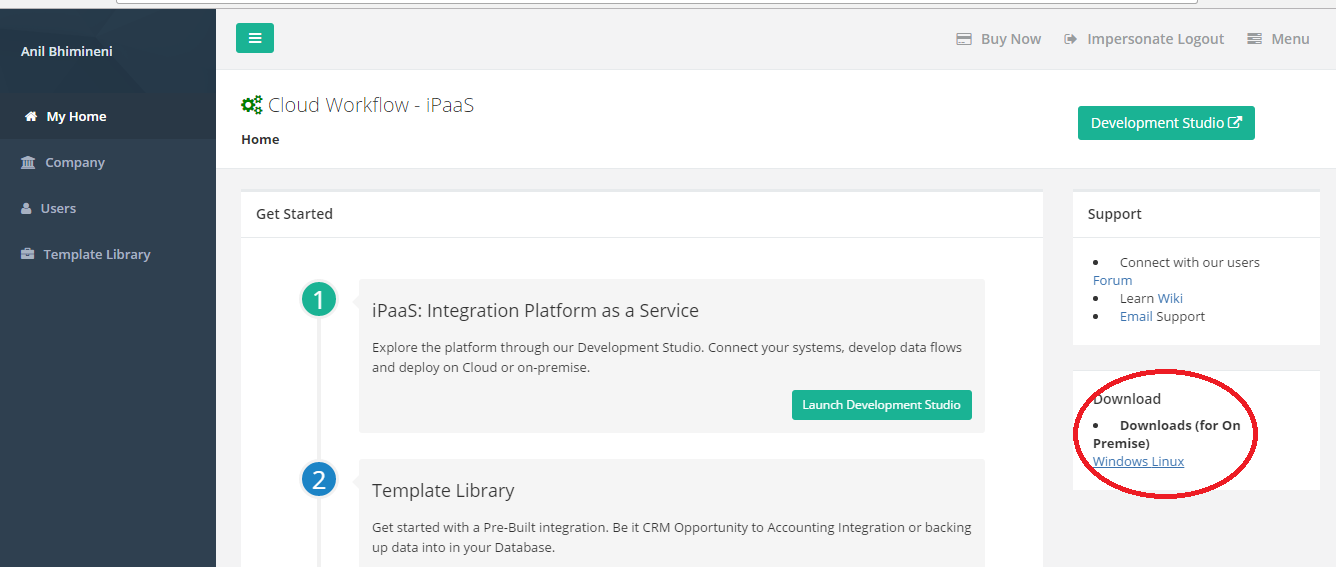
Go to DBSync website www.mydbsync.com ,Navigate through My Account - > Customer Login.
Input the valid DBSync platform Email ID and password to login to the DBSync App- center / Platform which would land the user on the landing page.
Now, click on the the download link as highlighted in the image to get the installer to your "Downloads"
you have an option to download the desired operating system version which would suite your needs, Either Linux or Windows.
Uninstall Earlier Version
Before you want to upgrade to the latest version, Be sure to uninstall to earlier version of DBSync cloud workflow that is already installed on your machine. Follow the below steps to uninstall the DBSync from your machine.
First way
- Navigate to Control panel → Programs → programs & Features from your computer
- On the windows from the list choose "DBSync_CloudWorkflow_VX.X.X.X"
- you can right click on the program which will show you uninstall, Clicking on uninstall will open a windows pop up asking whether "Are you sure you want to completely remove DBSync cloud workflow and all of its components"
- Click on Yes button to proceed with uninstall and progress bar will show the progress.
- After the uninstall , A windows pop up opens saying "DBSync Cloud workflow was successfully removed from your computer". Now click on OK button to confirm.
Second Way
Alternatively, you can uninstall it from the startup programs by navigating to startup programs → DBSync Cloud Workflow → uninstall and continue with uninstall that will remove DBSync and all of its components from your file system.
DBSync Cloud Workflow Installation
For upgrading the DBSync Cloud workflow you will have to uninstall the earlier version as detailed out in the earlier sections of this article and install the newer version as explained in the following steps.
- Start the installation by right-clicking on the installer and chose "Run as Administrator" option which would start the installation process.
- Sometime the windows might not allow you to install on your file system, If "User Account Control" window is popped up then click on Yes button to authorize the windows to proceed with installation.
- Now, you will be on the "License Agreement" screen, make sure to select the option "I Accept the agreement" and click on Next button to proceed with the installation.
- The default installation path is shown as "C:\DBSync_CloudWorkflow". If you wish to choose a different folder, click on the Browse button and select the desired location to proceed with the installation.
- If you have installed the earlier versions of DBSync for evaluation purpose, the installer detects the installed directory and alerts as shown in the image.
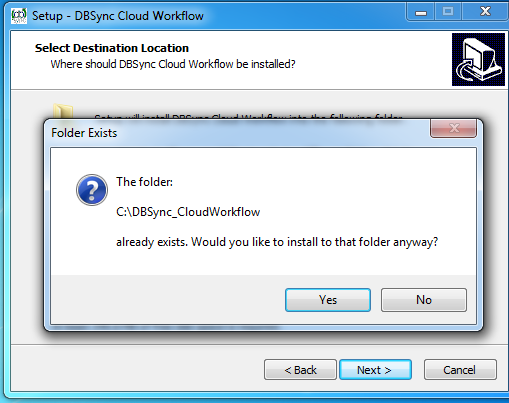
- Choose the option "Yes" if you wish to install the new version to the earlier installed directory, Else choose option "No" to change the installation directory.
- On the "Select Additional Task" window, check the options "Create a desktop Shortcut" and "Create a Quick Launch shortcut" if you wish to have DBSync shortcuts on your desktop, quick launch panel respectively.click on "Next" button to proceed with installation.
- From the "Ready to Install" window, Click on Install button to proceed with the installation and progress bar on the bottom of the "Installing" window will show you the progress of the installation.
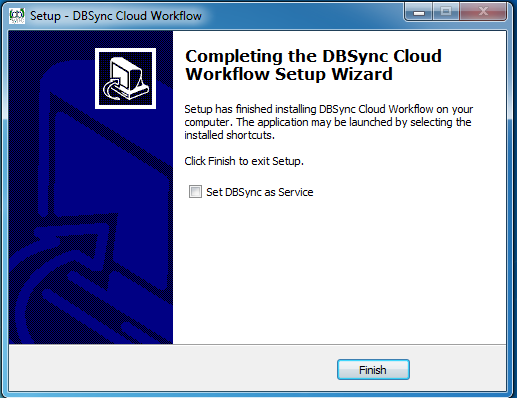
- Once the installation process is complete, you will be on window with name "Setup - DBSync Cloud Workflow" having an option "Set DBSync as service".
- If you wish to set it as a service, check the Check box "Set DBSync as Service" and click on "Finish" button as illustrated in image.
- If you have selected the option 'Set DBSync as Service', then DBSync would be running as a Windows Service in the background.
- If you wish to start DB sync manually, you can start DBSync from your desktop by starting "Start\All Programs\DBSync CloudWorkflow\DBSync".
Launch DBSync through All-Programs
If you wish to start the DBSync from the program files after the installation or any other time you login to your machine, you can go to Start->All Programs->CloudWorkflow choose DBSync service which would launch the tomcat that would acts as DBSync application server on the machine it is installed.
Now from your web-browser tab type the following address http://localhost:8080/cw/login.m?username=localhost_165@avankia.com&sessionId=avankia1&loginType=password&productCode=SomeCode to launch DBSync locally.
you can also learn the different options available of the installed folder of DBSync Cloud workflow, The following table shall list out all the available option for you to perform the necessary actions.
| Features | Description |
|---|---|
| DBSync | DBSync service which would launch the tomcat that would acts as DBSync application server on the machine it is installed |
| Remove Service | Choosing this option would remove the service from the windows services which runs in the background. Go to Control panel→Administrative Tools→ services Look for the service Apache Tomcat 8.5 DBSync which is removed. |
| Set as Service | On the start up of the windows, Instead of starting the service every time you can choose the option Set as Service that would run the service in the background. Go to Control panel→Administrative Tools→ services Look for the service Apache Tomcat 8.5 DBSync that keeps running. |
| Stop Service | Stop Service will stop the DBSync service |
| Uninstall | Uninstall will remove all the DBSync cloud workflow components from your machine. |
Overview
Content Tools