2022
Overview
In this article, you will learn how to transfer data from a file stored in an FTP server to Salesforce. The file will follow a CSV format. First, you will see a data map, explaining the relationship between fields in Salesforce and fields in the file stored in an FTP server. Then you will learn about the integration process. In the end, you will be presented with some additional information.
Data Map
As we are transferring data from a file stored in an FTP file to Salesforce, we need to find the correspondence between the fields from Salesforce and the fields in our file. The fields from Salesforce are defined by the selected table (for example Accounts). The fields in the file are defined by the user. Bear in mind that it is a good practice to keep the same nomenclature. In the example presented here, we will use data from Salesforce's table Accounts. However, the user may define other cases, such as:
The figure that appears below shows an example for the Accounts table from Salesforce. However, be aware that any other table from Salesforce could have been considered.

Creating the Integration
In order to transfer data from Salesforce to an FTP server (and vice versa), do the following steps:
- Go to www.mydbsync.com, click on Customer Login. Enter your Username and Password and click on Development Studio to open the Project console.
- Create a project with project, process, workflow. Use names of your choice.
- Click on Connectors on the left section of Project Console and create a Salesforce and an FTP connector. (Note: Enter the required details in the Salesforce and FTP credentials in the fields and validate the connections).
- Click on Project ->Process -> Workflow
- From the Workflow section, proceed to the Trigger Section.
- In the Trigger section, you can use three tabs, namely, Query Builder, Advanced Query Builder & Properties. You need to select data-source as FTP. You can make additional changes to Query by using the Advanced View section of Advanced Query Builder.
- In the Rules section, select the target connector as "Salesforce", operation, target object respectively.
- Click on Map to see the Mapping screen. You will see the list of Salesforce fields in the left section. On the right section, in Schema, you will see a list of selected file columns.
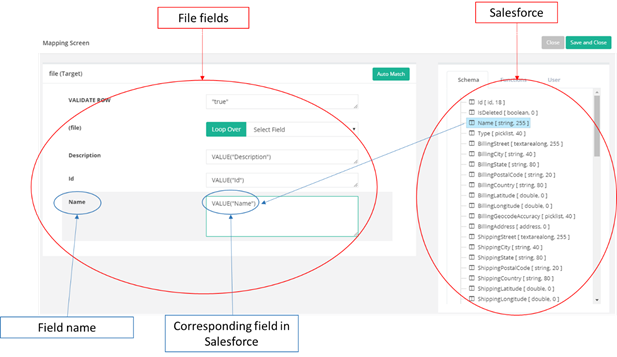
- Drag & drop the fields from Schema next to the required Salesforce fields. Click on Save and Close once the mapping is completed. Now, click on Save Workflow.
- Ensure that Workflow status is On.
- You are now ready to run the sync. Click on the Run button on the top right corner of the page.
- After the successful sync, open the log and check if everything is fine. Check if the data has been transferred to Salesforce.
Note: to transfer from Salesforce to an FTP server, define the Trigger using the Salesforce connector and the Rule using the FTP connector.
Additional Information
You can find additional information in the following links:
How to conveniently transfer data to and from FTP servers using DBSync: this article contains a detailed description of how to transfer data between Salesforce and a file contained in an FTP server.
Overview
Content Tools