2022
DBSync – Database to Database Integration
- Setup your Database for Integration. For this Tutorial I will be using MySQL Database Named "salesforce".
- Create tables "dbAccount" and "dbAccountNew" in Database with following script.
Database Scripts
create table `salesforce`.`dbAccount`
 ( `AccountID` varchar(100) NOT NULL ,
 `AccountName` text NOT NULL ,
 `BillingStreet` text ,
 `BillingPostalCode` numeric(20) ,
 `AnnualRevenue` decimal(30,2) ,
 `CreatedDate` date ,
 `LastModifiedDate` datetime ,
 `NumberOfOfficeLocations` int ,
 PRIMARY KEY (`AccountID`)
 );

 create table `salesforce`.`dbaccountnew`
 (`AccountID` varchar (100) NOT NULL,
 `AccountName` varchar (300) NOT NULL,
 `BillingAddress` varchar (500),
 `AnnualRevenue` Decimal (50,2),
 `CreatedDate` datetime ,
 `LastModifiedDate` datetime ,
 `NumberOfOfficeLocations` int,
 PRIMARY KEY (`AccountID`)
 );
- Enter some test data in "dbAccount" table. Go To www.mydbsync.com.
- Select Customer Login. Enter your User Name and Password and click Sign in. Click on Launch to access DBSync Integration Console.
- In DBSync console click on Create profile Button, Enter Profile Name and click on Save Button.

- A new Profile will be created by given Name. In this tutorial I have used name Database2Database. The Profile will be listed in the profile area as shown below:
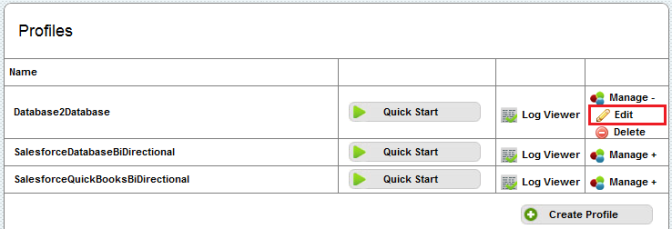
- Click on the Edit link on the right side of the profile Name. You will be redirected to the Process Builder window in the DBSync Console. Click the Create Adapter Button on the left hand side.

- Enter the Adapter Name, from AdapterType Drop Down Select Database Adapter and Click on Save Button.
Note: Adapter Name cannot contain Blank Space.

- Adapter will be created and will be listed in the Adapter section of the Process Builder. Click on Edit link in front of the adapter name and you will be presented with properties for the Adapter at the bottom left of the window. Enter values for all the properties and click on Save Properties. Both the sections of the window are shown below sequentially.


- Click on Validate Link Next to Adapter Name. A message box is displayed; if the message says "Connection Settings are valid" you are good to go. Else Click on Edit and enter correct values for Adapter properties and repeat the steps. Click OK.

- Click on Add Process Icon on the Right side of the screen. Enter Process Name and Click on Ok. A new process will be created and listed under profile name on the right side of the screen.

- Double Click on the Process Name "DatabaseSync" to open the process in the Control flow for DatabaseSync States. The process will contain 2 States by default:
- Start_state
- End_State
- Drag the Create State Button onto the control flow Area to create a new state. Enter the state name as "Execute" and click on OK Button. A new state will be created and placed on control flow area.

Click on [X] icon on Start_state to delete the default control flow from Start_State to End_state.
- Right Click\connect on Start_state followed by left click on Execute will create a control flow from Start_state to Execute. Right Click\connect on Execute followed by left click on End_state will create a control flow from Execute to End_state. All the control flows are displayed using arrows from one state to other state. Below you will find 2 screenshots one containing no control flow and second containing control flow as Start_state to Execute to End_state. Once done click on Save button at the top right corner of the window.


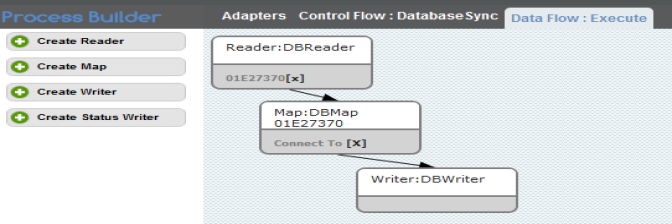
- Double click on Execute state to open data flow for Execute state. Drag the Reader button onto the data flow area and enter the Name for reader and click on OK Button. In this tutorial I am using "DBReader" as the reader name.

- Follow the same step for Create Map and Create Writer button. And you will get a data flow area as shown below in the screenshot. In this tutorial I have used "DBMap" for Create Map and "DBWriter" for Create Writer components.
- Reader: Reader is a process component that reads data from source "data source". Reading the data is also known as "Extracting" the data. Note one state can have only one Reader.
- Map: Map component converts data into the format that could be understood by writer and target data source. Converting the data so that it could be understood by target data source is also known as "Transforming" the data. Note One state can have more than one Map.
- Writer: Writer component writes the data to target "data source". Writing the data into a data source is also known as "Loading" the data. Note One State can have more than one writer.

- Right Click\Connect on DBReader followed by left click on DBMap will create a control flow from DBReader to DBMap. Right Click\Connect on DBMap followed by left click on DBWriter will create control flow from DBMap to DBWriter. All control flows will be displayed using arrows. A screenshot is shown below displaying the control flow after following the above process.
- Right Click\Properties on DBReader. The properties will be displayed in the bottom left area of DBSync Console. Select Database from Adapter Drop Down.

- Once Database Adapter is selected, a query builder section will appear in properties area and a lookup icon on the right side of query builder section. Click on lookup icon and you will presented with a query section will appear on the right of lookup icon. Query section will contain all the table listing from the database. Select the table and fields from the table to auto generate the query in query builder section. You can also write your own query. In this tutorial I will be selecting all the fields from "dbAccount" table. Click on save button once done. The screen shot is shown below:

- Right Click\Properties on DBWriter. The properties will be displayed in the bottom left area of DBSync Console. Select Database from Adapter Drop Down. Once Database Adapter is selected, all the properties for DBWriter will be listed in the properties area with 2 lookup icons. Click on the lookup icon at the top and list of tables from database will be displayed in the query section on the right. Check on the target table (The table you want to write the data to) name on the right side of the window. In this tutorial My target table is "dbAccountNew". Enter the primary key field name of the table in the pkey field, Select Upsert in Writetype and select true from autocreate drop down. A screenshot is shown below with all the values entered for DBWriter. Writetype contains 3 values in the drop down "insert", "update" and "upsert".
- Insert: If this option is selected then only new records from the source table will be pushed to target data source.
- Update: If this option is selected, it will update the target data source records with updated values in the source.
- Upsert: Upsert is combination of insert and update. If this option is selected then new data will be inserted in target data and old data will be updated with changed data.

- Click on Save once done. Right Click\Properties on DBMap. Enter 1 in the sequence text box. Enter description for the mapping. Click on Edit link for *******_map.xml file. You will be presented with a new window with source and target columns. Screenshots for Map properties and map editor is shown below respectively.


- In the Map window click on Target column followed by source column to create field to field mapping. You can also use various functions provided by DBSync. In the mappings shown below I have used few of these functions. Rest of the functions and their details you can find at the end of this tutorial or you can refer the following link "Mapping Functions". The Map window with all mappings done is shown below.
Overview
Content Tools