2022
Overview \
Data Flow \
Process Map \
Pre-requisites for Integration \
DBSync package (DBSync GreatPlains Integration) Installation in Salesforce \
Configure Great Plains for DBSync Integration \
DBSync Profile Setup \
DBSync Installation \
DBSync Configuration with Salesforce & Great Plains \
Running the integration\
Overview
DBSync for Salesforce & Microsoft Dynamics Great Plains Integration is an easy to use application to integrate Salesforce Accounts/Contacts, Products and Opportunity with GP Customers, Items and SOP Transactions respectively. DBSync is also useful in migrating historical GP data into Salesforce or vice versa. DBSync provides Bi-directional sync with pre-built field to field map along with flexibility for more complex and dynamic mapping capability.
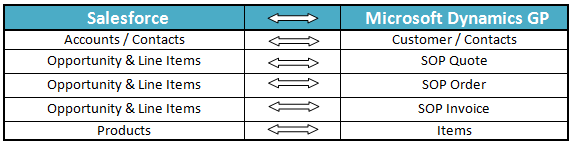
Data Flow
Data flow of Bi-directional integration between Salesforce & Microsoft Dynamics GP is shown in the below table.
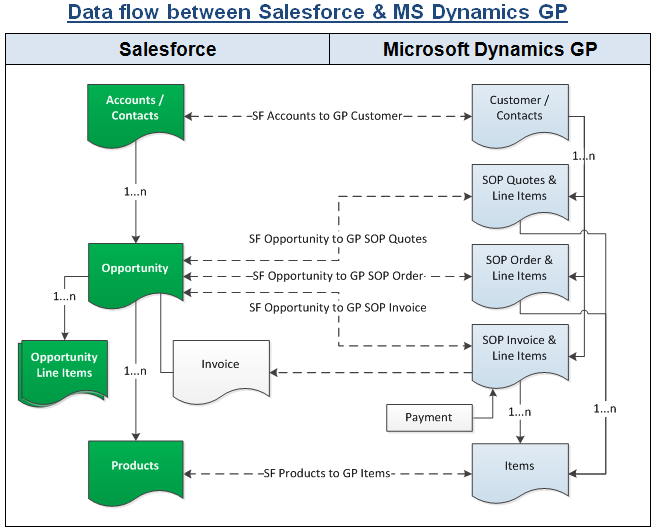
Process Map
Process Map of Bi-directional integration between Salesforce & Microsoft Dynamics GP is shown in the below image.
Pre-requisites for Integration
- Integration of Salesforce to GP SOP transaction is invoked provided the Generate field in Salesforce Opportunity is selected with the required transaction.
- It is mandatory that SF Opportunity (to be integrated with QB Invoice) is associated with the respective SF Account & also should have Products with Standard Price Book attached to it for DBSync to invoke integration.
- GP to SF integration is based on the time stamp. GP entity that is newly created or modified will be picked to sync into Salesforce.
DBSync package (DBSync GreatPlains Integration) Installation in Salesforce
- Install the DBSync Salesforce package for Salesforce & Great Plains integration solution from the AppExchange using the following link. https://login.salesforce.com/?startURL=%2Fpackaging%2FinstallPackage.apexp%3Fp0%3D04t9000000094vw&crc=1
- Once you click on the above link, you will get a prompt to enter Username and Password of Salesforce instance. Provide the necessary Salesforce credentials to proceed with the package installation. The Salesforce user installing the package should have the administrative privileges to proceed with the installation.
- Next you will see the Package Installation Details & Components. Click on Continue to Approve Package API Access, Choose Security Level and complete Installation.
- Verify if the package installation was completed successfully and check for the 'Deployed' status of the DBSync Invoices object.
- Go to Setup ? Create ? Custom Objects menu to verify if the "Invoices" object has Deployed status. If it is not, click edit button adjacent to the Invoice object, and mark Deployed as checked, and click on 'Save' button.
- Follow the next steps to include DBSync fields into Page Layout.
- Go to Setup ? Customize ? Account ? Page Layout. Click on edit and drag 'GPCustomerID' field on the page layout. Save the Account Page Layout.
- Go to Setup ? Customize ? Contact ? Page Layout. Click on edit and drag 'GPContactID', 'UniqueContactID' fields on the page layout. Save the Contact Page Layout.
- Go to Setup ? Customize ? Opportunities ? Page Layout. Click on edit and drag 'DOC ID', 'Doc Number', 'GPTransaction', ' GPTransactionID',' TransactionType' and ' Primary Contact' fields on the Page Layout.
- Go to Setup ? Customize ? Opportunities ? Opportunity Products. Click on edit and drag 'GP TransactionID' field on the Page Layout.
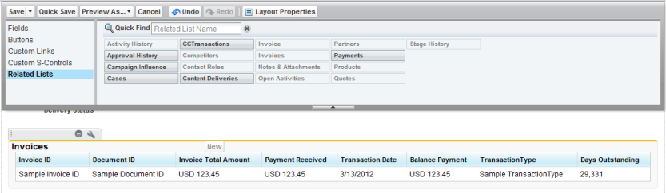
- Click on Related List and drag Invoices object to the Page Layout.
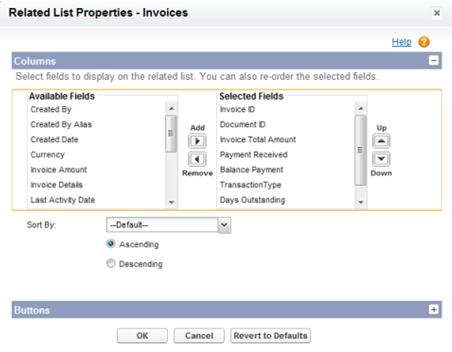
- Click on the setup icon on the Invoices object in the Related List Section and hit 'edit properties' button. Select columns Invoices, Invoice number, Total Invoice Amount, Payments, Balance, Days Outstanding, and Transaction Date. See the below screenshot for the columns order.
- After completing the process of adding all the necessary fields to the Opportunity page layout, click on the Save button on the top left had corner of the Opportunity Page Layout window to commit all the changes.
- Go to Setup ? Customize ? Opportunities ? Fields, and under Opportunity Custom Fields & Relationships section, click on New button to create a new custom field of Data Type "Auto Number" in Opportunity page layout with the following parameters.
- Field Label : Auto Doc Number
- Display Format : DBSYNC{000000}
- Starting Number : 1
- Field Name : Auto_Doc_Number
- Click on Next and make sure all the check boxes under Visible column are checked. Once done, click on Next and make sure Opportunity Layout is marked as checked on the subsequent page and click Save to commit all the changes.
- Go to Setup ? Customize ? Product ? Page Layout to move 'GPProductID, 'Location Code, 'Product Type' and 'Unit Of Measurement', 'PriceLevel', 'Class ID' and 'Currency ID' field to the Product layout.
- At this point, you have successfully completed configuration of your Salesforce instance for integration with Great Plains.
Configure Great Plains for DBSync Integration
- Install and setup Microsoft Dynamics GP 10.0 or higher.
- Install and setup SQl Server Management Studio.
- Install and setup eConnect Runtime for the Domain user accessing Great Plains and SQL Server.
DBSync Profile Setup
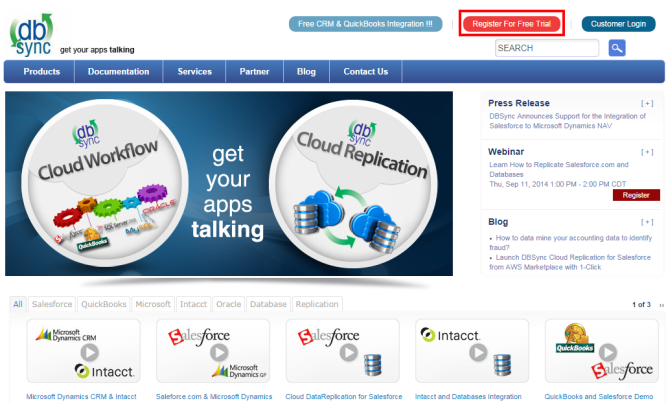
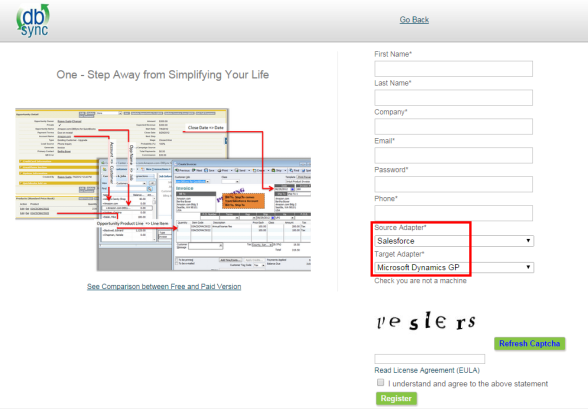
- Go to mydbsync.com & register for Free Trial.
- Ensure that Source & Target Adapters are Salesforce & Microsoft Dynamics GP respectively.
- Authentication e-mail will be sent to your email address. Click on the link in the authentication e-mail and enter the user name and password mentioned during registration.
- DBSync account is created with Salesforce & Great Plains adapters for a trial period.
DBSync Installation
It is necessary the on premise version of DBSync is used for Salesforce and Great Plains Integration. In order to use DBSync On Premise, DBSync should be installed locally and DBSync Account should be switched to On Premise from On Demand.
The process of installing DBSync is explained in the below link.
http://help.mydbsync.com/docs/display/dbsync/DBSync+On-Premise+Installation
The process of switching DBSync Account from On Demand to On Premise is explained in the below link
http://help.mydbsync.com/docs/display/dbsync/DBSync+On+Demand+to+On+Premise
DBSync Configuration with Salesforce & Great Plains
- Login into www.mydbsync.com with your Username & Password.
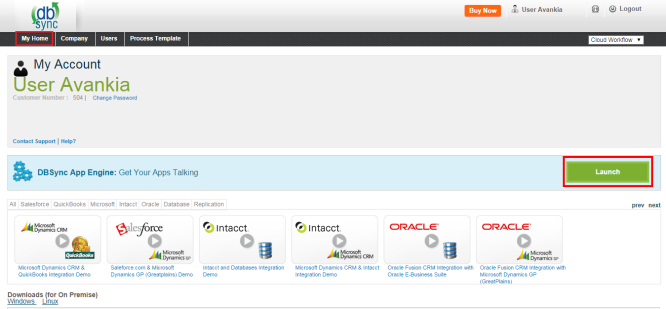
- Once logged in, click on MyHome from the menu and click on Launch button as show.
- Once launched, you will be redirected to DBSync console page in the next tab.
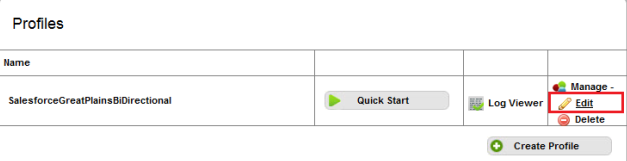
- Click on manage ? edit to navigate to adapter configuration page as shown.
- Click on edit link for the respective adapter to add required credentials as shown below.
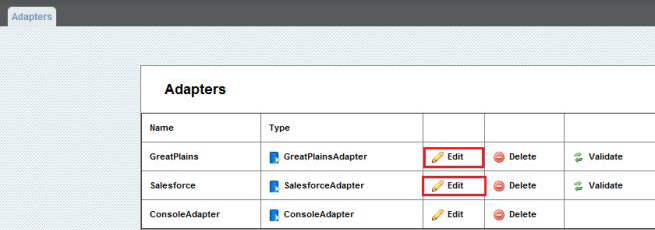
For GreatPlains
eConnectPort : 18888
Datasource : DESKTOPUSERNAME\MSSQLSERVER
Dbname : <<GreatPlains Company Database name >>
- Click on Validate to validate your GreatPlains adapter.

- Click on edit link for the Salesforce adapter to enter in Salesforce credentials as shown
For Salesforce
Username : <<Salesforce Username>>
Password : <<Salesforce password>>
Endpoint : https://salesforce.com/services/Soap/u/20.0
Note: For Sandbox, replace the default endpoint URL with the following link.
https://test.salesforce.com/services/Soap/u/20.0
Make sure to add the Salesforce security token after entering the password.
- Click on Save Properties button and then on Validate to validate your Salesforce credentials.
Running the integration
DBSync integration for Salesforce & Great Plains can be run automatically using Scheduler or manually using the Run Button.
The detailed process of using Scheduler to run the integration is shown in the below wiki link.
http://help.mydbsync.com/docs/display/dbsync/Scheduler
Using the Run button to run the integration manually is explained below.
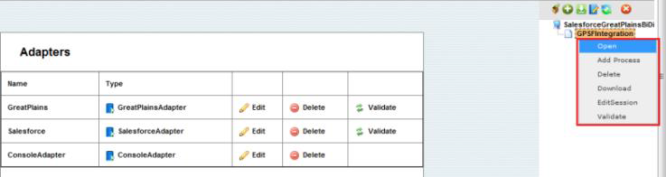
- Upon successful validation of your adapters, you can proceed to the Process Builder console either by double-clicking on the PDL on the right-hand column of DBSync console or by right-clicking and selecting the option Open. The below screenshot illustrates the same.
- The process builder page opens up. Before you can initiate the integration, select the Log level as All from the drop down and click Save button as highlighted in the below screenshot. Now click on Run button to start the integration process.
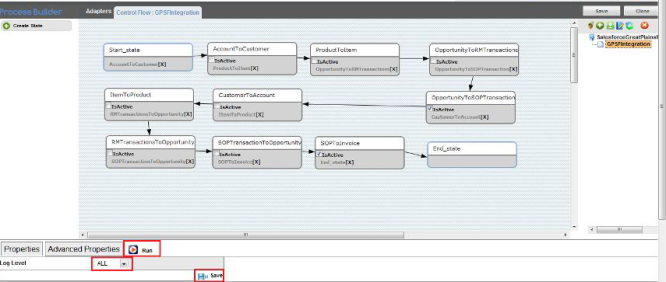
- The various boxes with connection established between each one of them are referred to as "STATES" or "WORKFLOWS". Each of these workflows can be activated or de-activated based on the requirement. These workflow rules can be activated by having their respective checkboxes checked.

- Once you have activated the necessary WORKFLOWS, click on the save button to save the configuration before initiating the integration Process.
Overview
Content Tools