2022
Login Page
1. Open Mozilla Firefox.
2. Enter the URL https://dbsync03.appmashups.com/dbsync2/login.m
3. The DBSync Log In Page is displayed.
Field Name |
Description |
Example |
|---|---|---|
Username |
Enter the Username |
<<user name>> |
Password |
Enter the Password |
<<password>> |
4. Click Login to view the DBSync 2.0 application.
5. Click on the Get Started hyperlink. The DBSync 2.0 Register page displays.
Note:All fields with* markare mandatory to enter\
Field Name |
Description |
Example |
|---|---|---|
First Name * |
Enter the first name |
User |
Last Name * |
Enter the Last name |
S |
Phone * |
Enter the phone number |
080-27824301 |
Email * |
Enter the Email ID of the user |
user@avankia.com |
Password * |
Enter the password of the user |
|
Confirm Password * |
Enter the password of the user to confirm |
|
Company Address 1 * |
Enter the company address |
<<Your Company Name>> |
Company Address 2 |
Enter the company address |
<<Your Company Name>> |
City * |
Enter the company address city name |
|
State * |
Enter the company address state name |
|
Zip Code * |
Enter the company address zip code |
|
Would you like on-demand or on-premise install |
Select the install process either to on-demand or on-premise from the drop down list |
On-Demand |
License Agreement |
Displays the license agreement and terms and conditions |
|
After entering all the fields, check the “I understand and agree to the above statement” checkbox
6. Click Register to register the details. The successful registration message displays after registering the details.
Home Page
DBSync home page displays after the successful login. The Homepage displays the various menus in the menu bar.
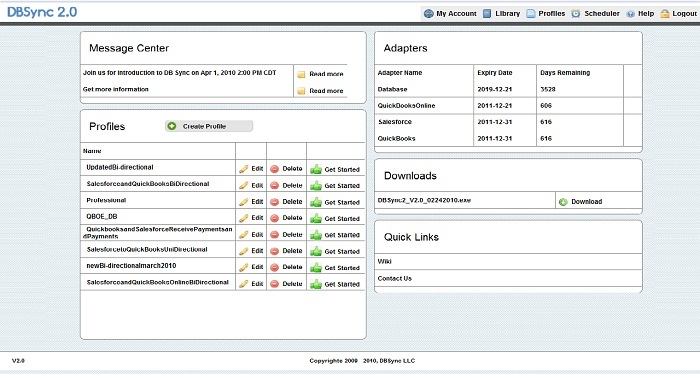
Fig.1 Home Page
Menu Name |
Description |
|---|---|
My Account |
Displays the details of the Account in DbSync.Like Server Login Details and Password Details. |
Library |
Displays the ready to use (default) mappings.By going through the description and overview hyperlink profiles, you can identify the profiles that support your needs. Click on the ‘Add’ hyperlink next to the profile in the library, to add the ready profiles to your login. |
Profiles |
Allows you to view the existing profiles. Based on the permissions you are able to edit the profile details. |
Scheduler |
Schedule the profile process and set the cron settings. |
Help |
Displays the help for the DBSync application |
Logout |
Exit the application |
Link Names |
Description |
|---|---|
Create Profile |
Enter the profile name to create a new profile. |
Message Center |
Displays the information related to DBSync application and other related news. |
My Adapters |
Adapters support profile repository features and my adapters helps you to identify your license duration. |
Quick Links |
Quick links helps you to view the information easily. |
Help |
Provides help for the application |
Knowledgebase |
Provides information on the application such as FAQ, troubleshooting and so on. |
Mapping Library |
Helps you to map the library components in the database. |
Tutorials |
Provides the knowledge on the application. |
Contact Support |
Provides you the contact support for the technical queries. |
Get Started |
The link for each profile which helps the end-user to move great chunks of data at one shot. |
Library
The Library component allows you to import the ready profiles with the default mappings for the respective integration adapters such as Salesforce, QuickBooks, Databases and so on.
- Click on the Overview hyperlink to know more details about the file you want to transfer from the current location to the destination and the description of the adapters that you want to transfer.
- Click on the Learn More hyperlink to know more details about the process.
- Click on the Add hyperlink to add the ready integration process template to your login.
Note: Once you import the profile from the library, the application leads you directly to the Profile Page.
The profile page has configurations for your profile adapters.
Overview
Content Tools