2022
Page History
The Writer Component
This page will demonstrate how to edit the writer component of DBSync.
In order to access the writer, first you will need to open the mapping of a process that you have already created. Please see section Creating Process Definitions of the wiki to add a process definition language and to open a process map for more information regarding creating and viewing a process.
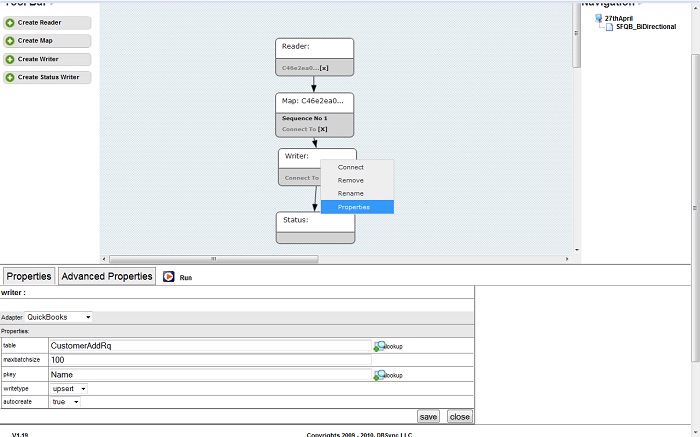
Reference the above screen shot when reviewing the instructions given below.
1. Right-click on the Writer Component and select 'Properties' to view the details of it.
2. Select the Adapter type from the drop down list – Example – QuickBooks Adapter. The properties of the specific adapter are automatically displayed on the selection.
3. Enter the External ID name in the field, if you wish to perform the Upsert operation on the records.
"Example-QBName__c"
4. Enter the Table name that you want to select as the target. (Account for example)
5. Click on the Lookup hyperlink to select the object to which it has to be written.
6. Enter the maxbatchsize that is the maximum batch size of the file as per your requirement. Example – 1000
7. Select the Write type from the drop down list. The options available are insert, update and upsert.
8. Click Save to save the information.
9. Click Delete to delete the Writer Component.
10. Click Close to close the Writer window.
![]() Note: A name for the writer must be definedA workflow is a collection of one Trigger and a set of rules required to perform an integration.
Note: A name for the writer must be definedA workflow is a collection of one Trigger and a set of rules required to perform an integration.
The status can be set to, 'On or Off'. An on status will enable a workflow to execute - either by schedule or by Run Now action. An Off status will disable a workflow from executing. Properties can also be set by selecting appropriate fields and save.
The below screenshot illustrates the workflow listing page. All workflows have a sequence in order of execution.

| Panel |
|---|
Create, Edit and Delete Workflow |
To create a workflow - "Create New Workflow"
- Enter a preferred name and "Save" to view the Workflow on the listing page.
- "Edit"- To edit/change the Workflow name.
- "Delete"- To Delete the Workflow and all of its components from the system. Once deleted, a user will not be able to recover Workflows, or any of its components, from the system.
- "Download"- Download the Workflow in a zipped format in the Downloads folder of the local file system.
Overview
Content Tools