2022
Introduction
This document explains the concept of ApiCode and, how it can be used to build DBSync Adapters.
The following step-by-step story board explains the following:
1: What is ApiCode ?
2: How to write an ApiCode project. And then, create an ApiCode Service?
3. How to write a test case for an ApiCode Service?
4: How to build and deploy an ApiCode project on DBSync2?
5: How to use it in DBSync profiles and execute a process flow?
Pre-Requisites
- JDK 7.
- Eclipse IDE (Enterprise developers).
- Local DBSync setup.
StoryBoard
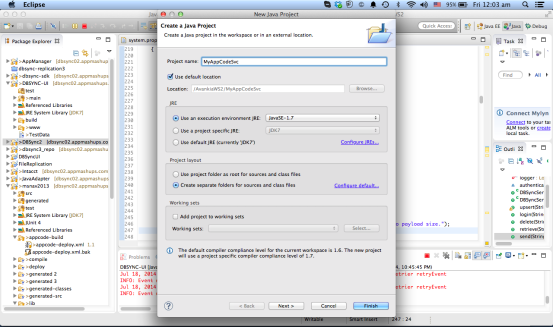
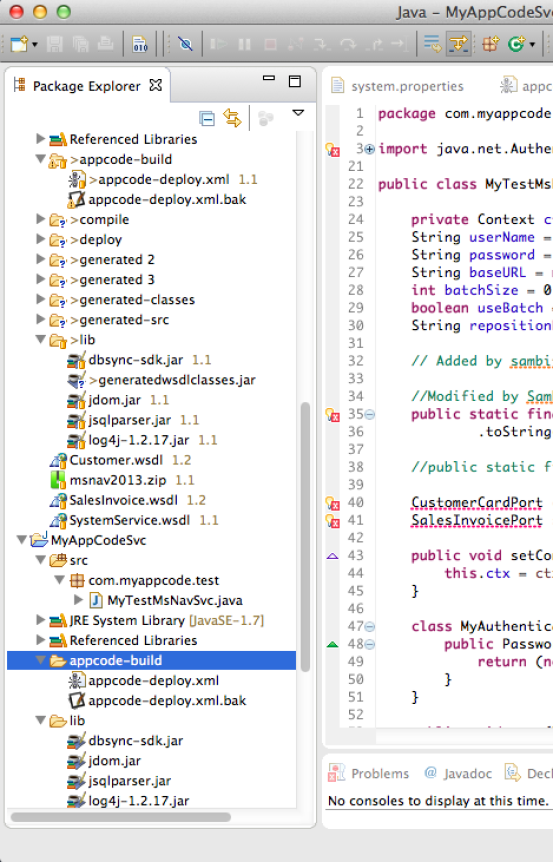
- Create a new Java Project in Eclipse IDE.
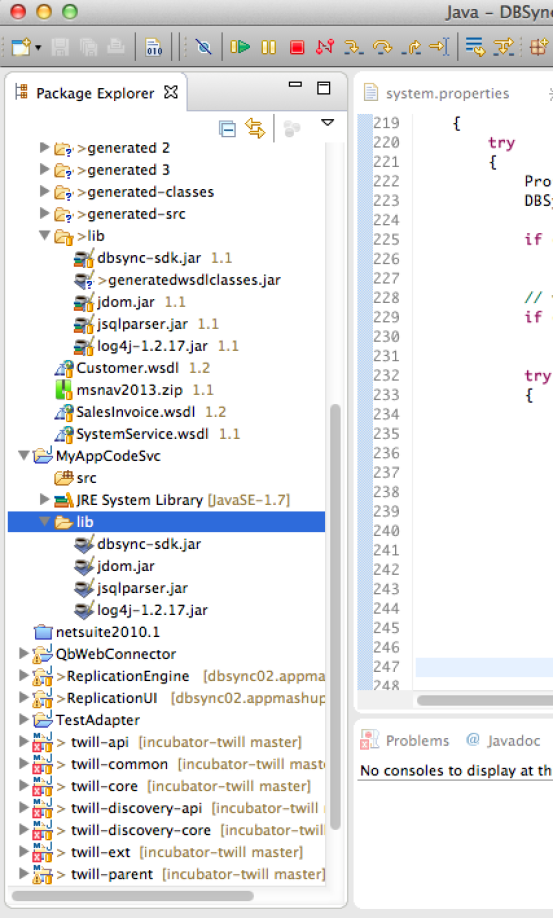
2.Now add the dbysnc-sdk.jar in the dependencies lib folder and other necessary jar files.

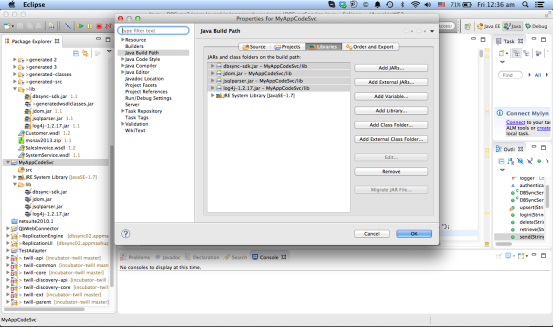
3. Now add the jars to the project dependencies Classpath and configure the build path in eclipse. Do so by using "Add Jars" button and then adding the jars present in the lib folder.
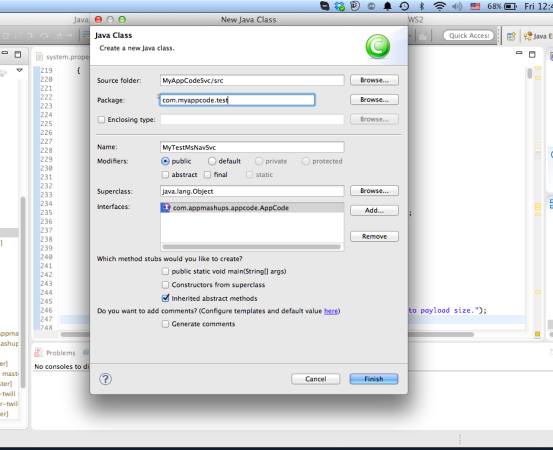
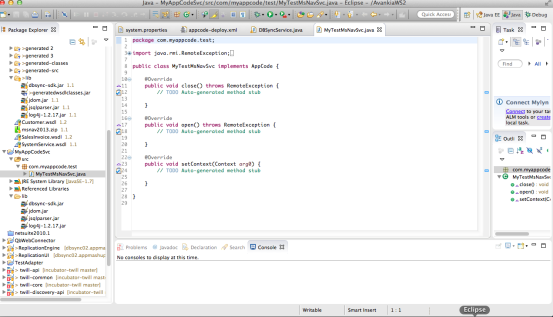
4. Now, create your main ApiCode Implementation class.
Note : Each ApiCode implementation must implement com.appmashups.appcode.AppCode interface:
5. Now, implement the default methods exposed by the ApiCode interface.
5.1 Open – Method called from the JavaAdapter to initialize the adapter resources, if any. This is done so that the latter can be used during the sync operation.
5.2 Close – Method called by JavaAdapter to close the ApiCode service and release its resources - if it is holding up any.
5.3 setContext – Utility method exposed to allow Java Adapter to set the context with the necessary properties.
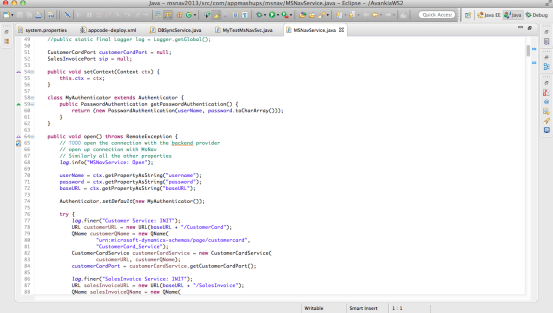
6. Now see an example of how we have implemented app-code for MSNav.
7.Please note that, before we start writing any reader or writer methods, in the AppCode service, we need to import the SOAP WSDL classes into the project. This will allow us to access the necessary entities and their fields and mappings.
For this, we can make use of the build script "appcode-deploy,xml" that is checked in under msnav2013 module under dbsync2_1 project in the CVS repository. The same needs to be copied into the "appcode-build" folder under the project.
8.Now, change the relevant values in the apicode-deploy.xml file to point to the relevant locations and set the necessary properties.
<!-- set global properties for this build -->
<!-- Setup Deployment specific properties -->
<property name="appcode.name" value="MyTestMsNavSvc" />
– The name of the appcode project —
<property name="appcode" location="/AvankiaWS2/MyAppCodeSvc"/>
— The location of the appcode project in your machine —
<property name="environment" value="sandbox" />
— The environment under which the jars will be deployed in dbsync2 ( folder under the profile folder) —
<property name="profile" value="profile_test" />
---- Name of the profile ----
<property name="dbsync.server.url" value="http://localhost:8080/dbsync2"/>
— DBSync2 server URL -----
<property name="dbsync.server.username" value="localhost@avankia.com"/>
— DBSync2 UID ----
<property name="dbsync.server.password" value="avankia"/>
---- DBsync2 Password —
Note: The DBSync2 Properties are actually required to deploy the zip file in DBSync2 server location which the DBSync2 server is running
9. Assuming we are trying to do a a SOAP call in our AppCode Service implementation, we need to run a wsimport task to download the binding classes into our project. This can be availed for future use to Read, Write and conduct getmetadata operations.
<!-- Additional properties to pass the wsdl filenames -->
<property name="customer_wsdl" value="Customer.wsdl"> </property>
<property name="salesinv_wsdl" value="SalesInvoice.wsdl"> </property>
<!-- added for running wsimport -->
<property name="java_home" value="/Library/Java/JavaVirtualMachines/jdk1.7.0_55.jdk/Contents/Home"/>

<target name="wsimport" depends="init">
<exec executable="$\{java_home\}/bin/wsimport">
<arg line="-keep -s $\{appcode\}/generated-src -d $\{appcode\}/generated-classes $\{appcode\}/$\{customer_wsdl\}"/>
</exec>
<exec executable="$\{java_home\}/bin/wsimport">
<arg line="-keep -s $\{appcode\}/generated-src -d $\{appcode\}/generated-classes $\{appcode\}/$\{salesinv_wsdl\}"/>
</exec>
<jar destfile="$\{appcode.lib\}/generatedwsdlclasses.jar" basedir="$\{appcode\}/generated-classes"/>
</target>

<target name="init">
<!-- Create the time stamp -->
<tstamp/>
<mkdir dir="$\{deploy.dir\}"/>
<mkdir dir="$\{compile.dir\}"/>
<mkdir dir="$\{deploy.dir\}/zip"/>
<!-- add src and target files -->
<delete dir="$\{appcode\}/generated-src"/>
<delete dir="$\{appcode\}/generated-classes"/>
<mkdir dir="$\{appcode\}/generated-src"/>
<mkdir dir="$\{appcode\}/generated-classes"/>

<delete file="$\{deploy.dir\}/$\{appcode.name\}.jar"></delete>
<delete file="$\{deploy.dir\}/zip/$\{appcode.name\}.zip"></delete>
<delete file="$\{appcode.lib\}/generatedwsdlclasses.jar"></delete>
</target>
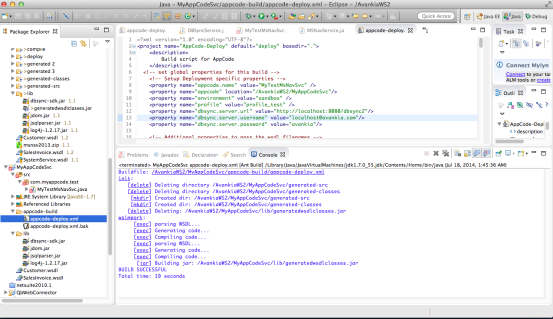
Run the ant task with target as wsimport. This will generate the SOAP binding classes along with the classes and source code.
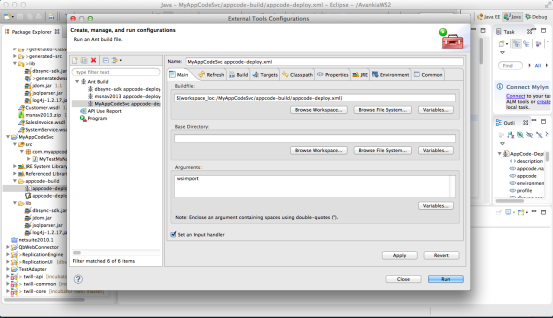
You can see the sample output below:
10. Now you can start using the generated classes in your AppCode project.
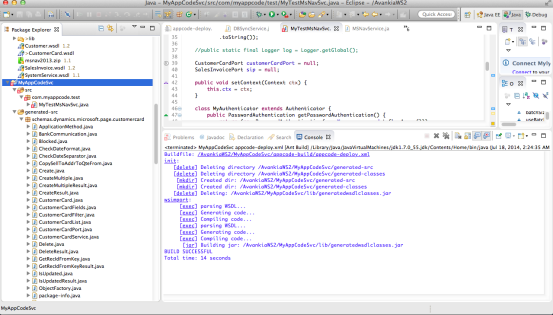
Note: Due to limitations in the existing DbSync mapping algorithm, which does not allow certain nested hierarchies, we need to create DBSync Compatible Wrapper classes to allow the metadata binding with the conversion processor.
Please refer to msnav2013 project where we have created necessary wrapper classes to do the metadata binding.
The main function of the wrapper classes is to convert from DBSync compatible type to the underlying SOAP type and Vice Versa.
public class Customer {
<properties
and methods
public static Customer createCustomer(CustomerCard card) {
Customer newObject = new Customer();
newObject.setKey(card.getKey());
newObject.setNo(card.getNo());
////Set other attributes
return newObject;
}
public static CustomerCard createCustomerCard(Customer customer) throws DatatypeConfigurationException {
CustomerCard card = new CustomerCard();
 card.setKey(customer.getKey());
 card.setNo(customer.getNo());
//set other attributes
return card;
}
}
11. Build the filter classes to be used in the reader classes.
Filter the data in the Read query. Please refer to CustomerFilter and SalesInvoiceFilter in MsNav.
 public class CustomerFilter{
     public CustomerFilter(){}
     public String key;
     public String No;
     public String Name;
}
12. Open Method
In this method, all authentications take place. Each AppCode can, by default, take the following three parameters as Adapter Properties.
userName = ctx.getPropertyAsString("username"); //User name for accessing service
password = ctx.getPropertyAsString("password"); //Password for accessing the service
baseURL = ctx.getPropertyAsString("baseURL"); //BaseUrl for making the soap call
In this method the actual authentication happens which is more of a one time in the reader and writer call
Authenticator.setDefault(new MyAuthenticator());
           try {
                log.finer("Customer Service: INIT");
                URL customerURL = new URL(baseURL + "/CustomerCard");
                QName customerQName = new QName(
                           "urn:microsoft-dynamics-schemas/page/customercard",
                           "CustomerCard_Service");
                CustomerCardService customerCardService = new CustomerCardService(customerURL, customerQName);
                customerCardPort = customerCardService.getCustomerCardPort();
                log.finer("SalesInvoice Service: INIT");
                URL salesInvoiceURL = new URL(baseURL + "/SalesInvoice");
                QName salesInvoiceQName = new QName("urn:microsoft-dynamics-schemas/page/salesinvoice","SalesInvoice_Service");
                SalesInvoiceService sis = new SalesInvoiceService(salesInvoiceURL,salesInvoiceQName);
                sip = sis.getSalesInvoicePort();
                batchSize = Integer.parseInt(ctx.getPropertyAsString("batchSize"));
           } catch (Exception e) {
                log.log(Level.SEVERE,
                           "Customer/SalesInvoice Service Initialization Failed", e);
                e.printStackTrace();
                throw new RemoteException("Customer/SalesInvoice Service Initialization Failed", e);
          }
13. Read and Write Methods.
An AppCode implementation service can either have a Read or a Write method exposed for Reader and Writer. The Reader Syntax is as follows:
/** Method to read a list of customers in MsNav Takes in a variable arguments* of CustomerFilter as input and returns a list of Customer objects */
     public List<Customer> readCustomer(CustomerFilter filter) throws Exception {//Read operation}
Inside a reader method, data is fetched using a relevant SOAP call with the necessary filter applied and the data fetched from the SOAP call is wrapped into the dbsync compatible output wrapper class
           try {
                // Modified by Sambit to check for null for the filter object
                if (null != filter) {
                     for (Field field : CustomerFilter.class.getFields()) {
                           CustomerCardFilter cusCardFilter = null;
                           Object value = getFieldValue(field, filter);
                           if (value != null
                                     && !((String) value).trim().equalsIgnoreCase("")) {
                                cusCardFilter = new CustomerCardFilter();
                                String fldName = field.getName().substring(
                                           field.getName().lastIndexOf(".") + 1);
                                // CustomerCardFields.valueOf(CustomerCardFields.NO.toString());
                                //System.out.println(CustomerCardFields.NO.toString());
                                cusCardFilter.setField(CustomerCardFields.valueOf(fldName.toUpperCase()));
                                cusCardFilter.setCriteria((String) value);
                                custCardFilterList.add(cusCardFilter);
                           }
                     }//for}//if(null != filter)
                // if there are more elements to read or it is the first read
                if (repositionKey == null || hasMoreElements()) {
                     CustomerCardList cList = null;
                     if (repositionKey == null) {
                           cList = customerCardPort.readMultiple(custCardFilterList,"", batchSize);
                     } else {
                           cList = customerCardPort.readMultiple(custCardFilterList,repositionKey, batchSize);
                     }
                     int cCount = cList.getCustomerCard().size();
                     for (int i = 0; i < cCount; i++) {
                           CustomerCard cusCard = (CustomerCard) cList.getCustomerCard().get(i);
                          /** Customer cusw = new Customer();
                          * cusw.setCustomerCard(cusCard);*/
                           // Customer cusw =
                          // (Customer)ClassConverter.convertToClass(cusCard,// Customer.class);
                           Customer cusw = Customer.createCustomer(cusCard);
                           customers.add(cusw);
                     }
                     if (customers.size() == batchSize) {
                           // Get the last element in the list of customers to get the
                           // repositionkey
                           Customer cusw = customers.get(batchSize - 1);
                           repositionKey = cusw.getKey();
                     } else {
                           repositionKey = "-1";
                     }
               }
           } catch (Exception e) {
                e.printStackTrace();
                log.log(Level.SEVERE, "Error while reading customers from MSNAV", e);
                throw e;
           }
           return customers;
14. Deployment Process.
The AppCode is bundled into a zip file. Then, it is deployed as a zip file into the environment specified in the appcode-deploy.xml file. The environment name is specified in the “environment” attribute.
<property name = “environment” value = “sandbox” />
Details about the appcode-deployx.xml parameters have been mentioned previously:
By default, the target is deploy. It does the following:
- init
- wsimport
- build
- zip
- deploy
For the deploy target to work, your DBSync location, that you specified in the appcode-deploy.xml file, must be running.
15. Viewing the Profile List.
Select the profile that you have used to deploy the AppCode. In this case, it is profile_test.
16. Java Adapter Properties.
Set the adapter properties for the Java Adapter:
Classpath – same as environment
Username – SOAP Service username
Password – SOAP Service Password
BaseURL – SOAP Service BaseURL
17. View the Metadata
View the metadata of the service to select and map.
Overview
Content Tools