2022
Upgrading to DBSync 4.2.6 ( On Premise Version)
Download the application
- Go to www.mydbsync.com, click on Customer Login. Enter your DBSync User ID and Password and click on Login button.
- Download The DBSync application from Download link on the right hand side of the My Home page as shown below.
- Download the desired version of DBSync based on the Operating system, either Linux or Windows platform.

Backing-up Your Current Projects
- Open My Computer and go to <<DBSync Install Dir>> \dbsync2\WEB-INF\conf\db and copy all the Files and folders to your Backup drive.
- For example, if DBSync is installed in C:\DBSyncIS31, you profile path would be "C:\DBSyncIS31\dbsync2\WEB-INF\conf\db".
- Copy all the contents in the "db" folder and save it in a desired location.
Uninstalling Previous Version of DBSync
- Go to Start\All Programs\DBSync Integration Suite\Uninstall
- If User Access Control window appears click on Yes.
- Select Yes on DBSyncIS Uninstall window. Once Uninstall is done click on OK.
Upgrading the Application
- Go to the Download folder and start the installation by right-clicking and selecting "Run as Administrator" on the "DBSync_V31.exe" file.
- If the User Access Control window is displayed click on Yes button to authorize the installation.
- Click on Next on the "Welcome to the DBSync Setup Wizard" window.

- Accept the License Agreement by selecting the option "I accept the agreement" and click on Next.

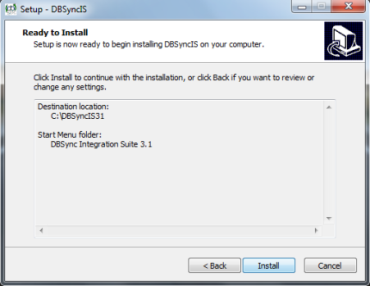
- The default windows path for DBSync installation is C:\ DBSyncIS31. If you want to use a different folder, click on the Browse button and select a desired location to install DBSync.

- Select the desired Start menu folder name or leave it unchanged to use the default folder and click on Next button. You can un-check the option below if you don't wish to create a Start menu folder.

- On the next window, select the check-boxes for Create Desktop Icon and Create a Quick Launch icon if you wish to have DBSync shortcuts on your desktop and click on Next button.

- Click on Install button to proceed with installation. After clicking next you will be presented with installation progress window as shown below.

- Once the installation process is done you will be presented with a window with an option to set DBSync as service. If you wish to set it as a service, check the Check box "Set DBSync as Service" and click on Finish button as illustrated below.

- Once done with Installation, copy the backed-up "db" folder to your new DBSync installation to the folder "C:\DBSyncIS31\dbsync2\WEB-INF\conf\db". At this point, you have successfully completed your DBSync Upgrade on your Desktop.
- If you have selected the option 'Set DBSync as Service', then DBSync would be running as a Windows Service in the background. If you wish to start dbsync manually, you can start DBSync from your desktop by starting Start\All Programs\DBSync Integration Suite\DBSync.
Verify your Configuration
- Go to www.dbsync.com. Click on Customer Login from top right corner of the page. Highlighted screenshot is shown below.
- Enter Your User Name and Password and click on Login.
- After logging in, go to My Home and click on Launch button in console area of the page to launch DBSync Console. Your should be re-directed to the DBSync console page.
Setting DBSync as Windows Service after Installation
- Go to Windows Start -- All Programs -- DBSync Integration Suite
- Right Click -- Set as Service
Alternatively you can follow the following article to configure installed Tomcat as a Windows service
- http://tomcat.apache.org/tomcat-5.5-doc/windows-service-howto.htmlhttp://tomcat.apache.org/tomcat-5.5-doc/windows-service-howto.html
Tomcat and IIS: Install & Setup
- http://tomcat.apache.org/connectors-doc/webserver_howto/printer/iis.htmlhttp://tomcat.apache.org/connectors-doc/webserver_howto/printer/iis.html
- http://onjava.com/pub/a/onjava/2002/12/18/tomcat.htmlhttp://onjava.com/pub/a/onjava/2002/12/18/tomcat.html
- http://www.prasannatech.net/2008/07/integrating-iis-with-tomcat.htmlhttp://www.prasannatech.net/2008/07/integrating-iis-with-tomcat.html
Troubling tomcat errors that prevent DBSync / tomcat as service
Load Balancing and best Practices
- http://people.apache.org/~mturk/docs/article/ftwai.htmlhttp://people.apache.org/~mturk/docs/article/ftwai.html
Upgrading to DBSync 4.2.6 ( On Demand Version)
- Download all the available projects to your local file system
- Go to Company Tab and then click on the company name hyperlink which will open "Information" page
- From the "DBSync Org properties " section , change the url to "https://app04.mydbsync.com/DBSync/login.m"
- Now the launch the DBSync platform from the app-center page
- Import the previously downloaded projects to the work space
Overview
Content Tools