2022
After you had installed our Salesforce & QuickBooks package from AppExchange of Salesforce, You need to select DBSync:QuickBooks Integration from the Force.com App Menu which will launch DBSync QuickBooks Integration app. Now, You will need to navigate to Setup tab to setup your Salesforce and QuickBooks connectors that will open connections with the respective applications.
Setup
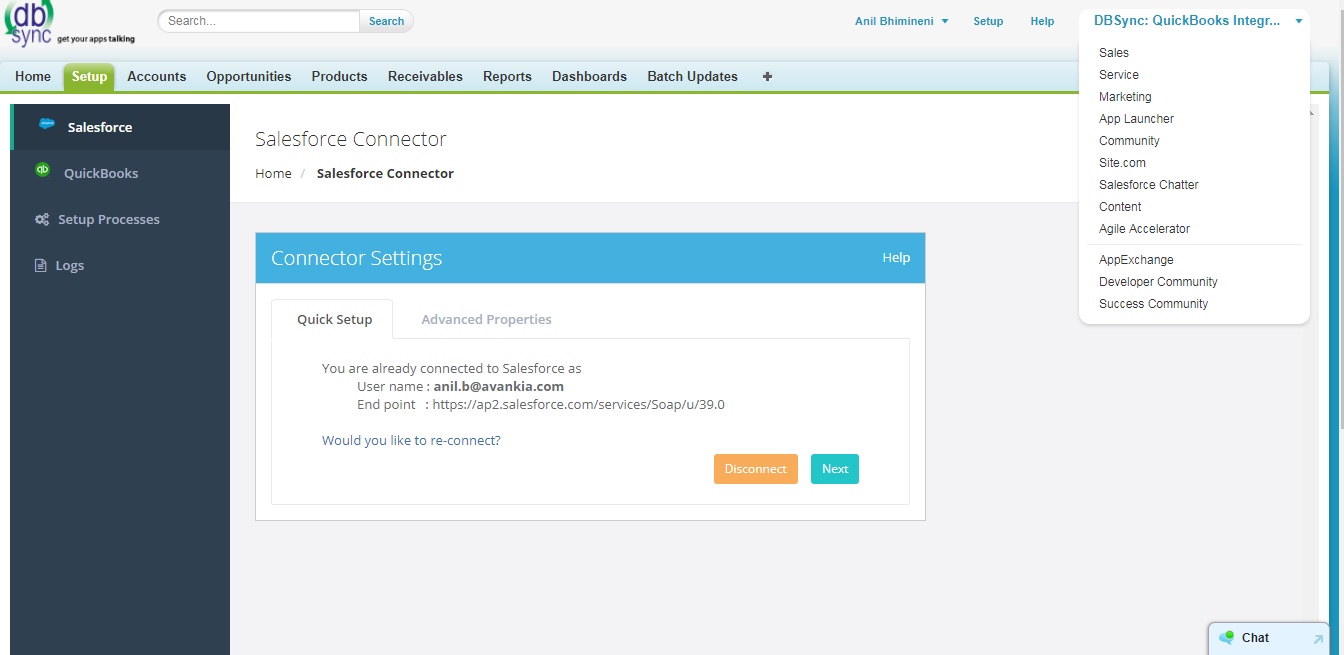
As shown in the above image, Navigate through Setup wizard which is self explanatory for an user to finish his connections with Salesforce and QuickBooks Instances.
Salesforce: For the ease of setup we support OAUTH authentication with Salesforce, Click on Connect to Salesforce which will open up an pop up to validate your instance credentials. After successful connection, As shown in the image you will see the button is changed from "Connect to Salesforce" to "Would you like to re-connect". Now click on Next button to proceed with the QuickBooks setup
QuickBooks: From the QuickBooks menu, you will have the option to toggle between QuickBooks desktop and QuickBooks online. If you choose QuickBooks desktop, Connection parameters pertaining to desktop loads up on the page. Make sure to input your QuickBooks file location, QuickBooks version .
If you had chosen QuickBooks online from QuickBooks type drop down, You should key in QBO username and password to authenticate and connect with your QBO instance (OAUTH Authentication for QBO) and you will be prompted to enter an 6 digit code as an added security check from Intuit which will be sent to your registered email id.
Setup Processes
In order to trigger the Integration, you will have to check the "Generate Customer & Invoice From Opportunity" and click on save button.From the Setup Processes menu, User also has an option to upgrade his plan from the Free to either Standard or Enterprise depending on his integration needs. Before you actually pay for the plan, You also have an option to take Free Trial of the plan you wish to subscribe.
Checklist Before Triggering Integrations
These are the few things which you have to keep in mind before initiating the integration using either Free or Standard version of Salesforce and QuickBooks.
- You will have to change the page layout for the Accounts, Contacts, Opportunity, Opportunity product, Product in Salesforce which is explained in the latter section.
- If you are using QuickBooks desktop you can initiate the sync only from QuickBooks web-connector, Make sure to Setup QuickBooks web-connector by following the link.
If you are using QuickBooks online version, you can Initiate the sync from the Account\Product\Opportunity by the click of a DBSync button.
For Eg: When you want to Sync SF Account To QB online customer then hit the button "SF Account>> QBO Customer".

The below steps are explained for changing page layout of an Account in Salesforce and for the rest of the objects the same set of steps to be followed.
- On the Salesforce Instance, Navigate to Salesforce Setup page by clicking on the Setup located on the top right section of the page and which is adjacent to Help menu.
- From the Quick Search area located on the extreme left section of the page, Search for "page layout" and scroll down to find the Account/ pagelayout menu options to the left of the page.
- Clicking on the Account\Pagelayout will open the Account page layout page, From there click on "Page Layout Assignment" and now click on Edit Assignment.
- Select all the user roles for which you wish to change the pagelayout and from the option of Page Layout To Use , choose DBSync Account Layout and save the changes.
- Now, Open any of the Account from the Account page where you will find the information as shown in the above image.
Overview
Content Tools