2022
- Click on the below link to install the DBSync App from AppExchange
- Enter your Salesforce Username and Password to install DBSync Package in that Salesforce instance. The Salesforce instance must have the administrative privileges to install App.
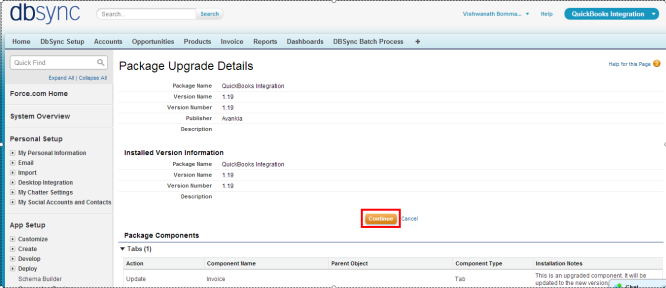
- DBSync Package Installation Details will be displayed in your Salesforce instance. Click on 'Continue'.
- Approve Package API Access and then click on 'Next'.

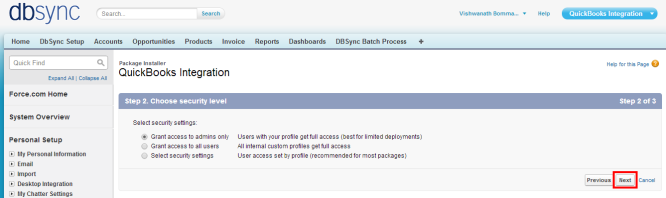
- Choose Security Level to Grant Access and then click on 'Next'.
- Package is ready to be installed. Click Install to 'install'.

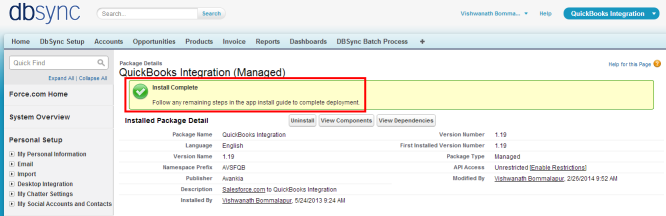
- Install complete message will be displayed which confirms that DBSync Package is installed.
- Go to setup
 Customize Account
  'Page Layout'
  Edit the Page Layout. Under the Page Layout drag the fields specified below to add it in Page Layout and Save.
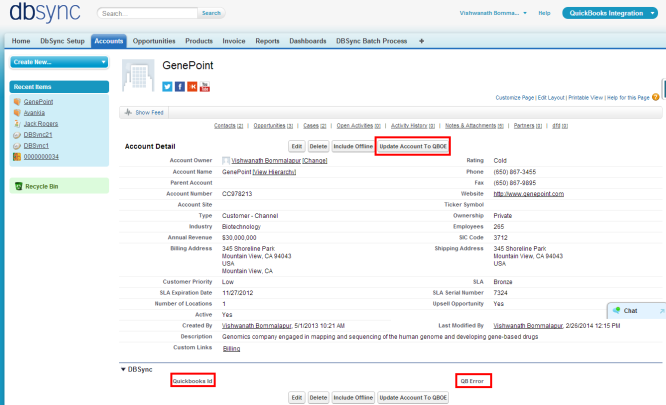
- Fields: "Quickbooks Id", "QuickBooks Error"
- Button: " Update Account To QuickBooksOE"
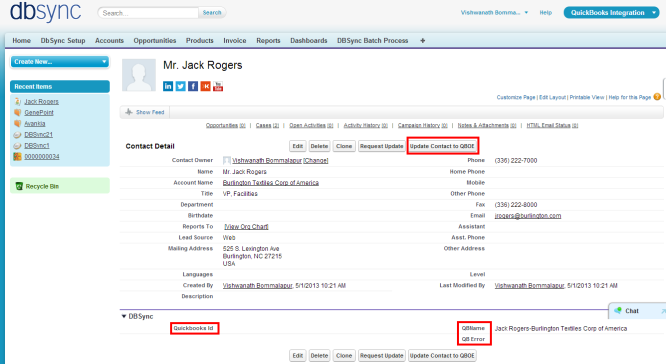
- Go to setup Customize Contact 'Page Layout Edit the Page Layout.
- Under the Page Layout drag the fields and buttons specified below to add it in Page Layout and Save.
- Fields: "Quickbooks Id", "QuickBooks Error", "QuickBooksName"
- Button: " Update Contact To QuickBooksOE"
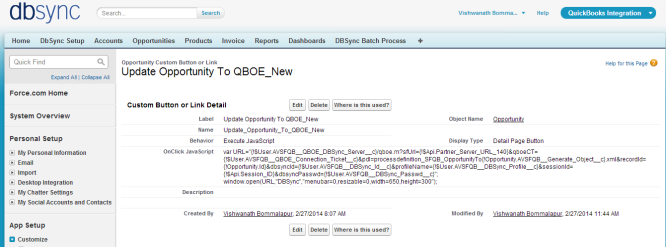
- New Buttons "Update Opportunity To QuickBooksOE_New" and "Update Invoice from QuickBooksOE_New" should be created in Salesforce Opportunity by referring the below steps.
Go to setup ![]() Customize
Customize ![]() Opportunity
Opportunity ![]() 'Buttons, Links and Actions'
'Buttons, Links and Actions' ![]() New Button or Link.
New Button or Link.
Enter the below mentioned details and save to create two buttons.
Label: Update Opportunity To QuickBooksOE_New
Behavior: Execute JavaScript
Display Type: Detail Page Button
OnClick JavaScript: var URL="{
!$User.AVSFQuickBooks__QuickBooksOE_DBSync_Server__c\}/QuickBooksoe.m?sfUrl=\{!
$Api.Partner_Server_URL_140}&QuickBooksoeCT={
!$User.AVSFQuickBooks__QuickBooksOE_Connection_Ticket__c\}&pdl=processdefinition_SFQuickBooks_OpportunityTo\{!Opportunity.AVSFQuickBooks__Generate_Object__c\}.xml&recordId=\{!Opportunity.Id\}&dbsyncId=\{!
$User.AVSFQuickBooks_DBSync_Idc}&profileName={
!$User.AVSFQuickBooks__DBSync_Profile__c\}&sessionId=\{!
$Api.Session_ID}&dbsyncPasswd={!$User.AVSFQuickBooksDBSync_Passwd_c}"; window.open(URL,"DBSync","menubar=0,resizable=0,width=650,height=300");
Label: Update Invoice from QuickBooksOE_New
Behavior: Execute JavaScript
Display Type: Detail Page Button
OnClick JavaScript: var URL="{
!$User.AVSFQuickBooks__QuickBooksOE_DBSync_Server__c\}/QuickBooksoe.m?sfUrl=\{!
$Api.Partner_Server_URL_140}&QuickBooksoeCT={
!$User.AVSFQuickBooks__QuickBooksOE_Connection_Ticket__c\}&pdl=processdefinition_QuickBooksSF_InvoiceToInvoice.xml&recordId=\{!Opportunity.Id\}&dbsyncId=\{!
$User.AVSFQuickBooks_DBSync_Idc}&profileName={
!$User.AVSFQuickBooks__DBSync_Profile__c\}&sessionId=\{!
$Api.Session_ID}&dbsyncPasswd={!$User.AVSFQuickBooksDBSync_Passwd_c}"; window.open(URL,"DBSync","menubar=0,resizable=0,width=650,height=300");

- These new buttons along with the other required fields should be included in the page layout by following the below steps.
Go to setup ![]() Customize
Customize ![]() Opportunity
Opportunity ![]() 'Page Layout'
'Page Layout' ![]() Edit the Page Layout.
Edit the Page Layout.
- Under the Page Layout drag the fields specified below to add it in Page Layout.
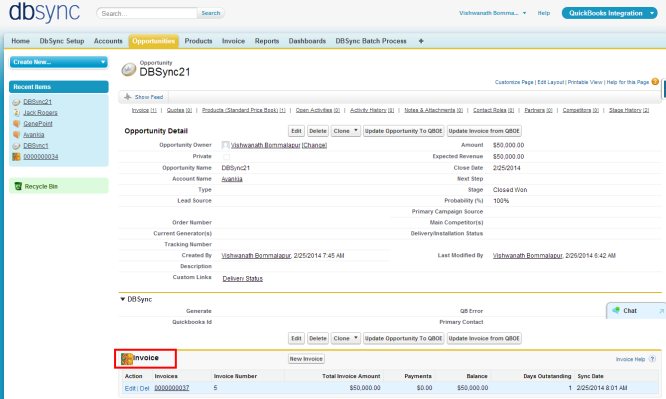
- Fields: "Quickbooks Id", "Primary Contact", "Generate", "QuickBooks Error"
- Buttons: "Update Opportunity To QuickBooksOE_New", "Update Invoice from QuickBooksOE_New"

- Move Invoices from the Opportunity Related List to the page layout.
- Click on Invoices in the Related List Section and hit "edit properties" button. Select columns as Invoices, Invoice number, Total Invoice Amount, Payments, Balance, Days Outstanding, and Transaction Date. Save the opportunity 'page layout'.
- Go to Setup
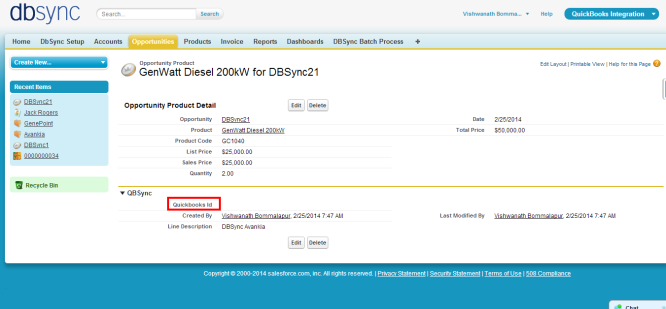
 Customize Opportunity Opportunity Products Edit Page Layout to move 'QuickBooksID' field to the page layout.
- New Button "Update Product To QuickBooksOE_New" should be created in Salesforce Product by referring the below steps.
Go to setup ![]() Customize
Customize ![]() Product
Product ![]() 'Buttons and Links'
'Buttons and Links' ![]() New Button or Link.
New Button or Link.
Enter the below mentioned details and save to create two buttons.
Label: Product To QuickBooksOE_New
Behavior: Execute JavaScript
Display Type: Detail Page Button
OnClick JavaScript: var URL ="{
!$User.AVSFQuickBooks__QuickBooksOE_DBSync_Server__c\}/QuickBooksoe.m?sessionId=\{!
$Api.Session_ID}&sfUrl={
!$Api.Partner_Server_URL_140\}&QuickBooksoeCT=\{!
$User.AVSFQuickBooks_QuickBooksOE_Connection_Ticketc}&pdl=processdefinition_SFQuickBooks_Item.xml&recordId={
!Product2.Id\}&dbsyncId=\{!
$User.AVSFQuickBooksDBSync_Idc}&profileName={
!$User.AVSFQuickBooks__DBSync_Profile__c\}&dbsyncPasswd=\{!
$User.AVSFQuickBooksDBSync_Passwd_c}"; window.open(URL,"DBSync","menubar=0,resizable=0,width=650,height=300");

- Go to Setup Customize Product 'Page Layout' fields to add is "QuickBooks Item type" , "QuickBooks Id" , "QuickBooks Error", "COGS" and "OnHand'" and Buttons "Update Product To QuickBooksOE_New" to the page layout.

- Go to setup Customize Users 'Page Layout' Edit the Page Layout. Under the Page Layout drag the fields and buttons specified below to add it in Page Layout and Save.
- Field "DBSync Id"
- Field "DBSync Passwd"
- Field "DBSync Server URL"
- Field "DBSync Profile"
Overview
Content Tools