2022
Overview
DBSync for Salesforce & QuickBooks Desktop Integration is an easy to use application to integrate Salesforce Accounts / Contacts, Products, Opportunity with QuickBooks Customers, Items, Estimate, Sales Order, Invoice, Sales Receipt & Credit Memo. DBSync is also useful to migrate historical QuickBooks data into Salesforce or vice versa.
DBSync provides Bi-directional sync with pre-built field to field map along with flexibility for more complex and dynamic mapping capability. DBSync also has an automatic online update, enabling DBSync customers to enjoy all the product updates and features with every new release.
Required Adapters
- Salesforce Adapter
- QuickBooks Adapter
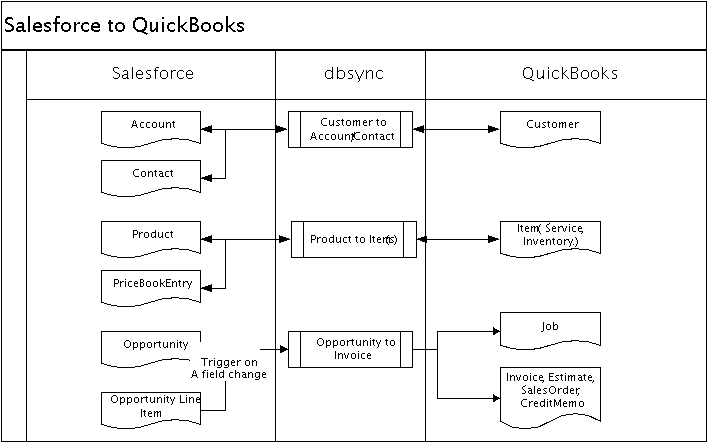
Salesforce to QuickBooks
Salesforce |
QuickBooks |
Account/Contact |
Customer |
Opportunity/OpportunityLineItem |
Job (Invoice, SalesOrder, SalesReceipts, Estimate) |
Product/PriceBook |
ItemService, ItemInventory, ItemNonInventory |
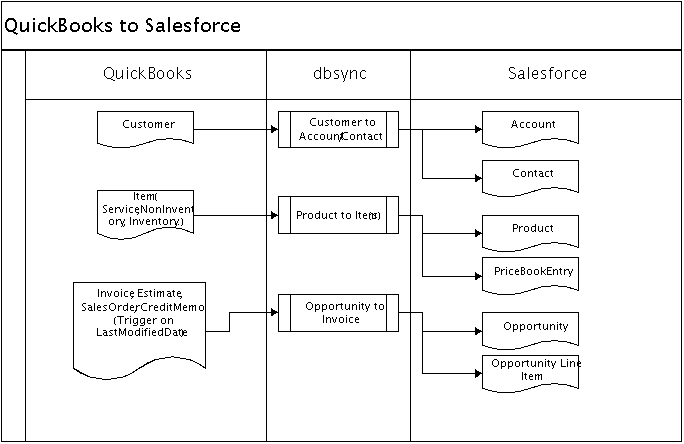
QuickBooks to Salesforce
QuickBooks |
Salesforce.com |
Customer |
Accounts |
Customer |
Contacts |
ItemInventory |
Products |
ItemNonInventory |
Products |
Invoice |
Opportunity |
Estimate |
Opportunity |
Sales Order |
Opportunity |
Sales Receipt |
Opportunity |
Credit Memos |
Opportunity |
Install DBSync Application in Salesforce Instance
- Get the following App from AppExchange for your Salesforce instance. https://login.salesforce.com/?startURL=%2Fpackaging%2FinstallPackage.apexp%3Fp0%3D04t600000001gWU&crc=1
- It asks for username and password of the Salesforce.com instance where you would like to install DBSync. The username and password should have the administrative privileges to install.
- Next you should see the contents of the package in your Salesforce.com instance. Click on Next and then click on Install and then Click on "Deploy Now" button.
- Go to setup ? Create ? Objects menu to see whether "Invoice" object has "deployed" status. If not, click edit adjacent Invoice object, check on "Deployed", and Save.
- Go to setup ? Customize ? Account ? 'Page Layout' menu to add the "QuickbooksId", "QB Error" field on the page layout. Save the Account 'page layout.'
- Go to setup ? Customize ? Contact ? 'Page Layout' menu to add the "QuickbooksId", "QB Error", "QBName" field on the page layout. Save the Contact 'page layout.'
Note: This is only used when you use Job in QuickBooks. If you are not using Jobs in QuickBooks, Contacts will not get updated as Contacts/Opportunity map to Jobs in QuickBooks
- Go to setup ? Customize ? Opportunity ? 'Page Layout' menu to move "Generate", "Quickbooks Id" ,"Primary Contact", "QB Error" on the Page Layout.
- In case you are using Professional version then move "Product Name" and "QuickBooks Item Type" to the layout.
- For Professional Version's not having products can use "Product Name" as a single quantity product line item in Invoice, estimate or sales order instead of having Products as in Enterprise edition
Note: In case your salesforce.com instance uses Record Types, the "Generate" drop down might be disabled. To enable the "Generate" drop down, the page layout needs to have the right permissions setup. Contact your Salesforce.com admin if you need further assistance in enabling the "Generate" button.
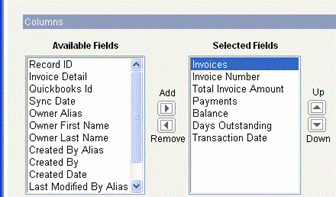
- Move Invoices from the Opportunity Related List to the page layout.
Click on Invoices in the Related List Section and hit "edit properties" button. Select columns as Invoices, Invoice number, Total Invoice Amount, Payments, Balance, Days Outstanding, and Transaction Date. See the screenshot below for the column sequence and Save the opportunity 'page layout'.
- Go to Setup ? Customize ? Opportunity ? Opportunity Products ? Page Layout ? Edit to move ‘QuickBooksID’ field to the page layout.
- Go to Setup ? Customize ? Product ? 'Page Layout' to move 'QuickBooks Item type', 'QuickBooks Id', 'COGS', 'QB Error' and 'OnHand' field to the page layout.
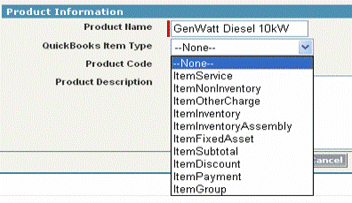
During the Sync process, Products get automatically created in case DBSync does not find it in QuickBooks.To create the products in the QuickBooks, each product needs to be mapped in an "Item" type. See the picture below:
Note:
Out of the box DBSync supports Products/Items in a flat structure and not in Hierarchy as Products in Salesforce.com is not Hierarchical. Please look at our Knowledge base for steps for handling hierarchies in Items from QuickBooks.
- Go to Setup ? Customize ? Users ? Page Layout ? Edit to move ‘QB SalesRep ID’ onto the page layout.
At this point, you have successfully completed your Salesforce.com instance setup.
Configure QuickBooks Application for DBSync Integration
QuickBooks needs to be setup in case you do not want to create Jobs in QuickBooks for every Opportunity in Salesforce.com.
- Open QuickBooks and go to Customer Center
- Edit or create a new Customer
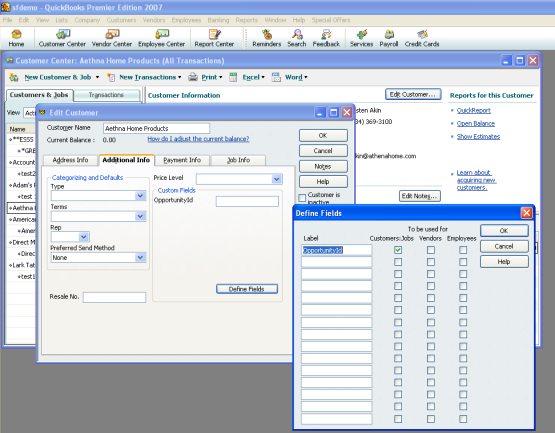
- Go to Edit Customer ? Additional Info ? Define Fields and create a new label as – OpportunityId (this is case-sensitive)
Configure DBSync for Integration
- If you have installed DBSync application on your local/server machine then its On-Premise else you are using On-Demand Version.
- If you are using On-Demand Version of DBSync please skip this step. This step is applicable only for On-Premise Version of DBSync. Login to DBSync Profile using registered username and password. Click on Company to see all the usernames in under company. Click on edit, under DBSync Org Properties, click on edit and enter URL as "http://localhost:8080/dbsync2/login.m".
- If you are using On-Premise version of DBSync please skip this step. This step is applicable only for On-Demand Version of DBSync. Login to DBSync Profile using registered username and password. Click on Company to see all the usernames in under company. Click on edit, under DBSync Org Properties, click on edit and confirm that URL is "https://dbsync05.appmashups.com/appcenter/login".
- Once Purchase Process is complete, go to Customer Login from top menu of www.mydbsync.com. Login using registered username and password.
- Select Process Templates from top Menu to see the list of Templates. Choose your process template according to the adapters you have. Click on Edit adjacent to the required process template and then Add Template to add this Process Template in DBSync Console.
- Here "Salesforce & QuickBooks Bidirectional" Template is selected.
- Click on Launch in Console Area to redirect to DBSync Integration Console.
- A new profile added is displayed in profiles section with Process Template Name.
- Once the process is added, click on "Quick Start" Link in Profiles Section of DBSync Console. You will be presented with a new page to get you started with configurations for Integration.
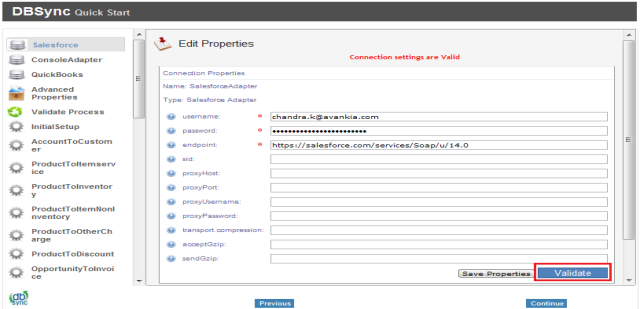
- Enter your login information in the properties window for Salesforce and click on validate button to validate the login credentials of Salesforce. Once you receive the message "Connection settings are valid" click on Continue button at the bottom. If you receive the message "Connection settings are invalid" then please check the followings
- Check whether User ID and Password for Salesforce is correct.
- Is there any invalid Network Access Settings.
- Make sure that security token is added in your password (for Salesforce Adapter)
- Click on QuickBooks link from the left Menu to open QuickBooks settings. Enter you QuickBooks Desktop file path in the 'file:' (file:_*) section and click on Save Properties button.
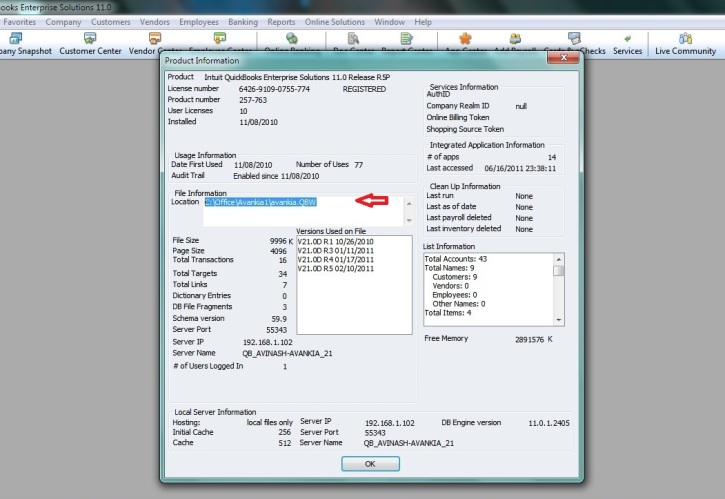
- You can retrieve full path / location of your Quickbooks file by pressing 'F2' key on your keyboard when in Quickbooks 'Home' page as shown below.
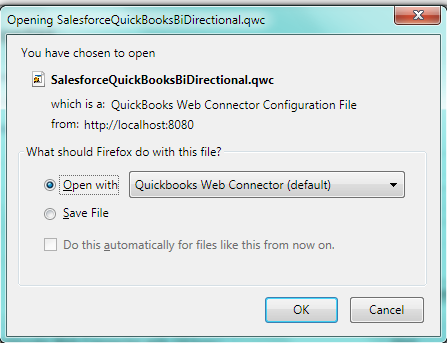
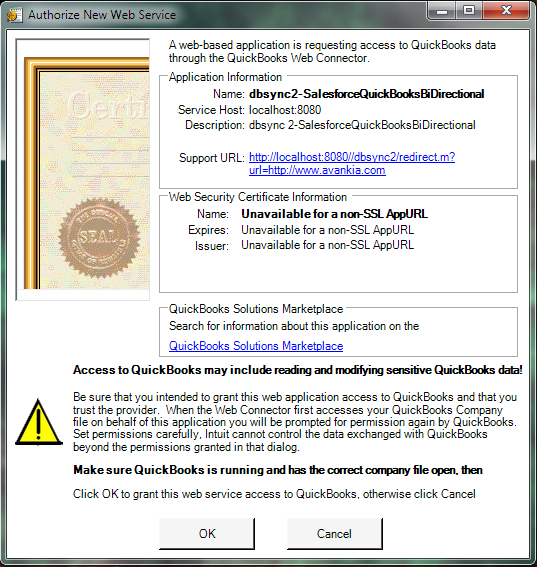
- Click on configuration Link at the bottom of the Edit Properties Area. A Pop-up box will appear, prompting you to open the file with "QuickBooks Web Connector (default)" click on OK button as highlighted below in screenshot.
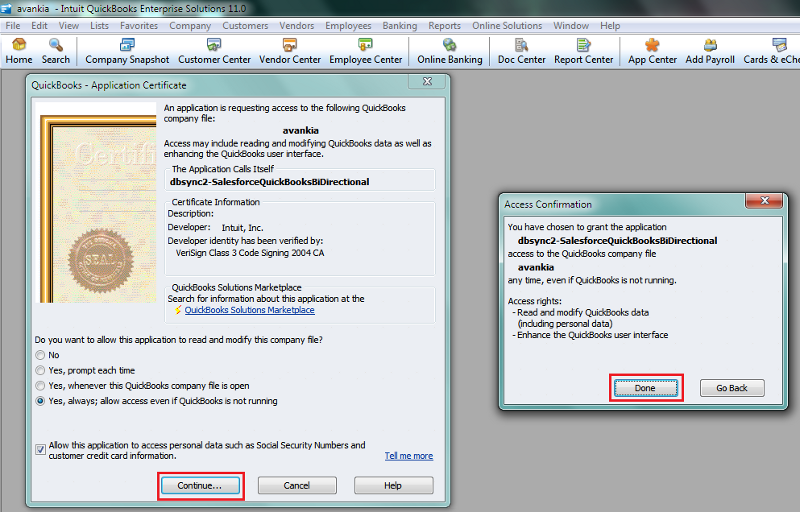
- Click on OK in the next window (first screenshot below) and on the next window select the option button "Yes, always; allow access even if QuickBooks is not running" and check the check box for "Allow this application to access personal data" and click on continue button (second screenshot below).
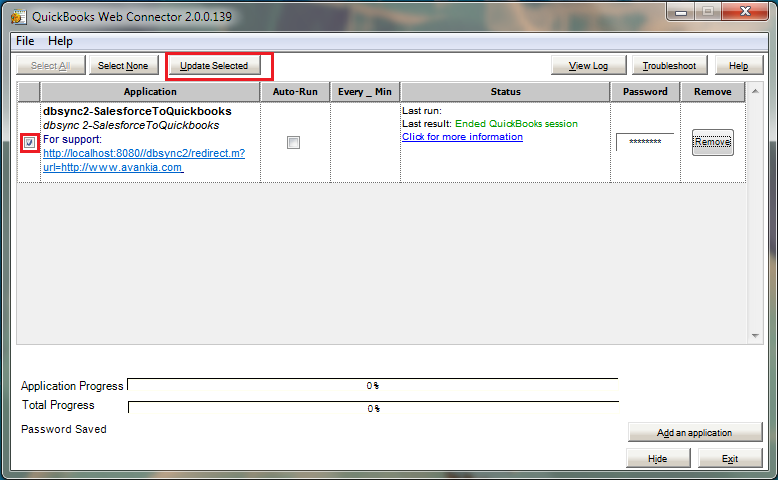
- In the Access Confirmation window click on the Done button. And the profile will get added to your QuickBooks Web Connector. A screenshot of the QuickBooks Web Connector is displayed
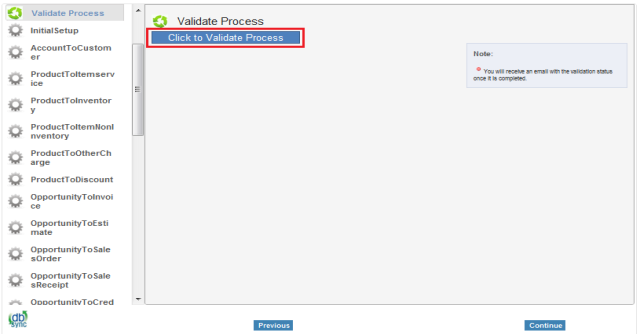
- For Validating the process click on the button Click to Validate Process. This process will check all the Adapter settings, mappings and states for the sync and present you with a report. In the report all the valid actions are marked with a green check icon as and all invalid actions are marked with red minus icon as . If all the actions are valid ( ) then click on continue button at the bottom.
- All the default mappings are listed in the left menu. You can choose to use or not use any mappings, like in the images below the mapping is done for Salesforce Accounts to be moved in QuickBooks as Customers. You can check the Status Check Box to make it part of integration, if you leave it unchecked it will not be part of integration. Similarly you select or deselect other mappings as required. You also have the capability to create custom mappings as per your business process.
Run Integration from QuickBooks Web Connector
- Before running the integration, the below mentioned points should be considered carefully for Integration of Standard DBSync Salesforce QuickBooks Bi-directional.
- Integration of Salesforce to QuickBooks transaction is invoked provided the Generate field in Salesforce Opportunity is selected with the required transaction.
- It is mandatory that Salesforce Opportunity (to be integrated with QuickBooks Transcation) is associated with the respective Salesforce Account & also should have Products with Standard Price Book attached to the Salesforce Opportunity for DBSync to invoke integration.
- The Primary Contact updated in Salesforce Opportunity will sync with QuickBooks Contacts.
- QuickBooks to Salesforce Integration works on time stamp. Any new or modified Customer, Items or transaction in QuickBooks will be integrated with Salesforce based on the Mapping selection.
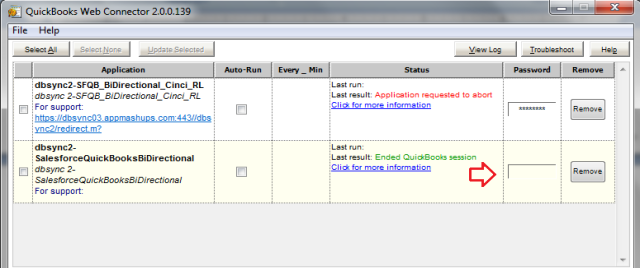
- Once you are done with the mappings go to your QuickBooks Web Connector by Start Programs QuickBooks Web Connector and click on the password textbox for profile dbsync2-SalesforceQuickBooksBiDirectional as highlighted below:
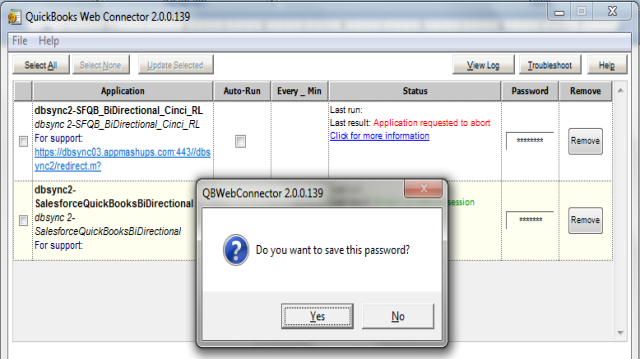
- Enter your DBSync password in the in the text box and hit Enter on your keyboard. One Message Box will be displayed asking you "Do you want to save this password" select Yes button. DBSync Password will be saved in the web connector.
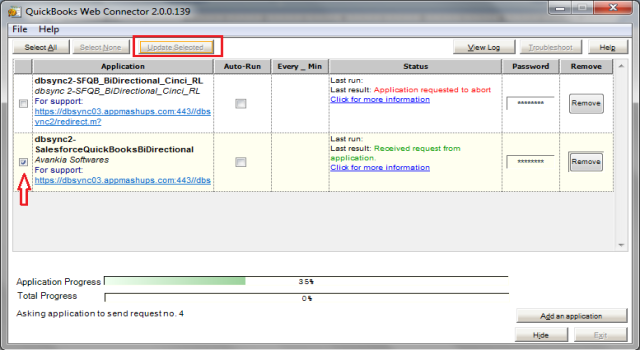
- Check the DBSync2-SalesforceQuickBooksBiDirectional check box and click on Update Selected button and sync will start and complete automatically. Auto-Run can also be used in Web Connector to run integration in regular intervals. For example, if you select 60 minutes, every 60 minutes integration will run by itself, provided Web Connector is open.
Data for all the mappings will be updated in Salesforce and QuickBooks accordingly.
