2022
The Scheduler component allows you to add a profile or process to a job scheduler (also referred to as a “cron”) so that database synchronizations can occur automatically (as per your scheduled time)
“Cron Settings” refer to the time that you are going to set for the profile and process to perform the synchronization.
To access the scheduler, click on the “Scheduler” link on the upper right hand corner of the application as indicated by the red arrow in the screenshot below:
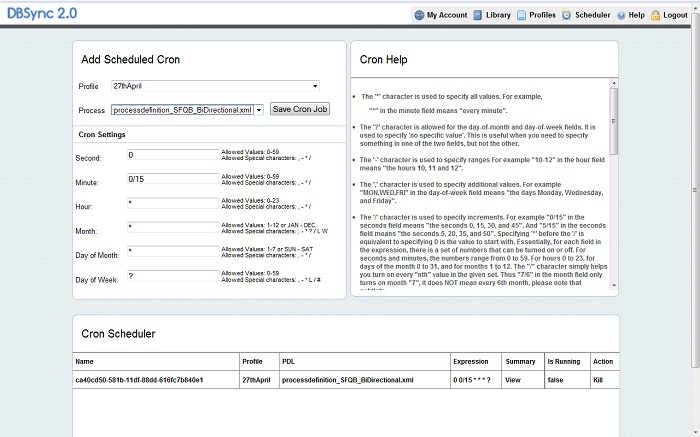
The screenshot below illustrates the scheduler component of the DBSync application:
To operate the scheduler, please refer to the following instructions and reference the following tables. The tables provide a description and example of each field. The window on the application entitled “Cron Help” also contains useful information regarding what data is acceptable to input into the “Cron Settings”
1. Select the profile that you want to from the drop-down list and set process and the Cron settings for the profile.
2. Click on the “Save Cron Job” button to save the page settings.
Table of fields for “Add Scheduled Cron” section of the application page:
Field Name |
Description |
Example |
|---|---|---|
Profile |
Select the profile name from the drop down list. |
SalesforceDatabaseBiDirectional |
Process |
Select the process from the drop down list. |
|
Table of Cron Settings
Field Name |
Description |
Example |
|---|---|---|
Cron Settings |
Allows you to set the profile cron settings in the database. |
|
Seconds |
Enter the “seconds” value Note: Allowed Values:0-59 Allowed Special characters: , - * / |
0 |
Minute |
Enter the “minute” value Note: Allowed Values:0-59 Allowed Special characters: , - * / |
2 |
Hour |
Enter the “hour” value |
1 |
Day of Month |
Enter the “day” of month value |
2 |
Month |
Enter the “month” value |
Nov |
Day of the week |
Enter the day of week value |
3 |
NOTES regarding the Scheduler:
1. Support for specifying both a day-of-week and a day-of-month value is not complete (you'll need to use the '?' character in one of these fields).
2. Overflowing ranges is supported - that is, having a larger number on the left hand side than the right. You might do 22-2 to catch 10 o'clock at night until 2 o'clock in the morning, or you might have NOV-FEB. It is very important to note that overuse of overflowing ranges creates ranges that don't make sense and no effort has been made to determine which interpretation CronExpression chooses. An example would be "0 0 14-6? * FRI-MON".
3. The scheduler is not applicable for QuickBooks Adapter.
