2022
FTP To Database Integration
In this article you will learn how to transfer data from an FTP server to a database.
Preliminary setps (Database preparation):
- Setup your Database for Integration ( For this Tutorial I will be using MySQL Database named "Accounts".)
- Create a Table "dbAccount" in Database. The scrips below show how to do it for MySQL, SQLSERVER and Oracle databases.
- Once you have created the table insert some dummy values on it.
Database Script : MYSQL | Database Script : SQLSERVER | Database Script : Oracle |
create table `Accounts`.`dbAccount` (`AccountID` varchar(100) NOT NULL , `AccountName` text NOT NULL , `BillingStreet` text , `BillingPostalCode` numeric(20) , `AnnualRevenue` decimal(30,2) , `CreatedDate` date , `LastModifiedDate` datetime , `NumberOfOfficeLocations` int , PRIMARY KEY (`AccountID`) ); | create table dbAccount (AccountID varchar(100) NOT NULL , AccountName text NOT NULL , BillingStreet text , BillingPostalCode numeric(20) , AnnualRevenue decimal(30,2) , CreatedDate date , LastModifiedDate datetime , NumberOfOfficeLocations int , PRIMARY KEY (AccountID) ); | CREATE TABLE "SYS"."DBACCOUNT"
("ACCOUNTID" VARCHAR2(20 BYTE) NOT NULL ENABLE,
"ACCOUNTNAME" VARCHAR2(100 BYTE),
"BILLINGSTREET" VARCHAR2(50 BYTE),
"BILLINGPOSTALCODE" VARCHAR2(50 BYTE),
"ANNUALREVENUE" NUMBER(30,2),
"CREATEDDATE" DATE,
"LASTMODIFIEDDATE" VARCHAR2(40 BYTE),
"NUMBEROFOFFICELOCATIONS" NUMBER(*,0),
CONSTRAINT "DBACCOUNT_PK" PRIMARY KEY ("ACCOUNTID")
);
|
Creating the integration:
Once you have your database ready, do the following steps:
- Go to www.mydbsync.com, click on Customer Login. Enter your Username and Password and click on Development Studio to open the Project console .
- Create a project with project, process, workflow. Use names of your choice.
- Click on Connectors on the left section of Project Console and create a DB and an FTP connector. (Note: Enter the required details in Database and FTP credentials in the fields and validate the connections).
- Click on Project ->Process -> Workflow
- From the Workflow section, proceed to the Trigger Section.
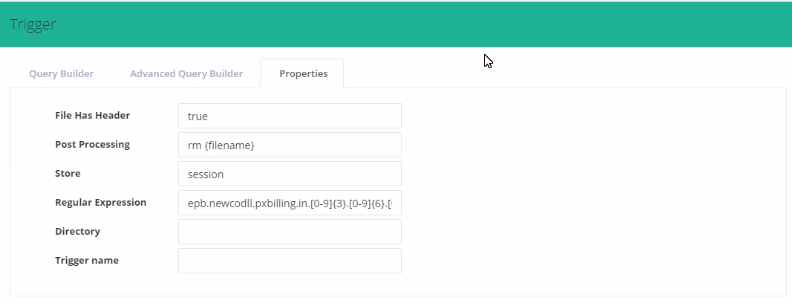
- In Triggers section, you can use three tabs, namely, Query Builder, Advanced Query Builder & Properties. You need to select data-source as FTP. You can make additional changes to Query by using the Advanced View section of Advanced Query Builder.
- In Rules section, select target connector as "Database", operation, target object respectively.
- Click on Map to see Mapping screen. You will see the list of Database fields in the left section. On the right section, in Schema you see list of selected File columns.
- Drag & drop the fields from Schema next to the required Database fields. Click on Save and Close once the mapping is completed. Now, click on Save Workflow.
- Ensure that Workflow status is On.
- You are now ready to run the sync. Click on the Run Button on the Top Right corner of the page.
- After the successful sync, open the log and the table. Check the file data have been rightly inserted in to the database table.
Overview
Content Tools